Extron electronics DTP3 T 202 User Manual
Hdmi twisted pair transmitters and receiver
Hide thumbs
Also See for DTP3 T 202:
- User manual (47 pages) ,
- Setup manual (4 pages) ,
- Setup manual (4 pages)

Related Manuals for Extron electronics DTP3 T 202


Summary of Contents for Extron electronics DTP3 T 202
- Page 1 DTP3 T 202 DTP3 R 201 HDMI Twisted Pair Transmitters and Receiver User Guide DTP Systems 68-3445-01, Rev. D 02 24...
- Page 2 Safety Instructions Safety Instructions • English Instructions de sécurité • Français AVERTISSEMENT : Ce pictogramme, , lorsqu’il est utilisé sur le produit, WARNING: This symbol, , when used on the product, is intended to signale à l’utilisateur la présence à l’intérieur du boîtier du produit d’une alert the user of the presence of uninsulated dangerous voltage within the tension électrique dangereuse susceptible de provoquer un choc électrique.
- Page 3 • 安全说明 简体中文 警告: 产品上的这个标志意在警告用户, 该产品机壳内有暴露的危险电 压, 有触电危险。 注意: 产品上的这个标志意在提示用户, 设备随附的用户手册中有重 要的操作和维护(维修)说明。 关于我们产品的安全指南、遵循的规范、EMI/EMF 的兼容性、无障碍使 www.extron.com 用的特性等相关内容,敬请访问 Extron 网站 , ,参见 Extron 安 全规范指南,产品编号 68-290-01 。 安全記事 • 繁體中文 안전 지침 • 한국어 警告: 若產品上使用此符號, 是為了提醒使用者, 產品機殼內存在未隔離的危險 경고: 이 기호 가 제품에 사용될 경우, 제품의 인클로저 내에 있는 접지되지 電壓,...
- Page 4 FCC Class A Notice This equipment has been tested and found to comply with the limits for a Class A digital device, pursuant to part 15 of the FCC rules. The Class A limits provide reasonable protection against harmful interference when the equipment is operated in a commercial environment.
- Page 5 Conventions Used in this Guide Notifications The following notifications are used in this guide: CAUTION: Risk of minor personal injury. ATTENTION : Risque de blessure mineure. ATTENTION: • Risk of property damage. • Risque de dommages matériels. NOTE: A note draws attention to important information. TIP: A tip provides a suggestion to make working with the application easier.
-
Page 7: Table Of Contents
Host-to Unit Instructions ........13 Error Message ..........14 Timeout ............14 Using the Command and Response Table ... 14 Symbol Definitions ........... 14 Command and Response Table for SIS Commands ............16 DTP3 T 202 / DTP3 R 201 • Contents... - Page 8 DTP3 T 202 / DTP3 R 201 • Contents viii...
-
Page 9: Introduction
Introduction This section gives an overview of the DTP3 T 202 and DTP3 R 201 and their features. Topics include: • About this Guide • About the DTP3 T 202 Transmitter and DTP3 R 201 Receiver • Features • Application Diagram... -
Page 10: Features
Stereo audio de-embedding (DTP3 R 201) — The captive screw stereo output is selectable for de- embedded or pass-through analog audio. • Buffered HDMI input loop-through (DTP3 T 202) — Features an active HDMI loop-through for local monitor support or system expansion. •... -
Page 11: Application Diagram
RTS CTS LAN / PoE CATx Cable up to 330' (100 m) HDMI HDMI HDMI PC with Local 4K Monitor 4K HDR Display Figure 1. Typical DTP3 Transmitter and Receiver Application DTP3 T 202 / DTP3 R 201 • Introduction... -
Page 12: Installation And Operation
ATTENTION: • The DTP3 T 202 and DTP3 R 201 devices are configured to output power to DTP3 models only. If connected to a non-DTP3 device, set the toggle switch to the DOWN (OFF) position. Failure to turn the power OFF will damage the connected device. -
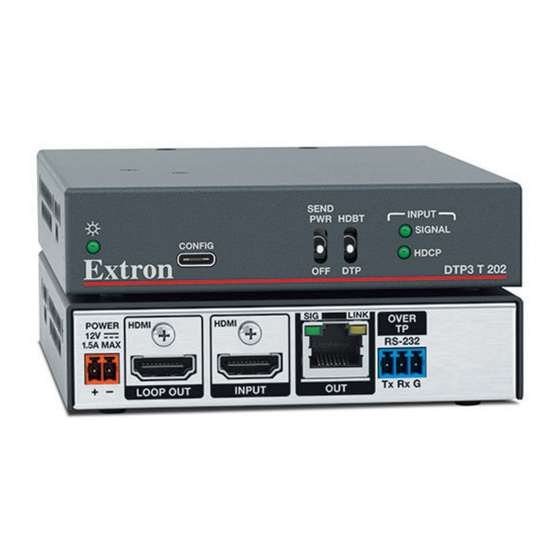
Page 13: Connections
Over TP port — Connect a serial RS-232 signal to this 3.5 mm, 3-pole captive screw port for bidirectional RS-232 communication (see RS-232 Connector Wiring on page 10 to wire the connector). DTP3 T 202 / DTP3 R 201 • Installation and Operation... -
Page 14: Receiver Rear Panel Connections
Balanced Audio Output Unbalanced Audio Output Figure 4. Captive Screw Connector Wiring for Stereo Audio Output NOTE: See the ATTENTION: on page 7 before wiring the captive screw connector. DTP3 T 202 / DTP3 R 201 • Installation and Operation... -
Page 15: Securing The Hdmi Connector
5. While holding the connector securely against the lacing bracket, use pliers or similar tools to tighten the tie wrap, then remove any excess 5 5 5 length ( Figure 5. LockIt Lacking Bracket DTP3 T 202 / DTP3 R 201 • Installation and Operation... -
Page 16: Tp Cable Termination And Recommendations
Do not comb the cable for the first 65 feet (20 meters), where cables are straightened, aligned, and secured in tight bundles. • Loosely place cables and limit the use of tie wraps or hook-and-loop fasteners. • Separate twisted pair cables from AC power cables. DTP3 T 202 / DTP3 R 201 • Installation and Operation... -
Page 17: Power Supply Wiring
Power Supply Wiring A 12 VDC, 2.0 A power supply is provided with the DTP3 T 202 transmitter. Follow these instructions to wire the 2-pole captive screw connector to your power supply: CAUTION: Risk of minor personal injury: The DC output cables must be kept separate from each other while the power supply is plugged in. -
Page 18: Rs-232 Connector Wiring
5. Connect the other end of the cable to a control system or the device being controlled. NOTE: The length and preparation of exposed wires is important (see the ATTENTION: on page 9 for details) DTP3 T 202 / DTP3 R 201 • Installation and Operation... -
Page 19: Operations
ATTENTION: • The DTP3 T 202 and DTP3 R 201 devices are configured to output power to DTP3 models only. If connected to a non-DTP3 device, set the toggle switch to the down (OFF) position. Failure to turn the power OFF will damage the connected device. -
Page 20: Connecting To The Front Panel Usb Port
Connecting a PC to the DTP3 Device Front Panel USB Port Resetting Reset Use the SIS command to reset the transmitter or receiver to its factory default settings (see on page 18). DTP3 T 202 / DTP3 R 201 • Installation and Operation... -
Page 21: Sis Configuration And Control
Each response from the transmitter and receiver ends with a carriage return and a line feed (CR/LF = ]), which signals the end of the response character string. DTP3 T 202 / DTP3 R 201 • SIS Configuration and Control... -
Page 22: Error Message
Alphanumeric characters and hyphens only. No distinction between upper and lower case. No spaces. First character must be a letter and the last character cannot be a hyphen. DTP3 T 202 / DTP3 R 201 • SIS Configuration and Control... - Page 23 = DTP/HDBT switch status 1 = DTP mode 2 = HDBT mode = Password: Maximum length 128 characters. All alpha-numeric characters permitted except |, and “space”. Passwords are case-sensitive. DTP3 T 202 / DTP3 R 201 • SIS Configuration and Control...
-
Page 24: Command And Response Table For Sis Commands
= Native resolution and refresh rate from currently assigned EDID, for example: 1920x1080 @ 60 Hz. Remote Send Power Switch Send Power switch status RPWR Verbose mode 2/3 Rpwr KEY: = Remote power: = Remote power disabled = Remote power (48 VDC) enabled DTP3 T 202 / DTP3 R 201 • SIS Configuration and Control... - Page 25 Alphanumeric characters and hyphens only. No distinction between upper and lose case. No spaces. First character must be a letter and the last character cannot be a hyphen. DTP3 T 202 / DTP3 R 201 • SIS Configuration and Control...
- Page 26 Absolute system reset to factory All device settings to ZQQQ settings factory default; however, firmware version remains the same. Reset to factory default settings Reset device to factory ZXXX default. DTP3 T 202 / DTP3 R 201 • SIS Configuration and Control...
-
Page 27: Product Configuration Software
Product Configuration Software The DTP3 T 202 and DTP3 R 201 can be easily configured using Extron Product Configuration Software (PCS). This section describes the software installation and communication (see the DTP3 T/R 202/201 PCS Help File for detailed control information). Topics include: •... - Page 28 Double-click the executable file and follow the on-screen directions to install the software. For Firmware: To install via PCS, see Update Firmware in the Device Menu on page 26. DTP3 T 202 / DTP3 R 201 • Product Configuration Software...
-
Page 29: Connecting To Pcs
Device Discovery panel (see figure 17). Figure 17. Device Discovery Screen 3. Select the DTP3 R 201 device by clicking on it to highlight it in the list ( 4. Click Connect ( DTP3 T 202 / DTP3 R 201 • Product Configuration Software... -
Page 30: Tcp/Ip Panel
), enter the port number or leave the field blank. PCS scans for the port if blank. NOTE: Select the Show Characters checkbox ( ) to display the password characters. 5. Click the Connect button ( ). A new device tab opens. DTP3 T 202 / DTP3 R 201 • Product Configuration Software... -
Page 31: Software Overview
Selecting Show Expanded Device Tabs (see figure 21) from the Software menu displays the device IP address or connection method in the Device tab. Figure 21. Expanded Device Tab DTP3 T 202 / DTP3 R 201 • Product Configuration Software... - Page 32 Open the PCS help file for general PCS operations. From the Software menu, select Extron PCS Help. Application Licensing Log into PCS with your Extron Insider acount or check licensing details. Figure 23. Application Licensing DTP3 T 202 / DTP3 R 201 • Product Configuration Software...
- Page 33 ) to disconnect the software from connected devices, close all offline device tabs, and close the software. Alternatively, click the Cancel button ( ) to leave the software open. DTP3 T 202 / DTP3 R 201 • Product Configuration Software...
-
Page 34: Device Menu
Restore this Device — Upload a saved configuration for the DTP3 T 202/DTP3 R 201 to the connected device. • Restore to Multiple Devices — Upload a saved configuration file for the DTP3 T 202/DTP3 R 201 to multiple devices on the network. •... -
Page 35: Reference Information
Reference Information This section provides procedures for mounting the DTP3 T 202 and the DTP3 R 201 as well as disconting the ground between them. • Mounting the Devices • Internal Settings Mounting the Devices ATTENTION: • Installation and service must be performed by authorized personnel only. -
Page 36: Internal Settings
Tx — J7 • 48 VDC Remote Power: On — Remote power is distributed (default). • Rx — J8 • Off — Remote power is • Tx — J8 disabled. DTP3 T 202 / DTP3 R 201 • Reference Information... - Page 37 7. Reinstall both units in their racks or other installation option (see Mounting the Devices on page 27). 8. If the shielded cable is used, disconnect the cable shield from the connector at either end of the cable. DTP3 T 202 / DTP3 R 201 • Reference Information...
- Page 38 If not provided with a power supply, this product is intended for use with a UL Listed power source marked “Class 2” or “LPS” rated 12 VDC, 1.8 A minimum (DTP3 T 202) or 12 VDC, 1.7 minimum (DTP3 R 201).
- Page 39 Extron Warranty Extron warrants this product against defects in materials and workmanship for a period of three years from the date of purchase. In the event of malfunction during the warranty period attributable directly to faulty workmanship and/or materials, Extron will, at its option, repair or replace said products or components, to whatever extent it shall deem necessary to restore said product to proper operating condition, provided that it is returned within the warranty period, with proof of purchase and description of malfunction to: USA, Canada, South America,...
Need help?
Do you have a question about the DTP3 T 202 and is the answer not in the manual?
Questions and answers