Advertisement
Quick Links
3R D GE N S EQ U OI A R O O F
R AC K
IN S TA L L I NS TRU C T I O N S
Please read the mounting instructions below carefully before attempting to install.
Check out the install video on the product page for factory rack disassembly.
Thank you for purchasing from Victory 4x4! Checkout our website, victory4x4.com for other great off-road
products. Be sure to rate and review our product online. If you have any questions or are missing parts, please
don't hesitate to call us at 269-459-8447!
Advertisement

Related Manuals for Victory 4x4 VSQRK-3G


Summary of Contents for Victory 4x4 VSQRK-3G
- Page 1 Check out the install video on the product page for factory rack disassembly. Thank you for purchasing from Victory 4x4! Checkout our website, victory4x4.com for other great off-road products. Be sure to rate and review our product online. If you have any questions or are missing parts, please...
-
Page 2: Includ Ed Hardwar E
INC LU D ED B O LT PACK (S ) 0 4 6 - 0 0 5 2 Note: Some Victory 4x4/JCR Offroad/SquatchProof products share hardware kits. Any extra hardware you may recieve that is not listed below can be repurposed or discarded. -
Page 3: Included Parts
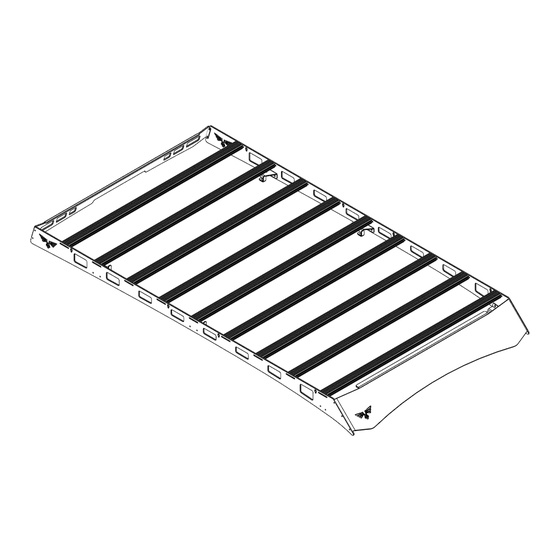
INCLUDE D PARTS 54” Crossbar Rear Fairing 54” 0 Front Fairing 54” 40 Front Fairing 1L/1R SideRail Rear Mount 1L/1R Included with light bar cutout option. Lightbar Mount 1L/1R 1L/1R Middle Mount Front Mount... - Page 4 A SS E M BLY You will need to remove the (2) factory roof rails. Each rail has a plastic cover on each side that will need to be removed with either a plastic pry tool or a flathead screw driver. If your vehicle is not equipped with the roof rails, there will still be (4) plastic covers in the same locations that will need to be removed.
- Page 5 A SSE MBLY With the hardware removed, you can now remove the roof rails and set them off to the side, there will be a rubber washer underneath where the base of the rails were that will also need to be removed. Next take a 10mm socket and remove the hex bolts also in the same mounting locations, you may need something like a 90 degree pick to prevent the nut from spinning.
- Page 6 ASS EMBLY Assemble the rack on the ground. Start by mounting the crossbars between the 2 side rails. For this, use the1/4”-20 X 3/4” button head bolts and the 1/4” ID washers (2 per bar per side). Make sure the machined slot in the rail of the crossbar is facing up, so that you can easily add t-nuts to mount your gear.
- Page 7 AS SE M BLY Next, mount the front and rear fairings. To do this, use the1/4”-20 X 3/4” button head bolts, 1/4” ID washers, and 1/4”-20 serrated flange nuts. The front fairing will need 3 of each per side and the rear fairing will need 2 of each per side.
- Page 8 AS SE MBLY Next, attach the inner mounts to the inside of the side rails using the 1/4”- 20 X 3/4” button head bolts, 1/4” ID washers, and 1/4”-20 serrated flange nuts as shown in the orientation below. All of the mounts will have arrows cut into them that need to be pointed toward the front of the vehicle.
- Page 9 A SS EM BLY The middle and rear mounts will all install the same. Take a provided 8mm button head and a washer and thread it through the bracket and into the factory threaded hole on the roof. With that loosely started, take one of the provided nut tabs and install it to the other hole in the bracket, where the hex bolt and nut were removed previously.
- Page 10 AS S E MBLY With both middle and rear mounts partially bolted on, take a 5/32 hex and tighten the front bolt going into the nut tab. Once that is tight, do the same to the rear bolt in the bracket going into the factory thread, using a 5mm hex.
- Page 11 ASSE M BLY With all of the mounts in place, now is the time to go around and adjust the overall appearance and height of the rack if desired, by loosening the front and rear fairings before any adjustment. You should adjust the front and rear fairings down as far as possible, so they are both firmly planted on the roof line.
- Page 12 4 0” L IG HT B AR A S S E M B LY Slide 2 t-nuts into each of the channels on the top side of the front-most crossbar using the slots. Then, place each light bar mount over one pair of t-nuts and loosely bolt it in place using the 1/4”-20 X 3/8”...
- Page 13 D IM E NS I O N S...
Need help?
Do you have a question about the VSQRK-3G and is the answer not in the manual?
Questions and answers