Advertisement
Quick Links
ADVE NTU RE
B ED R AC K
INS TAL L I NSTRUC T ION S
Please read the mounting instructions below carefully before attempting to install.
Be sure to check out the install video on the product page, if available.
Thank you for purchasing from Victory 4x4! Checkout our website, victory4x4.com for other great off-road
products. Be sure to rate and review our product online. If you have any questions or are missing parts, please
don't hesitate to call us at 269-459-8447!
Advertisement

Related Manuals for Victory 4x4 ADVENTURE BED RACK


Summary of Contents for Victory 4x4 ADVENTURE BED RACK
- Page 1 Be sure to check out the install video on the product page, if available. Thank you for purchasing from Victory 4x4! Checkout our website, victory4x4.com for other great off-road products. Be sure to rate and review our product online. If you have any questions or are missing parts, please...
-
Page 2: I Nclu D E D Hardware
I NCLU D E D HARDWARE 3/8”-16 X 3/4” Long 3/8”-16 Carriage Bolt Flange Locknut 5/16”-18 X 1-1/2” 5/16”-18 Carriage Bolt Flange Locknut... -
Page 3: Included Parts
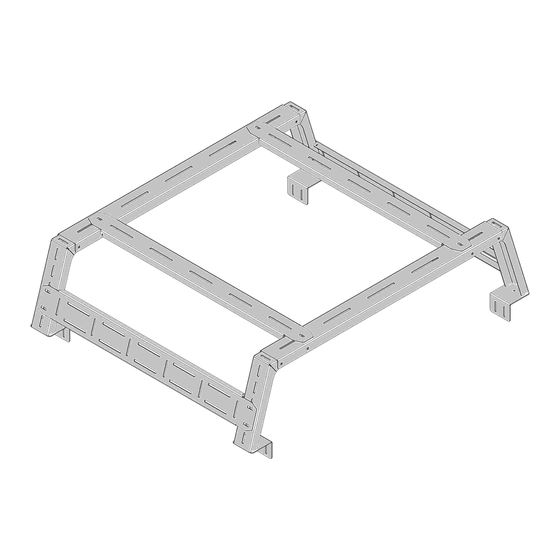
I NCLUD ED PARTS... - Page 4 A SS E M BLY How you begin the install depends on whether or not you have a trail rail system in the bed of your vehicle. If you do, insert a provided 5/16”-18 x 1-1/2” carriage bolt through each hole in the small rectangular spacer and slide that into the trail rail.
- Page 5 A SS E M BLY Next, mount the open-ended crossbars between the each of the front and rear legs using the provided 3/8”-16, 3/4” long carriage bolts and 3/8”-16 locking flange nuts on the inside. Assemble as shown in the orientation below.
- Page 6 AS SE M B LY Next, connect the front and rear legs using the wider crossbar using the provided 3/8”-16 x 3/4” carriage bolts and 3/8”-16 locking flange nuts. This bar mounts to the outside of the front and rear legs and gives you a few different mounting options to choose from.
- Page 7 AS SE M BLY Next, mount the remaining bars vertically between the two top horizontal crossbars. Choose which slots you want to mount to in the top crossbar and then use the provided 3/8”-16 x 3/4” carriage bolts and 3/8”-16 locking flange nuts to mount them in position.
- Page 8 AS SE M BLY Finally, if you need to clamp the legs to the bed, place the assembled bed rack into the bed and loosely attach the c shaped bracket to the back of the bottom of each of the legs using the 5/16”-18 x 1-1/2” carriage bolts and 5/16”-18 locking flange nuts.
- Page 9 DI ME NSI O NS NOTE: The 5’ rack need 48” long of trail rail or clampable bed space in order to mount, while the 6’ rack needs 60” long of trail rail or clampable bed space to mount. MINIMUM MAXIMUM...
Need help?
Do you have a question about the ADVENTURE BED RACK and is the answer not in the manual?
Questions and answers