Table of Contents
Advertisement
Quick Links
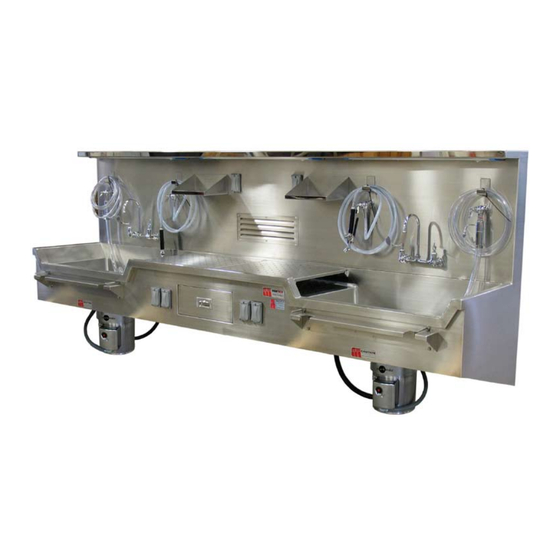
MODEL 1036-12
WALL MOUNTED AUTOPSY STATION
CENTER DISSECTING
CAUTION
• Inspect unit and all components
for any loosening that may have
occurred during shipping •
ATTENTION
Review entire manual before
starting assembly
Mortech™ Manufacturing Inc.
411 North Aerojet Avenue, Azusa, CA 91702
(626) 334-1471 www.mortechmfg.com
™
Technical Users' Manual
Installation and Operating Instructions
ISO Doc. #OM1036-12 (REV B)
JULY 2010
Advertisement
Table of Contents

Related Manuals for MORTECH 1036-12


Summary of Contents for MORTECH 1036-12
- Page 1 ™ Technical Users’ Manual Installation and Operating Instructions MODEL 1036-12 WALL MOUNTED AUTOPSY STATION CENTER DISSECTING CAUTION • Inspect unit and all components for any loosening that may have occurred during shipping • ATTENTION Review entire manual before starting assembly JULY 2010 Mortech™...
-
Page 2: Safety Information
• Is unit draining properly? WARNING • Are all nuts, bolts, and pins secured in place? It is crucial that any work performed on Mortech Mfg. Inc. If unit has an issue contact customer relations. manufactured items are carried out exclusively by skilled INSTRUCTION FOR HANDLING professionals who have the respective training. -
Page 3: Installation
1036-12 Wall Mounted Autopsy Station Installation DUCT FLANGE STATION TO BUILDING CONNECTION DUCT FLANGE WALL STATION TO BUILDING WALL DUCT FLANGE EXHAUST SECURE DUCT FLANGE WITH ALUMINUM ADHESIVE TAPE BACK OF VENT OPENING ALUMINUM TAPE DUCT FLANGE- ATTACHED TO THE SINK STATION. -
Page 4: Mounting Instructions
Drawings when mounted. Lengths of stations vary per project so you from Mortech for utilities is provided with the submittal packet must reference your submittal information for the station information. Utilities can include: water lines, electrical, etc. - Page 5 1036-12 Wall Mounted Autopsy Station Installation COLD, 3/4” COLD, 3/4” HOT, 1/2” HOT, 1/2” PRESSURE PRINCIPLE Figure-G ASSEMBLY MUST BE DRAIN, 1-1/2” CONNECTED TO DRAIN DRAIN, 1-1/2” PLUMBING CONNECTION INSTRUCTIONS Step 2: Connect drain line to sink basin or disposal unit, STEP 1: (Refer to Figure-G) Flush out all water lines depending on the option provided.
- Page 6 Plumbing 1036-12 Wall Mounted Autopsy Station Cold Water Hot Water Cold Water Hot Water Electrical Conduit Whip EXHAUST DUCT CONNECTION Plenum can be sealed by removing front grill. INSTRUCTIONS 2. Typical Exhaust requirement is 400 CFM at 0.25 w.g. See Specific Project Drawings for See your project requirements for specifics.
- Page 7 1036-12 Wall Mounted Autopsy Station Plumbing Electrical Conduit Solenoid Connect to Building Reduced Pressure Zone Assembly Connect each Reduced Pressure Zone Assembly to building drain Solenoid Electrical Conduit Connect to Building Reduced Pressure Zone Assembly JULY 2010 MFGISO DOC. #OM1036-12 (REV B)
- Page 8 Electrical 1036-12 Wall Mounted Autopsy Station 1036-12 ELECTRICAL CONNECTION INCOMING MAIN MAIN ELECTRICAL POWER POWER POWER DISCONNECT DISCONNECT (CONDUIT) GFCI DISPOSAL DISPOSAL GFCI RECEPTACLE SWITCH SWITCH RECEPTACLE FLUORESCENT FLUORESCENT SOLENOID SOLENOID DISPOSAL DISPOSAL LIGHT LIGHT VALVE VALVE DISPOSAL INCOMING ELECTRICAL...
-
Page 9: Parts Listing
If above two are adequate, disassemble unit and Check for debris in sink area check for debris causing a clog in the unit. Contact plumber to diagnose and clear Call mortech customer service if problem persists drain if problem persist Disposal not functioning Rust developing... - Page 10 Parts listing 1036-12 Wall Mounted Autopsy Station FLOURESCENT LIGHT OVER EACH DISSECTING AREA EXHAUST VENT (2) HYDRO ASPIRATOR TURN CONTROL VALVE ON/OFF TURN LEVER ON UNIT TO REVERSE FLOW (2) HOT/COLD MIXING FAUCET w/WRIST BLADE HANDLES GOOSENECK SWING NOZZLE (USE LEVERS TO TEMPER WATER)
- Page 11 1036-12 Wall Mounted Autopsy Station Accessories Scale Shelf Emergency Eyewash Stainless steel scale shelf Hose Assembly attached to front of station for Hand control spray to provide a gentle use with various platform type of water to rinse eyes of foreign debris.
-
Page 12: Component Data
(123.8 mm) (431.8 mm) 6-3/8" SOLENOID (161.9 mm) 1-1/2" 6-13/16" (38.1 mm) (173.0 mm) EXTERNAL ELECTRICAL CONNECTIONS ASCO Red Hat #8210G073 Solenoid Solenoid is located underneath unit. Mortech™ Manufacturing Inc. 411 North Aerojet Avenue, Azusa, CA 91702 (626) 334-1471 www.mortechmfg.com... -
Page 13: Specifications
INSINKERATOR DIVISION OF EMERSON ELECTRIC COMPANY 4700 21st STREET RACINE, WI 53406 TEL: 414 554-5432 1-800-558-5712 FAX: 414 554-8917 For additional information, see Commercial Product Information Binder. Mortech™ Manufacturing Inc. 411 North Aerojet Avenue, Azusa, CA 91702 (626) 334-1471 www.mortechmfg.com... - Page 14 Insinkerator Heavy Duty Disposal Heavy duty disposal OPERATING INSTRUCTIONS The Insinkerator commercial food waste disposer is UL Listed when installed in conjunction with Operating the Disposer Insinkerator mounting adapters and controls 1. Make sure there are no foreign objects in the disposer (see Figure 1 below for a typical installation).
- Page 15 Insinkerator Heavy Duty Disposal Heavy duty disposal ELECTRICAL Property Damage These plumbing instructions were written for an experienced WARNING - Electrical Shock competent installer. If the installer is not experienced in • Turn off the electrical supply to the disposer before plumbing installation, Insinkerator recommends that servicing.
- Page 16 Insinkerator Heavy Duty Disposal Heavy duty disposal INSTALLING THE DISPOSER (8) onto the lip. 6. Place the mounting gasket WARNING (11) on the disposer body flange. Secure the mounting flange Personal Injury (10) to the disposer body flange with six screws (12) pro- •...
- Page 17 Insinkerator Heavy Duty Disposal Heavy duty disposal • The disposer motor wiring connection is shown in the Commercial disposer accessories are included in this disposer terminal box. warranty only if they are included in the original disposer purchase package. DANGER Electrical Shock •...
- Page 18 Insinkerator Heavy Duty Disposal Heavy duty disposal TROUBLESHOOTING PROBLEM POSSIBLE CAUSE SOLUTION The disposer will not start No incoming power. Turn on electrical supply. and water does not flow. The disposer will not start The disposer overload Turn control to the off position and press but water flows.
- Page 19 CAUTION: Solenoid must be fully reassembled as the hous- ing and internal parts are part of and complete the magnetic circuit. Place insulating washer at each end of coil if required. Mortech™ Manufacturing Inc. 411 North Aerojet Avenue, Azusa, CA 91702 (626) 334-1471 www.mortechmfg.com...
-
Page 20: Product Features
120/277 Volt HP Rating: 1HP-120V 2HP-240V-277V Max Amp: 16 Amp Termination: Side Actuator Material: Thermoplastic Body Material: Thermoplastic Strap Material: Steel Standards and Certifications: UL/CSA 110V 220V Mortech™ Manufacturing Inc. 411 North Aerojet Avenue, Azusa, CA 91702 (626) 334-1471 www.mortechmfg.com... -
Page 21: Technical Specifications
Markings The outer surface of the conduit shall be clearly marked with a legible print legend in accordance with UL 1660 and CSA C22.2 No. 227.2. Mortech™ Manufacturing Inc. 411 North Aerojet Avenue, Azusa, CA 91702 (626) 334-1471 www.mortechmfg.com... -
Page 22: Feature & Specifications
120 (277 or universal 120-277 optional) Options Convenience outlet, rocker switch. 6’ SIT grounded cord & plug Mounting Under cabinet Additional info UL listed FLUORESCENT LIGHTING 5-1/4 1-3/4 Mortech™ Manufacturing Inc. 411 North Aerojet Avenue, Azusa, CA 91702 (626) 334-1471 www.mortechmfg.com... -
Page 23: Material Characteristics
RESET LINE LINE LINE LINE: cable brings power to the GFCI Service Panel Mortech™ Manufacturing Inc. Grounding connection to box ( if box has a grounding terminal) LOAD LOAD 411 North Aerojet Avenue, Azusa, CA 91702 (626) 334-1471 www.mortechmfg.com Wire... - Page 24 • Patented Quick-Fit™ Key Hole Mount for Easy Installation • Patented Universal-Fit™ Adapter Technology • Lockable Tab • Premium Powdercoat Finish • Spring Hinge Closure • UL Listed & 2008 NEC Compliant Mortech™ Manufacturing Inc. 411 North Aerojet Avenue, Azusa, CA 91702 (626) 334-1471 www.mortechmfg.com...
- Page 25 T&S SWIVEL GOOSENECK SPIGOT Ø2" [51mm] w/ Model #133X 1/2" NPT 2 3/8" 8" [203mm] Female Inlets [61mm] Adjustable from 7 3/4" to 8 1/4" [197mm to 210mm] Mortech™ Manufacturing Inc. 411 North Aerojet Avenue, Azusa, CA 91702 (626) 334-1471 www.mortechmfg.com...
- Page 26 4 ......005960-40 .....Eterna Barrel Asm-Hot 5 ........177F ........Lever Handle 6 ......000922-45......Lever Handle Screw 7 ......001660-45 ......Blue Index-CW 8 ......001661-45 ......Red Index-HW Mortech™ Manufacturing Inc. 411 North Aerojet Avenue, Azusa, CA 91702 (626) 334-1471 www.mortechmfg.com...
-
Page 27: Specifications
Plug: ................Bronze Gasket:................NBR Standard Screen: ....#20 mesh, 304 stainless steel D WYE STRAINER PLUMBED INTO A 1036-12 IMPORTANT Before Service and Maintenance: Shut water off before checking and cleaning the Wye Strainer fitting screen located inside the fitting. - Page 28 The assembly shall meet the requirements of: USC Manual 8th Edition†; ASSE Std. 1013; AWWA Std. C511; CSA B64.4. Shall be a Watts Regulator Co. Series 009. Mortech™ Manufacturing Inc. 411 North Aerojet Avenue, Azusa, CA 91702 (626) 334-1471 www.mortechmfg.com...
- Page 29 Tubing can be added to the outlet bottom of the aspirator to direct the flow of water into the sink drain. Reorder No. LW480 Mortech™ Manufacturing Inc. 411 North Aerojet Avenue, Azusa, CA 91702 (626) 334-1471 www.mortechmfg.com...
- Page 30 SPRAY HOSE ASSEMBLY SINGLE WALL CONTROL VALVE Model #2700 SPRAY HEAD Model #10820 SPRAY HANDLE Model #2913 SPRAY HOSE Mortech Model #SH10 SPRAY HOSE Mortech Model #SH10 FISHER SINGLE WALL CONTROL VALVE MODEL # 2700 Feature: • Single wall • Stem - right hand •...
-
Page 31: Maintenance Instructions
1036-12 Wall Mounted Autopsy Station Maintenance MAINTENANCE INSTRUCTIONS Shop Oil and Grease - These soils may be corrosive and may not allow the surface to maintain passivity, and so MAINTENANCE SCHEDULE removal is a necessity. Soap or detergent and water may be The unit requires regular maintenance and follow the used or a combination of detergent and water plus a solvent. -
Page 32: Maintenance Record
Maintenance record 1036-12 Wall Mounted Autopsy Station MAINTENANCE RECORD Date JULY 2010 MFGISO DOC. #OM1036-12 (REV B) -
Page 33: Training Record
1036-12 Wall Mounted Autopsy Station Training record TRAINING RECORD Date JULY 2010 MFGISO DOC. #OM1036-12 (REV B) -
Page 34: Warranty
Customer Relations. FAX (626) 334-1704 www.mortechmfg.com PROPRIETARY NOTICE info@mortechmfg.com The information in this manual is the property of Mortech © COPYRIGHT MORTECH MANUFACTURING INC., ALL Manufacturing. Mortech Manufacturing reserves all patent RIGHTS RESERVED. rights, proprietary design rights, manufacturing rights,...
Need help?
Do you have a question about the 1036-12 and is the answer not in the manual?
Questions and answers