Advertisement
Quick Links
WARRANTY INFORMATION:
All SSV Works enclosures are covered by a limited lifetime warranty against defects in material
or workmanship. All SSV Works Electronics are covered by a limited 1 year warranty against
defects in material or workmanship. All SSV Works and Kicker Speakers are covered by a limited
1 year warranty against defects in material or workmanship. Labor for replacement of defective
components is not covered. Contact SSV Works for further warranty information.
MAVR-PHZ3VTD
2024-Up Can Am Maverick R
Phase 3, V-Spec
3 Speaker Audio/RGB System
Please read and understand these
!
instructions completely before
installation to avoid possible injury, or
damage to the accessory or vehicle.
Advertisement

Subscribe to Our Youtube Channel
Related Manuals for SSV Works MAVR-PHZ3VTD


Summary of Contents for SSV Works MAVR-PHZ3VTD
- Page 1 All SSV Works Electronics are covered by a limited 1 year warranty against installation to avoid possible injury, or defects in material or workmanship. All SSV Works and Kicker Speakers are covered by a limited damage to the accessory or vehicle.
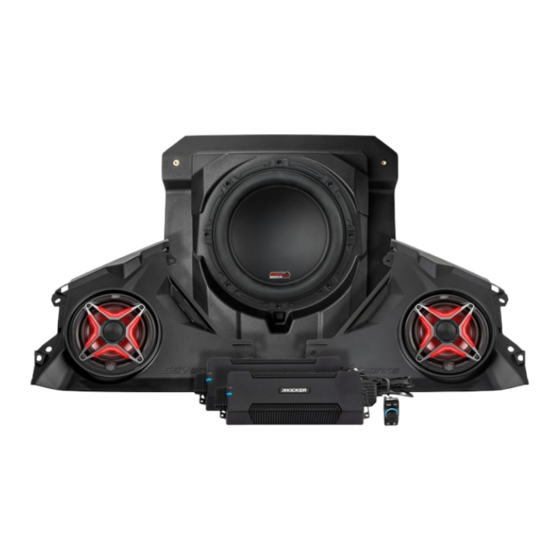
- Page 2 MAVERICK R DASH SPEAKER PANEL PARTS LIST PARTS LIST IMAGES Under seat 10” Subwoofer Speaker Panel Kit, Driver Side Speaker Panel Kit, Passenger Side 1650W Amplifier Assembly Amplifier Turn-On Delay Module LIT-CC RGB Controller...
-
Page 3: Tools Needed For Installation
MAVERICK R DASHBOARD DISASSEMBLY TOOLS NEEDED FOR INSTALLATION - T30 Torx Driver - Phillips Screw Driver - Pry Tool A. Use a plastic pry tool to remove the driver and passenger side front B. Remove the front fuse box cover. trims. -
Page 4: Warranty Information
WARRANTY INFORMATION: All SSV Works enclosures are covered by a limited lifetime warranty against defects in material or workmanship. All SSV Works Electronics are covered by a limited 1 year warranty against defects in material or workmanship. Labor for replacement of defective components is not covered. Contact SSV Works for further warranty information. - Page 5 RGB LED CONTROLLER COMMAND CENTER INSTALLATION TOOLS NEEDED FOR INSTALLATION - Wire Cutter A. Install the LIT-CC RGB LED Controller Rocker Switch in an B. Mount the LIT-CC RGB LED Controller Command Center in the unoccupied rocker switch opening. dash away from moving parts and secure with zip ties. Cut excess zip ties for a clean install.
- Page 6 AMPLIFIER TURN-ON DELAY A. Connect the amplifier turn-on delay module’s power and ground B. Route the turn-on delay output wire towards the steering column. wires to the factory bus bar. Secure the module to a harness using zip ties. +12V Output (Blue) +12V ACC (Red) Ground (Black) MAVERICK R AMPLIFIER KIT INSTALLATION...
- Page 7 TOOLS NEEDED FOR INSTALLATION - 10mm, 13mm & 18mm Socket Wrench A. The MAVR-PHZ3VTD includes one subwoofer enclosure that can be B. Start the install by removing the driver seat. Use an 18mm socket mounted under either the driver or passenger side seat.
- Page 8 G. Carefully remove the seat. H. Apply the foam pad (included in the kit) to the flat portion of the bottom reinforcement tube. I. Mount the brackets on the Mav R subwoofer enclosure using (4) J. Slide the Mav R subwoofer enclosure under the front seat rail M6x12mm hex head bolts and washers.
- Page 9 MAVERICK R POWER AND SPEAKER WIRING A. Remove the battery cover behind the driver seat. B. Disconnect negative battery terminal. C. Remove the cup holder by gently pulling up. D. Remove the center console side panels. E. Remove the screw to remove the rest of the center console side F.
- Page 10 G. Plug in the subwoofer connector to the B-H2702 extension cable. H. Make sure the subwoofer cable is tucked away from the seat bolts. I. Route the power cable along the driver side center console from the battery location towards the driver side dash. J.
- Page 11 L. Plug in the amplifiers turn-on bullet connectors to the turn-on delay M. Plug in the amplifier’s front speaker output to the B-H1385 “Y” module output wire. See page 6 for reference. harness and the rear speaker outputs to the B-H1913, 4-pin audio extension harness.
- Page 12 MAVERICK R DASH PANEL ASSEMBLY Insert the speaker bucket grommets (included in the kit) to the A1. The speaker bucket grommet is designed to be inserted with the front dashboard support holes encircled above. “UP” side on top for ease of the installation. B.
- Page 13 Completed dash panel installation. Completed subwoofer installation under the passenger seat with LIT-CC RGB controller on the center console. Completed rear speaker pods installation. E. Reinstall the seats. © 2024 SSV Works, Oxnard, CA 93030 MAVR-PHZ3VTD Rev. A 4-12-24...
Need help?
Do you have a question about the MAVR-PHZ3VTD and is the answer not in the manual?
Questions and answers