Advertisement
Quick Links
SSV WORKS, 201 N. Rice Ave Unit A, Oxnard, CA 93030
www.SSVworks.com | Phone: 818-991-1778 | Fax: 866-293-6751
WARRANTY INFORMATION:
All SSV Works enclosures are covered by a limited lifetime warranty against defects in
material or workmanship. All SSV Works Electronics are covered by a limited 1 year warranty
against defects in material or workmanship. All SSV Works Speakers are covered by a
limited 1 year warranty against defects in material or workmanship. Labor for replacement of
defective components is not covered. Contact SSV Works for further warranty information.
TOOLS FOR INSTALLATION
PARTS LIST IMAGES
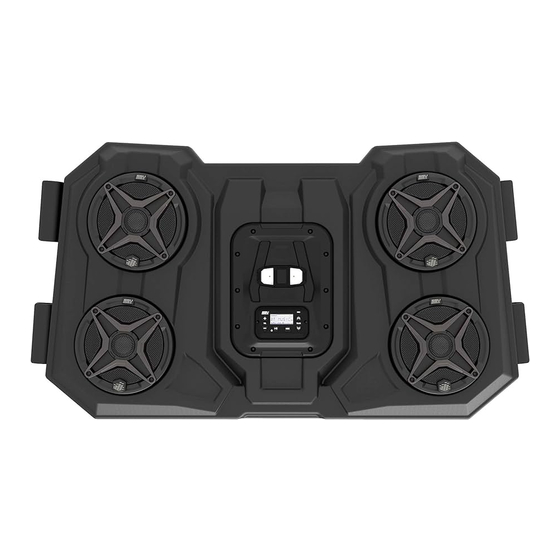
1. WP3-RZ3O65 Stereo
5. Power Harness
Always disconnect the battery when installing electronic devices.
A. Face the overhead down on a surface that will not damage the system.
Place the (4) base brackets onto the overhead. Center the brackets
mounting holes over the enclosures' threaded inserts.
- 8mm Socket & Wrench
2. Base Brackets x4
6. Fuse Holder & Ring
Terminal
A
Polaris RZR XP 1000 2 and 4 Seat
Overhead 4-Speaker Stereo System
!
- T40 Torx
- Wire Cutters & Crimpers
3. Support Brackets x4
7. 8mm Socket Head
Screws & Washers x32
B. Secure the (4) base brackets to the enclosure with (16) 8mm
M6x1x16mm screws and washers.
WP3-RZ3O65
Please read and understand these
instructions completely before
installation to avoid possible injury, or
damage to the accessory or vehicle.
4. Tension Brackets x4
8. 10" Zip Ties (5)
B
Advertisement

Related Manuals for SSV Works WP3-RZ3065


Summary of Contents for SSV Works WP3-RZ3065
- Page 1 All SSV Works enclosures are covered by a limited lifetime warranty against defects in instructions completely before material or workmanship. All SSV Works Electronics are covered by a limited 1 year warranty installation to avoid possible injury, or against defects in material or workmanship. All SSV Works Speakers are covered by a damage to the accessory or vehicle.
- Page 2 C. Thread the (2) support brackets to the (2) base brackets on D. Route the power and ground cable into the driver side of the roll cage driver side of the enclosure with (6) 8mm M6x1x16mm screws and down the “A” pillar. Leave about 10” of the harness out of the top and washers.
- Page 3 SUPPORT BRACKET SUPPORT BRACKET TENSION BRACKET TENSION BRACKET I. Slide (1) tension bracket into position beneath each support bracket. Fasten each tensioning bracket to the support bracket with (2) 8mm M6x1x16mm screws and washers. Pink lines represent how the bottom tension bracket will be in position. J Verify the overhead is evenly positioned and tighten all hardware.
- Page 4 We recommend removing the paint to bare metal, using a the second position terminal and attach the (BLACK) Ground wire. Re-screw on the nut. star washer, and repainting over the connection. WP3-RZ3O65 © 2020 SSV Works, Oxnard, CA 93030 WP3-RZ3O65 Rev. A 6-10-20...
Need help?
Do you have a question about the WP3-RZ3065 and is the answer not in the manual?
Questions and answers