Table of Contents
Advertisement
Quick Links
Advertisement
Table of Contents

Related Manuals for RGBlink TAO 1mini


Summary of Contents for RGBlink TAO 1mini
- Page 1 TAO 1mini User Manual Article NO: RGB-RD-UM-TAO 1mini E002 Version NO: V1.2...
-
Page 2: Table Of Contents
3.3.2 Input Settings ........................23 3.3.3 Output Settings ........................25 3.3.4 Network ..........................28 3.3.5 Bluetooth ..........................30 3.3.6 Fan Control ...........................31 3.3.7 Brightness ..........................31 3.3.8 About TAO 1mini ........................32 3.4 ON AIR ............................34 TAO 1mini User Manual... - Page 3 4.1 Product Code ..........................40 Chapter 5 Support ........................41 5.1 Contact us ...........................41 Chapter 6 Appendix ........................42 6.1 Specification ..........................42 6.2 FAQ ............................. 43 6.3 Terms & Definitions ........................44 6.4 Revision History .......................... 51 TAO 1mini User Manual...
-
Page 4: Declarations
RGBlink. If the purchaser or a third party carries out modifications or repairs on goods delivered by RGBlink, or if the goods are handled incorrectly, in particular if the systems are commissioned operated incorrectly or if, after the transfer of risks, the goods are subject to influences not agreed upon in the contract, all guarantee claims of the purchaser will be rendered invalid. -
Page 5: Operators Safety Summary
If there is damage, notify the shipping carrier immediately for all claims adjustments. Site Preparation The environment in which you install your product should be clean, properly lit, free from static, and have adequate power, ventilation, and space for all components. TAO 1mini User Manual... -
Page 6: Chapter 1 Your Product
Chapter 1 Your Product 1.1 In the Box USB-C Cable Power Adapter Double-thread 1/4 Screw Storage Box Note: The color of the accessories is subject to actual conditions. TAO 1mini User Manual... -
Page 7: Product Overview
TAO 1mini supports HDMI & UVC and FULL NDI gigabit Ethernet video stream codecs for encoding and decoding. TAO 1mini features light in weight and small in appearance, which makes it easy to carry. Standard camera screw holes can be easily installed to the camera bracket. -
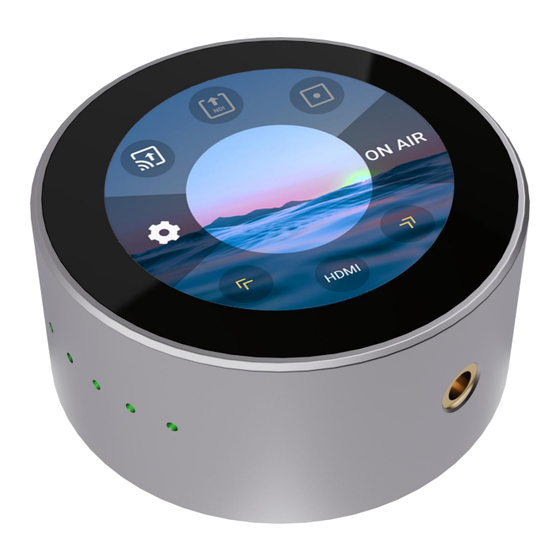
Page 8: Appearance
1.2.2 Appearance Description Item 2.1-inch TFT touch screen for real-time monitoring of signals Touch Screen and menu operations. ¼in Mounts For installation. TALLY Lamp LED TALLY indicators to show device status. TAO 1mini User Manual... -
Page 9: Connectors
USB camera for UVC capture. Support 5V/1A reverse power supply. HDMI-IN For receiving video signal. 3.5mm Audio Socket For analog audio input and audio output monitoring. USB 3.0 Connect to hard disk for recording, and storage up to 2T. Gigabit network port, support PoE. TAO 1mini User Manual... -
Page 10: Dimension
1.3 Dimension Following is the dimension of TAO 1mini for your reference: 91mm(diameter)×40.8mm(height). TAO 1mini User Manual... -
Page 11: Chapter 2 Install Your Product
Besides, you can also use PoE module for power supply. 2.3 Connect HDMI Output You can use an HDMI cable to connect TAO 1mini to a monitor with an HDMI input interface, so that you can monitor the input, output and audio display in real time. -
Page 12: Network Configuration
User should firstly ensure that the switch has access to the network. Then connect TAO 1mini and the computer to the same switch and in the same LAN. Finally, turn on DHCP of TAO 1mini for automatic capture of IP. No configuration is needed for your computer. -
Page 13: Connect Input Audio Signal And External Monitor
Step 2: Turn off the computer's network an then configure TAO 1mini and computer to the same LAN. Please set the IP address of the computer network port to 192.168.5.*. Step 3: Please click the buttons on the computer as follows: “Network and Internet Settings” >... -
Page 14: Chapter 3 Use Your Product
Once powering on TAO 1mini, the 2.1 inch display will show TAO 1mini logo and then come into the main menu. Operator can follow the operations below to use TAO 1mini. The main menu of TAO 1mini can be divided into five parts: Input Area, Output Area, Settings, ON AIR and Status Display Area. -
Page 15: Input Signal Selection
User can enter Input Signal parameter setting interface by pressing and holding the icon so as to adjust volume, shown as below. HDMI: Choose MUTE or adjust volume. ( 0-100 adjustable) UVC: Choose MUTE or adjust volume. ( 0-100 adjustable) TAO 1mini User Manual... -
Page 16: Ndi Decoding
( 0-100 adjustable) 3.1.2 NDI Decoding You can configure network of other device (Support NDI decoding function ) and TAO 1mini to the same LAN. Then click Search to find the NDI sources in the same LAN. Tap yellow arrows to select NDI Decoding icon. Press and hold the icon to enter the following interface. -
Page 17: Rtmp Pull
Tap yellow arrow to choose RTMP Pull icon so as to trigger this function. You can turn on Bluetooth to pair TAO 1mini with your mobile phone(For more details, please refer to 3.3.4 Bluetooth), so that you can import RTMP stream address via TAO APP, shown as below. -
Page 18: Play Video In U Disk
3.1.4 Play Video in U Disk You can insert U disk to USB 3.0 port of TAO 1mini so as to play the video stored in U disk. Click yellow arrow to select Player icon, then press and hold the icon to enter the following interface. -
Page 19: Output Area
User can check RTSP/RTMP/SRT stream address and click icon to confirm your selection. User can modify IP address of TAO 1mini in Network Settings and then RTSP/RTMP/SRT stream address will follow IP modification. Resolution, Bitrate and Display Mode can be set by clicking , shown as below. -
Page 20: Ndi Encoding
TAO 1mini supports NDI 5.0 decoding and can transmit data in H.264/H.265/RGBA/YUV442 format. In NDI network, TAO 1mini can convert video data from other channels (such as IP video streaming, HDMI, etc.) into NDI format and send it to the receiver. -
Page 21: Usb Recording
IP address. Users can revise channel name via software. Notice: When setting the NDI encoding resolution to 4K, the screen may turn to black, but TAO 1mini functions normally. 3.2.3 USB Recording Plug USB hard drive to TAO 1mini USB port and then TAO 1mini can work as a recorder. - Page 22 Resolution:Up to 3840x2160p60. Choose resolution by swiping the screen up and down. Click to confirm. Disk info: Check disk capacity and remaining recording time. You can return to the main menu to check the recording status, shown as below. TAO 1mini User Manual...
-
Page 23: Settings
The left area of the interface is the Settings Area, where users can perform eight functions, such as HOME, INPUT, OUTPUT, INTERNET, BLUETOOTH, FAN SPEED, BRIGHTNESS and ABOUT. 3.3.1 Home Click to return to the main interface of TAO 1mini. TAO 1mini User Manual... -
Page 24: Input Settings
Click RTMP Pull icon in Input Settings. You can perform RTMP Pull function with TAO APP, shown as below. For more details, please refer to 3.1.3 RTMP Pull. 3.3.2.2 NDI Decoding Click NDI Decoding icon in Input Settings to enter the following interface. TAO 1mini User Manual... - Page 25 In this interface, user can adjust Brightness or turn on/off Mirror mode. 3.3.2.4 Play the Video TAO 1mini can serve as a player. Click Player icon in Input Settings to enter the following interface. You can view video name, check video duration, video playback progress and switch video-playing mode.
-
Page 26: Output Settings
Encoding, USB Recording, HDMI Output Settings, UVC Output Settings and Audio Settings. Notice: Click to return to the previous interface. 3.3.3.1 RTMP Push Click RTMP Push icon in Output Settings. You can achieve RTMP Push and for more details, please refer to 3.2.1 RTMP Push. TAO 1mini User Manual... - Page 27 Users can set resolution, bitrate, encoding format, compression format and check the channel name. For more details, please refer to 3.2.2 NDI Encoding. 3.3.3.3 USB Recording Click Recording icon in Output Settings to do the following settings. Users can set bitrate, resolution and check disk info. TAO 1mini User Manual...
- Page 28 Click UVC icon in Output Settings to enter the parameter setting interface. You can choose output resolution by swiping the screen and then click to confirm. Tap the yellow arrow and you can also set mirror mode and display mode. TAO 1mini User Manual...
-
Page 29: Network
You can set HDMI output volume ( 0-100 adjustable) by swiping the screen up and down or choose MUTE mode. 3.3.4 Network Click Network icon to do the following settings. Tap yellow arrow for function selection. TAO 1mini User Manual... - Page 30 TAO 1mini supports WIFI connection. User can connect TAO APP in the mobile phone and TAO 1mini to the same WIFI so as to gain easier access to streaming via TAO APP. TAO 1mini supports DHCP. If DHCP is turned on, TAO 1mini will automatically capture the IP address.
-
Page 31: Bluetooth
You can turn on/off Bluetooth by swiping the screen left and right, shown as below. TAO 1mini can import stream-address with TAO APP. Firstly, you should pair TAO 1mini with TAO APP via Bluetooth. The following interface will pop up to remind the user whether to import a new stream address. -
Page 32: Fan Control
In the fan control interface, you can set the fan speed. Four gears for you to choose from, and you can also turn on Auto to achieve automatic adjustment of the fan speed. 3.3.7 Brightness Click Brightness icon to enter the following interfaces. TAO 1mini User Manual... -
Page 33: About Tao 1Mini
You can set the brightness and select screen rotation. Brightness: 0-100 adjustable. Display Rotation: 0°/ 180°adjustable. 3.3.8 About TAO 1mini Click Information icon to enter the following interface. User can check device information, turn on TALLY, upgrade TAO 1mini and choose factory reset. TAO 1mini User Manual... - Page 34 If you confirm the reset, click Notice:1. Keep TAO 1mini plugged in during upgrading, shown as Image 1. 2. If no file available on the USB disk or the file can not be recognized, the interface will display “None”, shown as Image 2.
-
Page 35: On Air
Image 1 3.4 ON AIR Click ON AIR and TAO 1mini will start streaming. Press and hold this icon to enter streaming configuration interface. Following steps take YouTube stream as the example. There are two methods for you to choose from. - Page 36 USB disk to TAO 1mini’s USB port. Step 4: Press and hold the streaming settings, you can see the links of the platforms identified by TAO 1mini after entering the settings, select the links of the live stream platforms you need, tap Next. After everything is set, tap confirm, it’ll automatically go back to the home page, then tap ON AIR.
- Page 37 Step 4: Take following steps to turn on Bluetooth of TAO 1mini. Step 5: Turn on Bluetooth of TAO APP. Then TAO 1mini will be recognized, shown as below. Click connect to pair TAO 1mini with TAO APP. Step 6: After successful paring, users should firstly click Device Name and then scan the QR code created in step 1.
- Page 38 Step 7: The RTMP address will be shown in the box, then click Send RTMP. Step 8: Then TAO 1mini will pop up a message, shown as below. Click YES to receive RTMP stream address. Notice:1.Make sure the distance between TAO 1mini and mobile phone is within 2m so as to ensure the stability of Bluetooth.
- Page 39 1: The user can hide the setting options by clicking the blank screen. And the interface will display output information at the top and the input information at the bottom. As shown in the figure above, information such as TAO 1mini User Manual...
-
Page 40: Status Display Area
3: On the basis of operation 2, user can click the screen again to restore the setting interface. 3.5 Status Display Area Click blank area of the homepage. The left area of interface is the Status Display Area, which displays the status of the TAO 1mini. no network input no USB Bluetooth is not connected. -
Page 41: Chapter 4 Ordering Codes
Chapter 4 Ordering Codes 4.1 Product Code 410-5513-05-1 TAO 1mini TAO 1mini User Manual... -
Page 42: Chapter 5 Support
Chapter 5 Support 5.1 Contact us TAO 1mini User Manual... -
Page 43: Chapter 6 Appendix
1024×768@60 | 1280×720@50/60 | 1280×768@60 | UVC/USB-C Input resolution 1280×1024@60 | 1360×768@60 | input 1920×1080@24/25/30/50/60 Decoding MJPEG/YUV | H.264 | H.265 performance Audio Input Audio delay setting 0~160ms Analog audio input MIC/LINE Maximum input level +6dBV Coding performance Support MJPEG\YUV,H.264,H.265 TAO 1mini User Manual... -
Page 44: Faq
A: Please try to unplug the power supply, power on and then turn on the device. 2.Does TAO 1mini support encoding and decoding at the same time? A: Cannot. TAO 1mini supports two encoding function and decoding function, but it can only work in one mode at the same time. -
Page 45: Terms & Definitions
A: Three kinds of streaming functions are supported. The first one is to use the RTMP streaming code of YouTube for direct streaming. The second one is to use the NDI encoding function of TAO 1mini. The third one is to use local RTMP, SRT, RTSP streaming codes for local streaming. ONLY ONE method is supported at the same time. - Page 46 ● DP 1.1: Was ratified on 2 April 2007, and version 1.1a was ratified on 11 January 2008. DisplayPort 1.1 allow a maximum bandwidth of 10.8 Gbit/s (8.64 Gbit/s data rate) over a standard 4-lane main link, enough to support TAO 1mini User Manual...
- Page 47 ●USB: Universal Serial Bus is a standard that was developed in the mid-1990s that defines cables, connectors and communication protocols. This technology is designed to allow a connection, communication and power supply for peripheral devices and computers. TAO 1mini User Manual...
- Page 48 ●HDBaseT: A video standard for the transmission of uncompressed video (HDMI signals) and related features using Cat 5e/Cat6 cabling infrastructure. ●ST2110: A SMPTE developed standard, ST2110 describes how to send digital video over and IP networks. Video is transmitted uncompressed with audio and other data in a separate streams. TAO 1mini User Manual...
- Page 49 Digital Multiplex (DMX) protocol has seen the protocol used for a wide range of other devices including video controllers. DMX512 is delivered over cable of 2 twisted pairs with 5pin XLR cables for connection. ●ArtNet: An ethernet protocol based on TCP/IP protocol stack, mainly used in entertainment/events applications. TAO 1mini User Manual...
- Page 50 This serves as a colour synchronizing signal to establish a frequency and phase reference for the Chroma signal. Colour burst is 3.58 MHz for NTSC and 4.43 MHz for PAL. ●Colour Bars: A standard test pattern of several basic colours (white, yellow, cyan, green, magenta, red, blue, and TAO 1mini User Manual...
- Page 51 ●EDID: Extended Display Identification Data. EDID is a data structure used to communicate video display information, including native resolution and vertical interval refresh rate requirements, to a source device. The source device will then output the provided EDID data, ensuring proper video image quality. TAO 1mini User Manual...
-
Page 52: Revision History
All information herein is Xiamen RGBlink Science & Technology Co Ltd. excepting noted. is a registered trademark of Xiamen RGBlink Science & Technology Co Ltd. While all efforts are made for accuracy at time of printing, we reserve the right to alter otherwise make change without notice.
Need help?
Do you have a question about the TAO 1mini and is the answer not in the manual?
Questions and answers