Table of Contents
Advertisement
Quick Links
Download this manual
See also:
User Manual
M2 Quick Start
Integrated Vision Mixer & Scaler
5 mega pixel capacity
Three output option modes – Dual 2K, 4Kx1K & 4K
Select or set output resolutions to any requirement
Dedicated source Preview output with Multiview
Wide range of transition effects built in
Up to 3 video layers including background for
presentation Program to Preview applications
Position, Scale, Crop video layers freely
DSK/Key on foreground video layers
Wide range of Masks can be applied to any foreground
video layer
Variable edge blending on foreground layers
Additional 3 independent layers for OSD, LOGO and STILL
Tally support built-in
Genlock support built-in
Modular construction
Advertisement
Table of Contents

Related Manuals for RGBlink M2


Summary of Contents for RGBlink M2
- Page 1 M2 Quick Start Integrated Vision Mixer & Scaler 5 mega pixel capacity Three output option modes – Dual 2K, 4Kx1K & 4K Select or set output resolutions to any requirement Dedicated source Preview output with Multiview ...
-
Page 2: Table Of Contents
4K1K Mode................................ 20 Switching Mode..............................21 Set the Output Resolution..........................22 Using Black Out..............................24 Saving Views..............................25 Recall Saved Settings............................26 Contact Information..............................27 © Xiamen RGBlink Science & Technology Co., Ltd. 1 / 28 Ph: +86 592 5771197 | support@rgblink.com www.rgblink.com... -
Page 3: Product Introduction
Now you choose input options, now you configure output operations, now control transitions from the t-bar, now apply layer masks, now do more. M2 redefines modern hands on scaling and mixing for any environment. Totally modular and flexible in configuration, M2 is packed with standard features to impress and present with ease. System Connection RGBlink offers solutions to demanding technical problems. -
Page 4: Packing Configuration
Packing Configuration Network Cable HDMI to DVI Antistatic Bag Screw Driver Cable Note: AC Power Cable supplied as standard according to destination market. © Xiamen RGBlink Science & Technology Co., Ltd. 3 / 28 Ph: +86 592 5771197 | support@rgblink.com www.rgblink.com... -
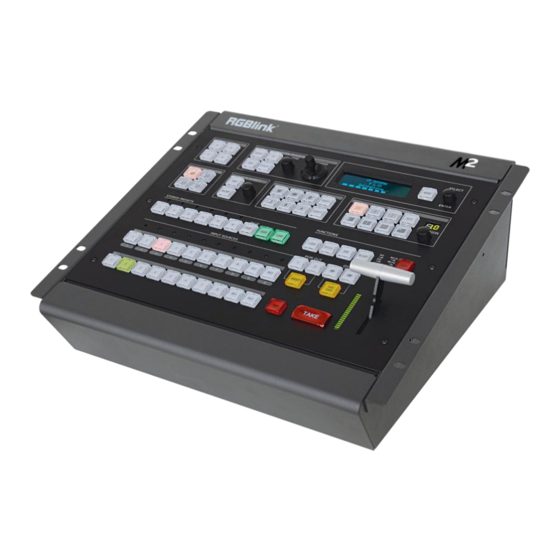
Page 5: Hardware Orientation
Multiview presets area Independent effects switching area Stored presets area OSD edit area Input sources area Switch modes area Menu and OLED display area © Xiamen RGBlink Science & Technology Co., Ltd. 4 / 28 Ph: +86 592 5771197 | support@rgblink.com www.rgblink.com... - Page 6 BLEND effect editing button. User can select the layer and set the blending width in BLEND menus. Rotary Knob Adjust the alpha of DSK layer. For DSK and BLEND adjustment and confirmation. © Xiamen RGBlink Science & Technology Co., Ltd. 5 / 28 Ph: +86 592 5771197 | support@rgblink.com www.rgblink.com...
- Page 7 Multiview mode selection, the button light is lit when selected, mainly for layout setting quickly in multiview. : 1P : PIP CENT : 3P. : M2 V1.1 can not support this function. Stored Presets Area SAVE Support 36 saving modes. LOAD Load saving views 1 to 36.
- Page 8 Mask&PIC pos X and Y, or set Pos X, Y of Mask or PIC separately. User can also load file from UDisk. Transition Area : ←+→ : ←□→ © Xiamen RGBlink Science & Technology Co., Ltd. 7 / 28 Ph: +86 592 5771197 | support@rgblink.com www.rgblink.com...
- Page 9 Independent Effects Switching Area PGM OUT 1/2 button: Independent effects switching for PGM1 or PGM2. GROUP: Effects switching for PGM1 or PGM2 at the same time. © Xiamen RGBlink Science & Technology Co., Ltd. 8 / 28 Ph: +86 592 5771197 | support@rgblink.com...
- Page 10 : Subtitle rows forward button. OSD TAKE Subtitles switch button. Switch Mode Area Seamless switching. TAKE Seamless switching with effect. T-BAR WIPE and mix switching. © Xiamen RGBlink Science & Technology Co., Ltd. 9 / 28 Ph: +86 592 5771197 | support@rgblink.com www.rgblink.com...
-
Page 11: Back Panel
HDMI output HDMI-A port Output VGA output DB15 port Control Interface 6. 7 TALLY light Genlock input BNC port USB port USB-A © Xiamen RGBlink Science & Technology Co., Ltd. 10 / 28 Ph: +86 592 5771197 | support@rgblink.com www.rgblink.com... - Page 12 RS-232 Interface LAN port RJ-45 Power Connection Power Switch AC 85-264V Max 65W, IEC-3 © Xiamen RGBlink Science & Technology Co., Ltd. 11 / 28 Ph: +86 592 5771197 | support@rgblink.com www.rgblink.com...
-
Page 13: Using Your Product
Using Your Product Menu Structure The menu structure is shown in the figure below: © Xiamen RGBlink Science & Technology Co., Ltd. 12 / 28 Ph: +86 592 5771197 | support@rgblink.com www.rgblink.com... -
Page 14: Pst Mode
PST Mode M2 supports 2 HDMI preview output, and it supports the functions as below: Signal Selection Push any button in Input Sources Area, for example, push the button [5], the border of signal 5 will change to yellow, and the signal in PGM monitor will be changed to signal 5. - Page 15 Mode: Select Key In or Key Out. Alpha: The adjustment range is between 0~128. Red Min: The adjustment range is between 0~255. © Xiamen RGBlink Science & Technology Co., Ltd. 14 / 28 Ph: +86 592 5771197 | support@rgblink.com...
- Page 16 ->PIC Pox Y Load File From UDisk Enable the mask function: Turn the rotary knob, select <ON/OFF>, and set ”ON” to enable the mask function. © Xiamen RGBlink Science & Technology Co., Ltd. 15 / 28 Ph: +86 592 5771197 | support@rgblink.com...
- Page 17 User can also push the layer mask selection button in Layer Mask Area to select the mask. Mask setting: M2 supports load file from UDisk, and set the selected layer, including effect & PIC Pos X, Y, effect X, Y and PIC Pos X, Y.
- Page 18 2. Turn the rotary knob, and select the LOGO that to custom, push the knob to confirm. 3. Turn the rotary knob, select <X> or <Y>, and set the position of LOGO. Additionally, M2 supports load file from UDisk. Custom OSD Push [MENU] button, and enter to the menu items.
- Page 19 2. Turn the rotary knob, and select the Still that to custom, push the knob to confirm. 3. Turn the rotary knob, select <X> or <Y>, and set the position of Still. Additionally, M2 supports load file from UDisk. © Xiamen RGBlink Science & Technology Co., Ltd.
-
Page 20: Pgm Mode
1. Switch the edited PST image to program by pushing the [CUT], [TAKE] button or T-bar, and then the PGM image will return to PST state, which can be edited. 2. There are 2 HDMI outputs for program, and realize 4Kx1K output. © Xiamen RGBlink Science & Technology Co., Ltd. 19 / 28 Ph: +86 592 5771197 | support@rgblink.com... -
Page 21: 4K1K Mode
4. Turn the rotary knob, and set H Total as 3840, then it realizes the 4K1K mode. 4K1K ->H Total 3840 V Total 1080 PGM1 H Size 1920 © Xiamen RGBlink Science & Technology Co., Ltd. 20 / 28 Ph: +86 592 5771197 | support@rgblink.com www.rgblink.com... -
Page 22: Switching Mode
3. TAKE switch: Switch the PST image to program with wipe and fade by pushing [TAKE] button. 4. TRANSITION DURATION: Transition duration setting, the adjustment range is between 0~9.9S. © Xiamen RGBlink Science & Technology Co., Ltd. 21 / 28 Ph: +86 592 5771197 | support@rgblink.com... -
Page 23: Set The Output Resolution
Custom Format >> 4K1K >> Color Space/Sample/Bit >> 3. Turn the rotary knob, and select <Custom Format>, push the rotary knob to confirm. © Xiamen RGBlink Science & Technology Co., Ltd. 22 / 28 Ph: +86 592 5771197 | support@rgblink.com www.rgblink.com... - Page 24 4. Set H Active, V Active and Fred according to actual need, then select <Set> and set “Yes”, push the rotary knob to confirm. © Xiamen RGBlink Science & Technology Co., Ltd. 23 / 28 Ph: +86 592 5771197 | support@rgblink.com...
-
Page 25: Using Black Out
Black out description: Black signal realizes one-key-touch to a black screen. M2 provides black effect processing for program output and preview output, with cut black effect. Operation is as below: Push the [BLACK] button, the button light is lit, then the program output is cut to black. -
Page 26: Saving Views
Saving Views M2 provides 36 positions for saving or recording parameters. To save current parameters and settings: 1. Push the [SAVE] button in Stored Presets Area, the button [SAVE] and [PAGE] lights are lit, and some of buttons 1~6 are lit and some are flashing. The button lit can be saved and flash will be overwrite, push the button lit to save. -
Page 27: Recall Saved Settings
Recall Saved Settings M2 provides 36 positions for saving or recording parameters. To recall saved settings: 1. Push the [LOAD] button in Stored Presets Area, the button [LOAD] and [PAGE] lights are lit, and some of buttons 1~6 are lit and some are flashing. The button lit is ready for recall and flash means just recall, push the button lit to recall. -
Page 28: Contact Information
All video products are designed and tested to the highest quality standard and backed by full 3 years parts and labor warranty. Warranties are effective upon delivery date to customer and are non-transferable. RGBlink warranties are only valid to the original purchase/owner. Warranty related repairs include parts and labor, but do not include faults resulting from user negligence, special modification, lighting strikes, abuse(drop/crush), and/or other unusual damages.
Need help?
Do you have a question about the M2 and is the answer not in the manual?
Questions and answers