Table of Contents
Advertisement
Quick Links
ATOMSTACK MAKER A5 V2, A10 V2 User Manual ATOMSTACK MAKER A5 V2, A10 V2 Benutzerhandbuch
ATOMSTACK MAKER A5 V2, A10 V2 Manuel de l'utilisateur ATOMSTACK MAKER A5 V2, A10 V2 Manuale
d'uso ATOMSTACK MAKER A5 V2, A10 V2 Manual de usuario
Note: Images are for reference only, please refer to the actual product. Hinweis: Die Bilder dienen nur als Referenz, bitte beziehen Sie sich auf das tatsächliche Produkt.
Remarque: Les images sont à titre de référence seulement, veuillez vous référer au produit réel. Nota: le immagini sono solo di riferimento, si prega di fare riferimento al
prodotto reale. Nota: Las imágenes son solo para referencia, consulte el producto real.
F03-0197-0AA1
B
EN
Advertisement
Table of Contents

Subscribe to Our Youtube Channel
Related Manuals for ATOMSTACK MAKER A5 V2


Summary of Contents for ATOMSTACK MAKER A5 V2
- Page 1 ATOMSTACK MAKER A5 V2, A10 V2 User Manual ATOMSTACK MAKER A5 V2, A10 V2 Benutzerhandbuch ATOMSTACK MAKER A5 V2, A10 V2 Manuel de l’utilisateur ATOMSTACK MAKER A5 V2, A10 V2 Manuale d'uso ATOMSTACK MAKER A5 V2, A10 V2 Manual de usuario Note: Images are for reference only, please refer to the actual product.
-
Page 2: Table Of Contents
Directory Verzeichnis Répertoire Directory Directorio List of items Instructions du boîtier de commande Safety Declaration Before Installation Installation et utilisation du logiciel Techniques d’utilisation de la machine User Safety Statement Disclaimer and Warning Instructions d’entretien et avertissements Installation Steps Précautions pour les problèmes courants Control Box Instructions Software Installation and Use Machine Usage Techniques... -
Page 3: List Of Items
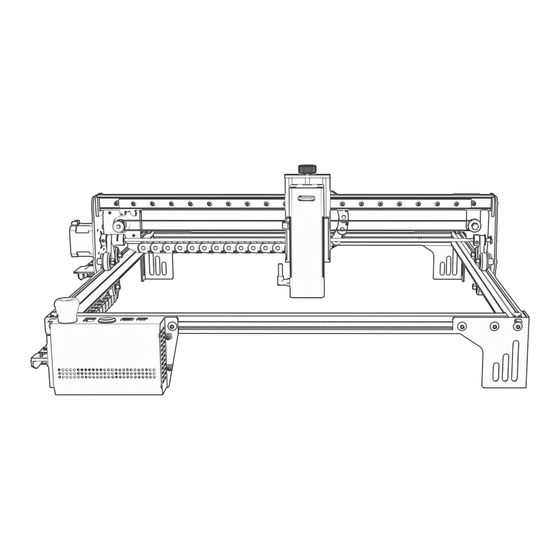
List of items Liste der Artikel Liste des éléments Elenco degli articoli Lista de artículos Fixed focus Fixfocus Laser Laser Laser X-axis Beam Strahl der X-Achse Faisceau de l’axe X Supporting feet Stützfüße Belt Gürtel Ceinture Mise au point fixe Laser Láser Fascio dell'asse X Haz del eje X Pieds de soutien Piedini di appoggio... -
Page 4: Safety Declaration Before Installation
Safety Declaration Before Installation Sicherheitserklärung vor der Installation Déclaration de sécurité avant l’installation Dichiarazione di sicurezza prima dell'installazione Declaración de seguridad antes de la insta- lación Before using the laser engraver, please read this safety guide carefully. It includes warnings about situations that require special attention and unsafe practices that may cause damage to your property or endanger your personal safety. - Page 5 Avant d’utiliser le graveur laser, veuillez lire attentivement ce guide de sécurité. Il comprend des avertissements sur les situations qui nécessitent une attention particulière et les pratiques dangereuses qui peuvent causer des dommages à votre propriété ou mettre en danger votre sécurité personnelle. 1.Ce produit appartient aux produits laser de classe 4.
- Page 6 Antes de utilizar el grabador láser, lea atentamente esta guía de seguridad. Incluye advertencias sobre situaciones que requieren atención especial y prácticas inseguras que pueden causar daños a su propiedad o poner en peligro su seguridad personal. 1. Este producto pertenece a los productos láser de clase 4. El sistema láser en sí debe cumplir con la última versión de IEC 60825-1, de lo contrario el uso de este producto está prohibido. 2.
-
Page 7: User Safety Statement
User Safety Statement Erklärung zur Benutzersicherheit Déclaration de sécurité de l’utilisateur Dichiaraz- ione di sicurezza dell'utente Declaración de seguridad del usuario Laser can harm human eyes and skin. Do not expose your eyes or skin directly to laser. The laser product has an optical lens and emits a straight laser beam. The light emitted by the product, whether direct or reflected, is extremely harmful because it can spread over long distances while maintaining high light density. - Page 8 2.2 Brandschutz Beim Schneiden wird das Substrat verbrannt, und hochintensive Laserstrahlen erzeugen extrem hohe Temperaturen und eine große Menge an Wärme. Einige Materialien können während des Schneidens Feuer fangen und Gas und Rauch im Inneren des Geräts erzeugen. Wenn der Laserstrahl auf das Material trifft, entsteht an dieser Stelle meist eine kleine Flamme. Es bewegt sich mit dem Laser und ist nicht kontinuierlich eingeschaltet, wenn der Laser vorbeifliegt.
- Page 9 2.5 Sécurité électrique Pour éviter les accidents tels que les incendies et les chocs électriques, la machine de gravure laser fournit un adaptateur secteur avec un fil de terre. Lorsque vous utilisez la machine de gravure laser, branchez la fiche d’alimentation dans une prise de courant mise à la terre. 2.6 Sécurité...
- Page 10 2.2 Seguridad contra incendios El corte quema el sustrato, y los rayos láser de alta intensidad generan temperaturas extremadamente altas y una gran cantidad de calor. Algunos materiales pueden incendiarse durante el corte, generando gas y humo dentro del equipo. Cuando el rayo láser golpea el material, generalmente aparece una pequeña llama en este punto. Se moverá con el láser y no estará encendido continua- mente cuando pase el láser.
-
Page 11: Disclaimer And Warning
This product is not a toy and is not suitable for individuals under the age of 15. Do not allow children to touch the laser module. When operating this product in a setting with children, please be cautious. This product is a laser module. Please scan the QR code on the cover to obtain the complete "User Manual" and the latest instructions and warnings. Atomstack reserves the right to update this disclaimer and safety operation guide. - Page 12 AtomStack pueda establecer. Usted entiende y acepta que AtomStack no es responsable de todas y cada una de las pérdidas causadas por los usuarios que no utilizan el producto de acuerdo con este manual. Los usuarios tienen prohibido desmontar la máquina sin la guía de los técnicos de la empresa.
-
Page 13: Installation Steps
Installation Steps Installationsschritte Étapes d’installation Passaggi di installazione Pasos de instalación outward äußerlich extérieur esterno exterior M5*25 M5*25 M5*25 outward outward äußerlich äußerlich extérieur extérieur esterno esterno exterior exterior Limit switch Endschalter Interrupteur de fin de course Finecorsa Interruptor de límite M5*25 M5*25 outward äußerlich extérieur esterno exterior... - Page 14 M5*6 M5*6 M5*6 M5*6 M5*6...
- Page 15 Note: The installation of the Y-axis timing belt can refer to the installation of the timing belt on the X-axis component.Check if the belt is tight enough: Press the position shown in the leftmost picture with your fingers. If the belt is elastic, it is tight enough.
- Page 16 M5*8 M5*14 M5*14 M5*8 M5*14 M5*8 M5*14 M5*8 M5*14 M5*8 M5*14 M5*8...
- Page 17 M3*6 M3*6 M4*12...
- Page 19 Adjust the eccentric wheel. Stellen Sie das Exzenterrad ein. Ajustez la roue excentrique. Regolare la ruota eccentrica. Ajuste la rueda excéntrica. Tip: How to determine the tightness Tipp: Wie bestimme ich den festen Astuce : Comment déterminer Suggerimento: come determinare la Consejo: Cómo determinar la of the eccentric nut ? Sitz der Exzentermutter ?
-
Page 20: Control Box Instructions
Control Box Instructions Anleitung für die Steuerbox Instructions du boîtier de commande Istruzioni della scatola di controllo Instrucciones de la caja de control Not-Aus-Schalter: Im Notfall wird durch Drücken dieser Taste der Betrieb der Emergency Stop Switch: In case of an emergency, pressing this button will Interrupteur d’arrêt d’urgence: En cas d’urgence, appuyer sur ce bouton Maschine sofort gestoppt. - Page 21 Software Installation and Use Softwareinstallation und -nutzung Installation et utilisation du logiciel In- stallazione e utilizzo del software Instalación y uso del software 2.Install LaserGRBL 1.Download the LaserGRBL Software Double-click the software installation package to start the installation process, and click "Next" until the software is completely visit the following website: http://lasergrbl.com/download/ installed.
- Page 22 2.2 Next, we will load the custom buttons into the LaserGRBL software. In the LaserGRBL software, right-click the blank space next to the bottom button (as shown in Figure 3) -> Import Custom Button, and then select the downloaded custom button zip file for import, and press Yes (Y) until no pop-up windows appear. (See Figure 4 and Figure 5) 2.2 Als nächstes laden wir die benutzerdefinierten Schaltflächen in die LaserGRBL-Software.
- Page 23 4.Connect laser engraving machine A. Connect the engraving machine to the computer with LaserGRBL software installed. B. Plug in the power of the engraving machine. C. Open LaserGRBL software. D. In the software, select the correct port number and baud rate-115200 (in general, the COM port does not need to be manually selected, but if you have multiple serial devices connected to the computer, you need to do this.
- Page 24 4.Connect máquina de grabado láser A. Conecte la máquina de grabado a la computadora con el software LaserGRBL instalado. B. Enchufe la alimentación de la máquina de grabado. C. Abra el software LaserGRBL. D. En el software, seleccione el número de puerto correcto y la velocidad en baudios-115200 (en general, no es necesario seleccionar manualmente el puerto COM, pero si tiene varios dispositivos serie conectados a la computadora, debe hacerlo.
- Page 25 5.Engraving parameter settings 1.1 Select the engraving file. Open the LaserGRBL software, click "File" > "Open File", and then select the graphics to be engraved. LaserGRBL supports NC, BMP, JPG, PNG, DXF and other formats.(See Figure 12 ) 2.2 Image parameters, engraving mode, engraving quality settings a.
-
Page 26: Software Installation And Use
e. Après avoir terminé les paramètres ci-dessus, cliquez sur les paramètres de vitesse de sculpture, d’énergie de sculpture et de taille de sculpture à côté d’eux. (Voir la figure 13) 3.3 Réglages de la vitesse de sculpture, de l’énergie de sculpture et de la taille de sculpture (Voir la figure 14) a. - Page 28 6.Laser focus adjustment The effect of carving or cutting largely depends on whether the laser is focused. Most existing laser engraving machines on the market use zoomable lasers. It is necessary to observe whether the laser is focused by staring at the laser while turning the fixed nut of the laser. Staring at the laser for a long time can damage your eyes (even if you wear goggles), and it is difficult to distinguish the slight changes in focus, so it is difficult to find the best laser focus.
- Page 29 6.Regolazione della messa a fuoco laser L'effetto dell'intaglio o del taglio dipende in gran parte dal fatto che il laser sia focalizzato. La maggior parte delle macchine per incisione laser esistenti sul mercato utilizza laser zoomabili. È necessario osservare se il laser è...
- Page 30 7.Positioning A. The engraver does not know where to carve, so before you start carving, an important task is positioning. We will complete the positioning operation in three steps. B. Select the "move to center" button, and the laser will move to the center of the pattern, and the carving will be placed below the laser.(See Figure 20) C.
- Page 31 8.Start and Stop Engraving or Cutting 1.1 Start: After completing the above operations, click the green button as shown in the to begin engraving. There is a number that can be edited next to the start button. It is the number of times engraved or cut. LaserGRBL allows for multiple consecutive uniform engravings or cuts, which is especially useful for cutting.(See Figure 24) 2.2 Stop: If you want to stop midway through the job, you can click the stop button as shown in the figure to stop engraving or cutting.(See Figure 25) 8.Starten und Stoppen des Gravierens oder Schneidens...
- Page 32 8.Démarrer et arrêter la gravure ou la découpe 1.1 Démarrer : Après avoir terminé les opérations ci-dessus, cliquez sur le bouton vert comme indiqué dans le pour commencer la gravure. Il y a un numéro qui peut être modifié à côté du bouton de démarrage. C’est le nombre de fois gravé...
- Page 33 9.LightBurn Installation Tutorial We can download the installation package from the LightBurn website: https://lightburnsoftware.com/(See Figure 26) Double-click on the installation package to be installed, and then click "Next" in the pop-up window. (Note: LightBurn is a paid software. For a better experience, we recommend purchasing the original software. Here we will demonstrate the installation of the trial version.)(See Figure 27,28,29,30,31,) 9.LightBurn-Installations-Tutorial Wir können das Installationspaket von der LightBurn-Website herunterladen: https://lightburnsoftware.com/ (Siehe Abbildung 26)
- Page 35 Before setting the engraving file, you need to check the speed parameters, as shown in the figure.(See Figure 32,33) Bevor Sie die Gravurdatei einstellen, müssen Sie die Geschwindigkeitsparameter überprüfen, wie in der Abbildung gezeigt.Italian copy translation.(Siehe Abbildung 32,33) Avant de définir le fichier de gravure, vous devez vérifier les paramètres de vitesse, comme indiqué...
-
Page 36: Machine Usage Techniques
Machine Usage Techniques Techniken zur Maschinennutzung Techniques d’utilisation de la machine Tecniche di utilizzo della macchina Técnicas de uso de la máquina 1.The closer the laser is to the table, the more unstable the structure, so try to lift the laser away from the table when using it. -
Page 37: Maintenance Instructions And Warnings
Maintenance Instructions and Warnings Wartungsanweisungen und Warnungen Instructions d’entretien et avertissements Istruzioni per la manutenzione e avvertenze Instrucciones y advertencias de manten- This product has a highly integrated design and does not require maintenance. However, if the laser system installed on this product needs repair or adjustment, please: 1.Unplug the power plug of the laser on the product to turn off the laser. - Page 38 Questo prodotto ha un design altamente integrato e non richiede manutenzione. Tuttavia, se il sistema laser installato su questo prodotto necessita di riparazioni o regolazioni, per favore: 1.Scollegare la spina di alimentazione del laser sul prodotto per spegnere il laser. 2.
-
Page 39: Precautions For Common Problems
Precautions for Common Problems Vorsichtsmaßnahmen für häufig auftretende Probleme Précautions pour les problèmes courants Precauzioni per problemi comuni Precauciones para problemas comunes 1. Choose the correct COM port to connect the software and device, the baud rate should be set to 115200 to ensure that the connection between the computer port and USB cable is secure. If you need laser assistance for tuning, please:If you need assistance, please contact our after-sales service 2. - Page 40 Scan QR code: QR code reader/code-barres scanner ou toute application avec un scanner Servizio clienti : Scan the QR code to get product information, firmware, Per la politica di garanzia dettagliata, si prega di visitare il nostro sito ufficiale: www.atomstack.com parameters. Per il supporto tecnico e l'assistenza, inviare un'e-mail a: support@atomstack.com Produttore: Shenzhen Ikier Technologies Co., Ltd.
- Page 41 For more information, scan the QR code. Für weitere Informationen scannen Sie den QR-Code. Pour plus d’informations, scannez le code QR. Per ulteriori informazioni, scansiona il codice QR. Para obtener más información, escanee el código QR.
Need help?
Do you have a question about the MAKER A5 V2 and is the answer not in the manual?
Questions and answers