Advertisement
Quick Links
INSTALLATION MANUAL
PRODUCT:
MODEL:
PART NO:
CAUTION!
To reduce the risk of serious injury or damage, please read and understand all instructions and
procedures before attempting to install or use this product. Safety glasses must be worn at all
times during installation or maintenance of this product. Ensure all mounting bolts are tensioned
after 400 km and periodically there after.
NOTICE
Whilst the bumper adds additional protection to your vehicle, precautionary measures still need to
be taken to avoid damage. Always drive to the conditions and your surroundings.
ADR69 COMPATIBLE
AIR BAG COMPLIANT
Ver. 4
FRONT ALUMINUM BUMPER
FORD RANGER (2022 - PRESENT)
FORD EVEREST (2022 - PRESENT)
2D.1814.1-NL
www.rival4x4.com
Advertisement

Related Manuals for Rival 2D.1814.1-NL


Summary of Contents for Rival 2D.1814.1-NL
- Page 1 FORD RANGER (2022 - PRESENT) FORD EVEREST (2022 - PRESENT) PART NO: 2D.1814.1-NL CAUTION! To reduce the risk of serious injury or damage, please read and understand all instructions and procedures before attempting to install or use this product. Safety glasses must be worn at all times during installation or maintenance of this product.
-
Page 2: Technical Information
*WINCH INSTALLATION A winch with a pull capacity of up to 10000 lbs can be installed with the RIVAL Bumper. It is not advisable to exceed this pulling capacity since damage, injury or death may occur where the 10000 lbs recommended capacity is exceeded. - Page 3 Always use recovery points as a matched pair teamed with an equalising bridle during any recovery situation. Please attach this "Warning" label to the door aperture. Installation manual 2D.1814.1-NL Date: 9 Nov 2023 www.rival4x4.com < Page 3 of 19 >...
- Page 4 * It is recommended that you carry out regular inspections of all the bumper elements such as all bolts, wires, connectors. * A winch with a pull capacity of up to and including 10000 lb can be installed with the RIVAL Bumper. It is not advisable to exceed this pulling capacity since damage, injury or death may occur where the 10000lb recommended capacity is exceeded.
-
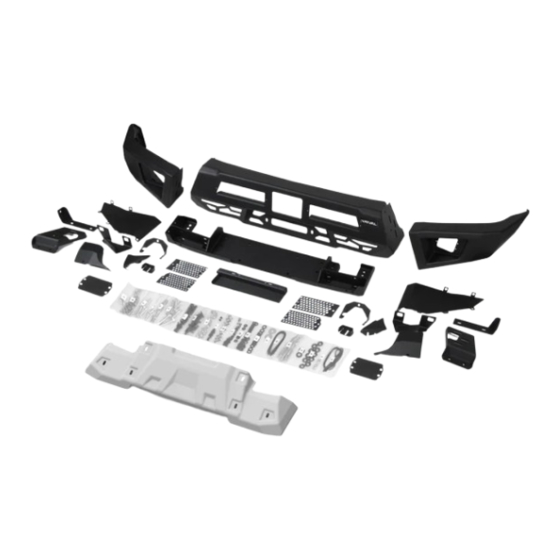
Page 5: Parts Listing
Qty 1 42. Left intercooler bracket...... Qty 1 21. Winch bracket........Qty 1 43. Right intercooler bracket....Qty 1 22. Right bracket for bash plate....Qty 1 Installation manual 2D.1814.1-NL Date: 9 Nov 2023 www.rival4x4.com < Page 5 of 19 >... - Page 6 X. Washer 8.......... Qty 4 L. Washer penny 10......Qty 12 Y. Washer 12........Qty 16 M. Parking sensor washer....Qty 6 Z. Nut M12..........Qty 8 Installation manual 2D.1814.1-NL Date: 9 Nov 2023 www.rival4x4.com < Page 6 of 19 >...
- Page 7 *Set aside for re-use later on. Fig.6 Fig.5 6. Mark future cutting line along the bumper 5. Remove radiator grille (fig.5). split line (fig.6). *Set aside for re-use later on. Installation manual 2D.1814.1-NL Date: 9 Nov 2023 www.rival4x4.com < Page 7 of 19 >...
- Page 8 Fig.12 Fig.11 12. If your vehicle has radar, unscrew OE 11. Remove plastic clips and remove damper bolts (fig.12). (fig.11). *Set aside for re-use later on. Installation manual 2D.1814.1-NL Date: 9 Nov 2023 www.rival4x4.com < Page 8 of 19 >...
- Page 9 18. Unscrew OE bolts and remove OE skid 17. Install OE horn as shown in fig 17. plate (fig.18). and fix it using OE bolts. *Set aside for re-use later on. Installation manual 2D.1814.1-NL Date: 9 Nov 2023 www.rival4x4.com < Page 9 of 19 >...
- Page 10 OE bolts, bolts М8х30, nuts М8, M8x30, washers 8 (item D, J) (fig.22). washers 8 (item D, P, J) (fig.23). *Do not tighten yet. *Do not tighten yet. Installation manual 2D.1814.1-NL Date: 9 Nov 2023 www.rival4x4.com < Page 10 of 19 >...
- Page 11 29. Similarly install on the right side of vehicle recovery point (item 40) and fix it using (fig.29). bolts М8х20, washers 8 (item V, X) (fig.28). *Tighten hardware after that. Installation manual 2D.1814.1-NL Date: 9 Nov 2023 www.rival4x4.com < Page 11 of 19 >...
- Page 12 34. Install insert nuts М6 with 2 nuts (item 7) (item C, I) into insert nuts M6 with 2 nuts on both sides of the vehicle (fig.34). (item 7) (fig.35). Installation manual 2D.1814.1-NL Date: 9 Nov 2023 www.rival4x4.com < Page 12 of 19 >...
- Page 13 М6х20 and and washers 6 (item A, O, H). washers 6 (item A, H). *Do not tighten that. *Tighten hardware after that. Installation manual 2D.1814.1-NL Date: 9 Nov 2023 www.rival4x4.com < Page 13 of 19 >...
- Page 14 47. Disconnect electronic connectors on sensor washers (item M) (fig.46). both sides of the vehicle and remove OE wires with parking sensors on OE bumper (fig.47). Installation manual 2D.1814.1-NL Date: 9 Nov 2023 www.rival4x4.com < Page 14 of 19 >...
- Page 15 2D.0041.1, purchased separately) (fig.51). (fig.50). *Tighten hardware after that. *Tighten hardware after that. Fig.52 Fig.53 52. Install weatherstrip (item 30) on bumper body, as shown in fig.52, 53. Installation manual 2D.1814.1-NL Date: 9 Nov 2023 www.rival4x4.com < Page 15 of 19 >...
- Page 16 57. Fix bash plate (item 34) using screws into holes of brackets (item 22, 23, 24, 25) as M10x30 countersunk-head, countersunk shown in fig.57. washers (item E, N). *Tighten hardware after that. Installation manual 2D.1814.1-NL Date: 9 Nov 2023 www.rival4x4.com < Page 16 of 19 >...
- Page 17 (fig.64). the vehicle. Fix flaps and fenders using screws M6x20, washers 6 (item A, I) (fig. 63). *Tighten hardware after that. Installation manual 2D.1814.1-NL Date: 9 Nov 2023 www.rival4x4.com < Page 17 of 19 >...
- Page 18 66. Connect OE wirings back (fig.67). 67. Install OE plastic pad and fix it using OE clips (fig.68). Fig.69 68. Сonnect terminal “-” on the battery (fig.69). Installation manual 2D.1814.1-NL Date: 9 Nov 2023 www.rival4x4.com < Page 18 of 19 >...
- Page 19 INSTALLATION PROCEDURE Before operating a vehicle fitted with RIVAL Bumper 2D.1814.1-NL: - make sure all fittings are tightened - check winch operation - check that all electrical wiring is attached to the lights Installation manual 2D.1814.1-NL Date: 9 Nov 2023 www.rival4x4.com...
Need help?
Do you have a question about the 2D.1814.1-NL and is the answer not in the manual?
Questions and answers