Advertisement
Quick Links
INSTALLATION MANUAL
PRODUCT: RECOVERY POINTS
MODEL:
ISUZU D-MAX (2017-)
PART NO: 2D.9103.1
WARNING!
In order to reduce the risk of severe injury or property damage: Before installation and use of this product read the whole
procedure, paying special attention to the safety notice and installation notice! Upon installation or maintenance of this product
it is necessary to use protective glasses. Check integrity of the design and torque settings of fasteners in each 1000km of the
vehicle usage. Do not use this product if there is any damage to the design or fasteners
www.rival4x4.com
Advertisement

Subscribe to Our Youtube Channel
Related Manuals for Rival 2D.9103.1


Summary of Contents for Rival 2D.9103.1
- Page 1 PRODUCT: RECOVERY POINTS MODEL: ISUZU D-MAX (2017-) PART NO: 2D.9103.1 WARNING! In order to reduce the risk of severe injury or property damage: Before installation and use of this product read the whole procedure, paying special attention to the safety notice and installation notice! Upon installation or maintenance of this product it is necessary to use protective glasses.
-
Page 2: Safety Notice
RIVAL 2L.9101.1 Winch Bracket SAFETY NOTICE * The RIVAL recovery points are designed to compliment the use and design of the specified vehicle under conditions specified by the car manufacturer. * While driving the vehicle at any speed, collision with any other vehicle, animal or object must always be avoided. - Page 3 TECHNICAL INFORMATION БАМПЕР ПЕРЕДНИЙ TOYOTA HILUX REVO Vehicle fitted with a RIVAL recovery points have the following advantages: - Access to each recovery point, in case if parallel recovery point blocked. - Possibility to choose the side to hitch the tow, depending on the side of recovery point on the tawing vehicle.
-
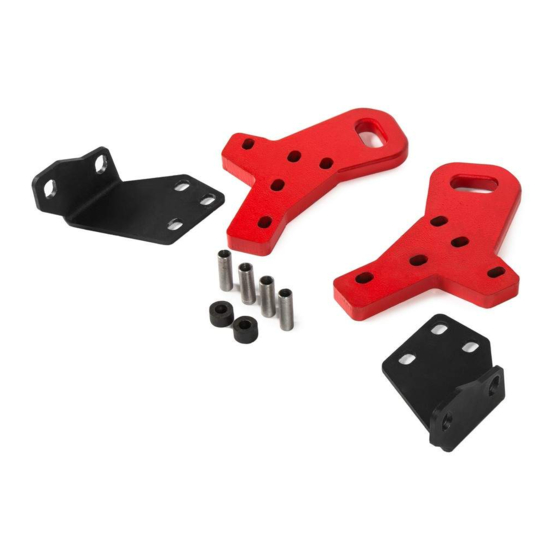
Page 4: Parts Listing
8 pc Adjusting washer 12 ..М ..2 pc Washer М1 ........ 14 pc М10 ........2 pc М12........2 pc М12х1,25....... 6 pc www.rival4x4.com 2D.9103.1 Installation manual Date: 29.05.2019 < Page 3 of 12 >... - Page 5 3. Remove 4 screws as shown. * Set aside for re-use later. 4. Remove radiator grill fittings (6 pc) as shown. Carefully dismantle the radiator grille. * Set aside for re-use later. www.rival4x4.com 2D.9103.1 Installation manual Date: 29.05.2019 < Page 4 of 12 >...
- Page 6 Set aside for re-use later. 7. Remove 1 plug in wheel arches on the left and right, as shown. Set aside for re-use later. www.rival4x4.com 2D.9103.1 Installation manual Date: 29.05.2019 < Page 5 of 12 >...
- Page 7 Pull the bumper edge by unlatching the latches, moving from the bumper edge to the center. Disconnect fog lights and parking sensors. 10. Unscrew 4 bolts, as shown. Set aside for re-use later. www.rival4x4.com 2D.9103.1 Installation manual Date: 29.05.2019 < Page 6 of 12 >...
-
Page 8: Инструкция По Установке
13. Instal left bracket (pos. 2) on left recovery point, using bolts M10x45 and M10x50, adjustment washers M10 and bushing (pos.4). * Do not tighten yet. Use right bracket (pos.3) for right recovery point. www.rival4x4.com 2D.9103.1 Installation manual Date: 29.05.2019 < Page 7 of 12 >... - Page 9 #1 and #2, as shown. Make the same actions for right recovery point using template (attachment 2), remove area #1 and * Stick the template over for more hardness, using scotch tape. www.rival4x4.com 2D.9103.1 Installation manual Date: 29.05.2019 < Page 8 of 12 >...
- Page 10 Adjust it on the bumper following cutout and fix it using masking tape, as shown. Mark cut line, using template. 18. Connect the cut lines as template shown (red dash lines). www.rival4x4.com 2D.9103.1 Installation manual Date: 29.05.2019 < Page 9 of 12 >...
- Page 11 Adjust it on the bumper following cutout and fix it using masking tape, as shown. Mark cut line, using template. 21. Connect the cut lines as template shown (red dash lines). www.rival4x4.com 2D.9103.1 Installation manual Date: 29.05.2019 < Page 10 of 12 >...
- Page 12 22. Make sure, that wires do not handicap to cut the bumper. Carefully cut out marked area, using angle grinder. * Polish burrs and sharp edges. 23.Install bumper and radiator grille onto the vehicle. www.rival4x4.com 2D.9103.1 Installation manual Date: 29.05.2019 < Page 11 of 12 >...
- Page 13 Инструкция по установке INSTALLATION PROCEDURE Before operating a vehicle fitted with a RIVAL recovery points: - make sure that all screw joints are tightened; - check integrity of all recovery points components. www.rival4x4.com 2D.9103.1 Installation manual Date: 29.05.2019 < Page 12 of 12 >...
- Page 14 Attachment 1 LEFT RECOVERY POINT TEMPLATE Cut out line Masking tape sticking area...
- Page 15 Attachment 1 LEFT RECOVERY POINT TEMPLATE COPY Cut out line Masking tape sticking area...
- Page 16 Attachment 1 RIGHT RECOVERY POINT TEMPLATE Cut out line Cut out line Masking tape Masking tape sticking area sticking area...
- Page 17 Attachment 1 RIGHT RECOVERY POINT TEMPLATE Copy Cut out line Cut out line Cut out line Masking tape Masking tape sticking area sticking area...
Need help?
Do you have a question about the 2D.9103.1 and is the answer not in the manual?
Questions and answers