
Subscribe to Our Youtube Channel
Related Manuals for FLASHFORGE 3D PRINTER Creator


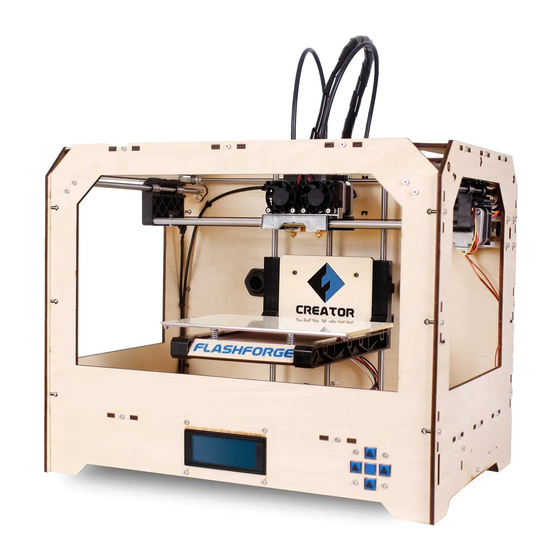
Summary of Contents for FLASHFORGE 3D PRINTER Creator
- Page 1 Creator Start-up Guide [Includes unpacking, setup, usage, and troubleshooting information] FlashForge Technology Co., Ltd. www.ff3dp.com 第 一 页 共 一 页...
-
Page 2: Table Of Contents
Contents Precautions…………………………………………………………………………...3 What’s in the box……………………………………………………………………..3 Unpacking……………………………………………………………………………4 Hardware installation………………………………………………………………...8 Software installation…………………………………………………………………11 USB connection & setting temperature ……………………………………………..20 Feeding and withdrawing filament…………………………………………………..27 Setting parameters…………………………………………………………………...32 Initial print setup……………………………………………………………………..33 Dual-Extruder print…………………………………………………………………..37 第 二 页 共 二 页... -
Page 3: Precautions
Precautions [Important: Read this user guide and heed all warnings] ! Because the Creator is sensitive to static electricity, make sure to release your own body’s static electricity by touching a grounded object before any operation of the Creator. If you want to repair your Creator by yourself, the power source must be shut off and the power cord must be unplugged. -
Page 4: Unpacking
Unpacking The Creator was carefully hand-packed by the staff at the FlashForge factory. Please follow the unpacking steps laid out below and heed all warnings. ! Handle with extra special care. Do not use any unnecessary force. ! Do not remove the thin yellow film from the heating plate. It is a heat-resistant adhesive tape intended to improve the adhesion of the materials to the plate. - Page 5 Do not use it to lift the Creator. Now take the Creator out of the box by grasping the frame. Be sure to grasp only the frame. Gently lift and transfer the printer to your work surface.
- Page 6 Under the build platform you’ll find the filament -- either one or two rolls, depending on whether your Creator has one or two extruders. It’s easiest to remove the filament by first removing all of the remaining packing material.
- Page 7 To do this, first take out the long box in the front, then the small box on the right, and finally the two wire trays. You have now finished the unpacking job! Next: set up the hardware. 第 七 页 共 七 页...
-
Page 8: Hardware Installation
Next is the installation of the filament bracket. If you have two brackets, install one on each side; if you have only one, install it on the left hand side (when viewing the Creator from the front). The installation of the filament bracket is very simple -- just insert it into the circular opening and tighten the nut behind. - Page 9 The hardware installation is almost completed. Next, with the power switch in the "OFF" position, confirm that the power cord is plugged in to the power outlet next to the power switch. Now plug the USB A TO B cable into the USB B-type port -- do not plug the other end in yet.
- Page 10 Congratulations, you have completed the initial hardware installation! If you're ready to get started printing, proceed to the next step: software installation! 第 十 页 共 十 页...
-
Page 11: Software Installation
Software installation ReplicatorG0040 is the ideal software to drive your dual extruder Creator. It can be downloaded from our official website: http://www.sz3dp.com/% E9% A9% B1% E5% 8A% A8% E4% B8% 8B% E8% BD% BD / Click Data Download, open creator Series driver, and then you can see the download link Download the 3 extracting packages in the red box and decompress them one by one. - Page 12 第 十二 页 共 十二 页...
- Page 13 (the text and green code on the above image can not be seen ) Then we will give a detailed introduction on how to import files and generate G-code. Click on the option in , click the file open file you want to print (STL format), and import it by double-clicking.
- Page 14 After the image is imported, there may be some problems, such as the diagram is unseen or the position is wrong. In that case, the following function keys can be used: 第 十四 页 共 十四 页...
- Page 15 When the position is in the center, which is the ideal printing position. The next step is to generate G-code. 第 十五 页 共 十五 页...
- Page 16 You can get the G-code by clicking the button in the red box. 第 十六 页 共 十六 页...
- Page 17 A: Slicing profile. Select replicator slicing defaults B: Left and right extruder print selecting. Left means printing with the left extruder, while right means printing with the right extruder. C: If your sample is in dangling structure, print support is needed. None means no support.
- Page 18 And there is another possibility: Users who do not choose the default installation path in the installation of python, can click "G-code generation" button in Replicator G, and a dialog box will pop up alerting that the executable file python can not be found. First click "N"...
- Page 19 Select the "parameter setting" option in the "File". Click the button “select Python interpreter”. Find the Python installation directory in the dialog box, select python.exe and click "Open". 第 十九 页 共 十九 页...
-
Page 20: Usb Connection & Setting Temperature
After clicking the "Close" button, the settings are done! The machine will work normally by clicking the “G-code generation” button. Next we will start a preliminary test on the machine’s connections and we will heat the platform and extruder. USB connection & setting the extruder and platform temperature First, connect the machine and computer with the provided USB cable. - Page 21 This is the USB port on the machine. After connecting the cable, open the software -- we are going to connect the computer and printer. Click the Machine, Choose the second option (Serial Port) on the menu, and we will find no port connected.
- Page 22 The software driver has not been installed if no port appears; let’s install the driver. Click My Computer; right click select properties, then the basic system parameters appear. Then select Device Manager. This software driver in the red box is not installed. Right click the Replicator, and 第...
- Page 23 select Update Driver Software. Select browse my computer to search for driver software. Click Browse to find the location of software 0040. 第 二十三 页 共 二十三 页...
- Page 24 Click FTDI USB Drivers in the driver folder before confirmation, and finally click next. The driver is now installed. Next is to connect to the printer. The steps are the same. Click printer; select the second connection (serial port). The port COM3 (this is the port for our test machine, it is different in each machine) appears.
- Page 25 Next, we can connect the machine. Click the function keys in the red box. If red turns to green, the machine is connected with the computer. The next step is to heat the extruder and build platform. 第 二十五 页 共 二十五 页...
- Page 26 An interface will appear by clicking the cross-shaped function key. Input the target values. 220 degrees for the extruder (maximum 230 degrees); 115 degrees for the heating platform (maximum 120 degrees). After input, the platform will start to warm up. When the extruder temperature reaches 50 degrees, the cooling fan will activate and the current temperature value will display to the right, as shown below.
-
Page 27: Feeding And Withdrawing Filament
It shows that the heating of the sprinkler and bottom plate is normal. Feeding and withdrawing filament Some users report that it’s easy to feed filament, while others report that it’s hard -- what would explain this? Sometimes, if the location is wrong (trying to operate at different angles), the filament feeding wheel is not secure and the material cannot be fed. - Page 28 How to set the filament First, remove the filament Guide Tube by pulling out. When the guide sleeve is disengaged, you can keep pulling the material from the guide sleeve behind the device until the thread passes through from the front. To avoid blocking in print, please ensure that two threads are loaded from the middle.
- Page 29 Feeding the material by LCD option 1. When you start your machine, the display indicates: Build from SD Preheat Utilities 2. Click the button board on the right, and then click the page down key to advance to the second page. The display indicates: Preheat Utilities Info and Settings...
- Page 30 This operation cannot be done until your machine has been connected to your computer. If the print software is successfully connected, a dialog box will pop up: Click the icon in the red box -- this is the Control Panel icon. The dialog box shown below will then pop up.
- Page 31 How to withdraw the filament 1. When you start your machine, the display indicates: Build from SD Preheat Utilities 2. Click the button board on the right, and click the page down key to advance to the second page. The display indicates: Preheat Utilities Info and Settings 3.
-
Page 32: Setting Parameters
Setting parameters 3D printer parameters include fill ratio, layer thickness, wall thickness, wiring speed and idling speed. The parameters are shown below. Filling ratio: the rate to fill the object -- 100% percent is solid. Layer thickness: the wiring thickness of each layer. Wall thickness: the outer thickness of the printed article. -
Page 33: Initial Print Setup
These parameters affect the printing quality. The default settings are relatively stable. You can also find your own parameters, as shown below. Initial print First click file column to select example, print a small cubic of 20mm and check the finished product, then this picture pops up. - Page 34 When this interface appears, click Move, click Center and Placing Platform button, so that the sample will be printed in the center. After clicking the two buttons, click G Code Generation button, a Generation G Code dialog box pops up. Parameters will be set according to the data setting in the picture, as shown in Figure 第...
- Page 35 Click G Code Generation, the following picture appears After G code is generated, the temperature of the bottom plate should be changed, please check the following picture for modification. First click G code in red box, and then change M109 S110 T1 to M109 S115. 第...
- Page 36 After modifying, click the File button to save this sample, and click button to build the sample. This concludes the initial print instructions. 第 三十六 页 共 三十六 页...
-
Page 37: Dual-Extruder Print
Dual-Extruder print First try the two-color printing coming with our software Open operating software replicator g, and then click the G code option in red box. Select the last column to Merge .stl for Dual Extrusion Click Merge .stl for Dual Extrusion, dialog box will pop up as below: 第... - Page 38 Click Browse left Extruder, find folder Flashforge finished version replicatorg-0040, click it, find examples and select double-head choice Two_color_World _a.stl, as shown: Click Browse for right Extruder, find folder Flashforge finished version replicatorg-0040, click it, find examples and select Dual-Extruder choice Two_color_World _b.stl, as shown in figure:...
- Page 39 The suffix name must be. G-code Save it to the desktop. Then click Right G-code Generation button, two G-code Generation dialog boxes pop up. As shown below: After G-code dialog boxes pop up, remove √ before use base / support in the front, and then generate G-code one by one to.
- Page 40 After G-code is generated, click the G-code in red box and modify the temperature of the bottom plate 第 四十 页 共 四十 页...
- Page 41 Then modify M109 S110 in red box TO (set HBP temperature) M109 S115 (set HBP temperature) As shown below: After modification, save the file, click Build button for two-color printing. Shown as below: 第 四十一 页 共 四十一 页...
Need help?
Do you have a question about the Creator and is the answer not in the manual?
Questions and answers