Advertisement
Quick Links
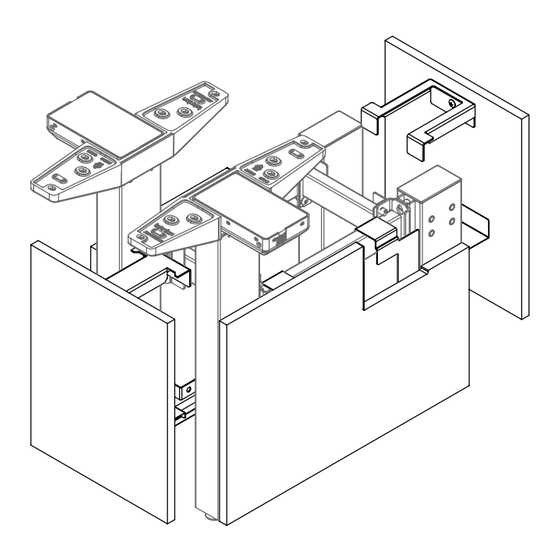
height-adjustable bench
Installation Guides
Date: Sept 2019
Page: 1 of 10
Section:
SCREENS AND GABLES
HABN_225e
Rev.
Navigate Single-Sided End Gable - Solid (HNBCGESS), Navigate Single-Sided Mid Gable - Solid (HNBCGMSS)
2.1
2.2
1.1
1.4
2.5
2.6
2.13
2.8
2.9
2.3
1.3
1.7
Advertisement

Subscribe to Our Youtube Channel
Related Manuals for Teknion HNBCGESS


Summary of Contents for Teknion HNBCGESS
- Page 1 Installation Guides Date: Sept 2019 Page: 1 of 10 Section: SCREENS AND GABLES HABN_225e Rev. Navigate Single-Sided End Gable - Solid (HNBCGESS), Navigate Single-Sided Mid Gable - Solid (HNBCGMSS) 2.13...
- Page 2 height-adjustable bench Installation Guides Date: Sept 2019 Page: 2 of 10 Section: SCREENS AND GABLES HABN_225e Part & Product Identification ITEM ITEM PREVIEW DESCRIPTION PART NUMBER QTY. PREVIEW DESCRIPTION PART NUMBER QTY. 1. NAVITAGE END GABLE, SOLID, SINGLE SIDED, HAB (HNBCGESS30) HANGING BRACKET FOR A16-3021...
- Page 3 height-adjustable bench Installation Guides Date: Sept 2019 Page: 3 of 10 Section: SCREENS AND GABLES HABN_225e Part & Product Identification ITEM PART ITEM PART PREVIEW DESCRIPTION QTY. PREVIEW DESCRIPTION QTY. NUMBER NUMBER GABLE CONNECTING 2.11 A16-3651 PLATE SIDE COVER FOR MID C07- GABLE, SINGLE 4718AL\30...
- Page 4 height-adjustable bench Installation Guides Date: Sept 2019 Page: 4 of 10 Section: SCREENS AND GABLES HABN_225e ATTACH CONNECTION PLATES TO FRAME LEGS ATTACH SUPPORT BRACKETS STEP 1: Loosen Legs Hex Bolt to allow enough room for Gable Connecting Plate. Fasten STEP 2: Fasten Brackets to Outside Cover Assembly Gable Connecting Plates to Frame Legs.
- Page 5 height-adjustable bench Installation Guides Date: Sept 2019 Page: 5 of 10 Section: SCREENS AND GABLES HABN_225e MOUNT INSIDE COVER ASSEMBLY MOUNT INSIDE COVER ASSEMBLY STEP 3: Mount Inside Cover Assembly onto Stretcher Bar. STEP 4: Secure Inside Cover Assembly to Gable Connecting Plate on both sides using Tap Quad Pan screws provided.
- Page 6 height-adjustable bench Installation Guides Date: Sept 2019 Page: 6 of 10 Section: SCREENS AND GABLES HABN_225e MOUNT OUTSIDE COVER ASSEMBLY STEP 5: Mount Outside Cover Assembly to Stretcher Bar as shown above.
- Page 7 height-adjustable bench Installation Guides Date: Sept 2019 Page: 7 of 10 Section: SCREENS AND GABLES HABN_225e ATTACH CONNECTING PLATES TO FRAME LEGS MOUNT BOTTOM ANGLE BAR 2.17 2.11 STEP 6: Loosen Legs Hex Bolt to allow enough room for Gable Connecting Plate. Fasten STEP 7: Mount Bottom Angle Bar and secure to Gable Connecting Plate on both sides using Gable Connecting Plates to Frame Legs Tap Quad Pan screws provided...
- Page 8 height-adjustable bench Installation Guides Date: Sept 2019 Page: 8 of 10 Section: SCREENS AND GABLES HABN_225e ATTACH SUPPORT BRACKETS - 1 ATTACH SUPPORT BRACKETS - 2 2.12 2.16 2.14 2.18 2.16 2.16 STEP 8: Fasten Brackets and Cover Plates to Side Cover Assemblies as shown. STEP 9: Fasten Brackets and Cover Plates to Front Covers as shown.
- Page 9 height-adjustable bench Installation Guides Date: Sept 2019 Page: 9 of 10 Section: SCREENS AND GABLES HABN_225e MOUNT SIDE COVER ASSEMBLY STEP 10: Mount Side Cover Assembly onto the Stretcher Bar as shown.
- Page 10 height-adjustable bench Installation Guides Date: Sept 2019 Page: 10 of 10 Section: SCREENS AND GABLES HABN_225e MOUNT FRONT COVER ASSEMBLY PLACE TOP COVERS STEP 11: Mount Front Covers onto the Frame Link and Bottom Connecting Brackets. STEP 12: Place Top Covers as shown above.
Need help?
Do you have a question about the HNBCGESS and is the answer not in the manual?
Questions and answers