Advertisement
Quick Links
complements
Section:
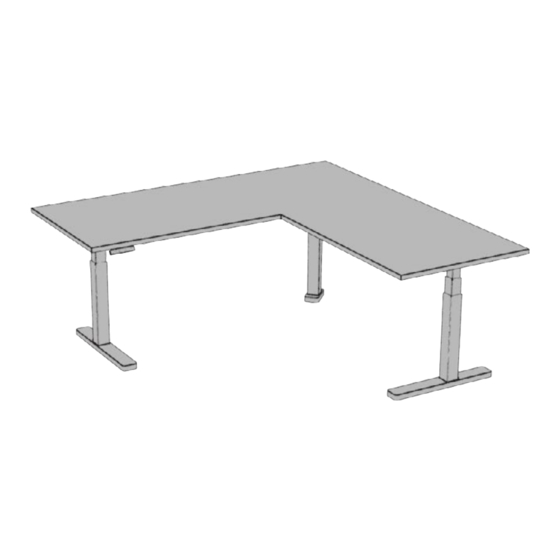
HEIGHT-ADJUSTABLE TABLES
Description:
HA TABLES - QUICK CONNECT
NOTE: Extended Electric Model (9E) is
shown below
Installation Guides
hiSpace Basic Height-Adjustable Extended Corner Complete Table (YJS),
hiSpace Height-Adjustable Leg Riser Kit (YSRK)
B3
B1
B4A
B6
B2
B8
B7
Date:
Sept 2022
COM_136
A1
1 of 19
Page No:
Rev. No: 2
Advertisement

Related Manuals for Teknion hiSpace Basic Height-Adjustable Extended Corner Complete Table YJS


Summary of Contents for Teknion hiSpace Basic Height-Adjustable Extended Corner Complete Table YJS
- Page 1 complements Installation Guides Section: HEIGHT-ADJUSTABLE TABLES Date: Sept 2022 1 of 19 Page No: Description: HA TABLES - QUICK CONNECT COM_136 Rev. No: 2 hiSpace Basic Height-Adjustable Extended Corner Complete Table (YJS), hiSpace Height-Adjustable Leg Riser Kit (YSRK) NOTE: Extended Electric Model (9E) is shown below...
- Page 2 complements Installation Guides Section: HEIGHT-ADJUSTABLE TABLES Date: Sept 2022 2 of 19 Page No: Description: HA TABLES - QUICK CONNECT COM_136 Rev. No: 2 Part and Product Identification B11 - hiSpace Motor Cable E - Complements Plastic Tray Cable Mgmt (YEYS) x1 A - HA Extended Corner Worksurface (N09-9455/10) x 2 A1 - Main Worksurface...
- Page 3 complements Installation Guides Section: HEIGHT-ADJUSTABLE TABLES Date: Sept 2022 Page No: 3 of 19 Description: HA TABLES - QUICK CONNECT COM_136 ATTACH BRACKETS TO WORKSURFACE ATTACH REINFORCEMENT BAR STEP 1: Attach Legs Mount Brackets to Worksurface as shown above. STEP 2: Attach Reinforcement Bar to Worksurface as shown above.
- Page 4 complements Installation Guides Section: HEIGHT-ADJUSTABLE TABLES Date: Sept 2022 Page No: 4 of 19 Description: HA TABLES - QUICK CONNECT COM_136 ATTACH LEGS TO WORKSURFACE SECURE LEGS TO WORKSURFACE STEP 3A: Attach legs to Worksurface as shown above. STEP 4A: Push Legs to Outer side of the Worksurface.
- Page 5 complements Installation Guides Section: HEIGHT-ADJUSTABLE TABLES Date: Sept 2022 Page No: 5 of 19 Description: HA TABLES - QUICK CONNECT COM_136 ATTACH LEGS TO WORKSURFACE SECURE LEGS TO WORKSURFACE NOTE: Fixed Leg Assembly shown Below STEP 3B: Attach legs to Worksurface as shown above. Line up the mating holes on the leg STEP 4B: Push Legs to Outer side of the Worksurface.
- Page 6 complements Installation Guides Section: HEIGHT-ADJUSTABLE TABLES Date: Sept 2022 Page No: 6 of 19 Description: HA TABLES - QUICK CONNECT COM_136 SECURE LEGS TO BRACKETS - 1 SECURE LEGS TO BRACKETS - 2 NOTE: Steps 5 to 19 are identical for Extended height and Fixed height Configurations.
- Page 7 complements Installation Guides Section: HEIGHT-ADJUSTABLE TABLES Date: Sept 2022 Page No: 7 of 19 Description: HA TABLES - QUICK CONNECT COM_136 ATTACH FEET TO LEGS FASTEN FEET TO LEGS STEP 7: Position feet to the mating concentric holes on the leg STEP 8: Attach Feet to legs with screws provided.
- Page 8 complements Installation Guides Section: HEIGHT-ADJUSTABLE TABLES Date: Sept 2022 Page No: 8 of 19 Description: HA TABLES - QUICK CONNECT COM_136 ATTACH FLUSH PLATES TO WORKSURFACE ATTACH BRACKETS TO WORKSURFACE STEP 9: Attach Flush Plates to Worksurface as shown above. STEP 10: Attach Leg Mount Brackets to Return Worksurface as shown above.
- Page 9 complements Installation Guides Section: HEIGHT-ADJUSTABLE TABLES Date: Sept 2022 Page No: 9 of 19 Description: HA TABLES - QUICK CONNECT COM_136 ATTACH BARS TO WORKSURFACE SECURE LEGS TO WORKSURFACE STEP 11: Attach Reinforcement Bars to Return Worksurface as shown above. STEP 12: Attach legs to Retun Worksurface as shown above.
- Page 10 complements Installation Guides Section: HEIGHT-ADJUSTABLE TABLES Date: Sept 2022 Page No: 10 of 19 Description: HA TABLES - QUICK CONNECT COM_136 SECURE LEGS TO WORKSURFACE SECURE LEGS TO BRACKETS STEP 13: Push Legs to Outer side of the Return Worksurface. STEP 14: Install Cam Handle as shown above and Make sure its Locked in then, insert Pin and lock the Cam Handle as shown above.
- Page 11 complements Installation Guides Section: HEIGHT-ADJUSTABLE TABLES Date: Sept 2022 Page No: 11 of 19 Description: HA TABLES - QUICK CONNECT COM_136 ATTACH FEET TO LEGS ATTACH FEET TO LEGS (OPTIONAL) STEP 15: Position feet to the mating concentric holes on the leg STEP 16: Attach Feet to legs with screws provided.
- Page 12 complements Installation Guides Section: HEIGHT-ADJUSTABLE TABLES Date: Sept 2022 Page No: 12 of 19 Description: HA TABLES - QUICK CONNECT COM_136 MERGE RETURN ASSEMBLY STEP 17: Align Return Worksurface Assembly to the side of main Worksurface as shown above.
- Page 13 complements Installation Guides Section: HEIGHT-ADJUSTABLE TABLES Date: Sept 2022 Page No: 13 of 19 Description: HA TABLES - QUICK CONNECT COM_136 FASTEN FLUSH PLATE STEP 18: Fasten screws on the Flush Plate from the Return Worksurface side.
- Page 14 complements Installation Guides Section: HEIGHT-ADJUSTABLE TABLES Date: Sept 2022 Page No: 14 of 19 Description: HA TABLES - QUICK CONNECT COM_136 FASTEN SCREWS ON REFORCEMENT BARS STEP 19: Fasten screws on the Reinforcement Bars on the Main Worksurface side.
- Page 15 complements Installation Guides Section: HEIGHT-ADJUSTABLE TABLES Date: Sept 2022 Page No: 15 of 19 Description: HA TABLES - QUICK CONNECT COM_136 DISASSEMBLE FELT COVER ATTACH WIRING BRACKET NOTE: Only for Extended Electric (9E) STEP 20: Attach legs to Worksurface as shown above. STEP 21: Attach Wiring Bracket as shown above with screws provided.
- Page 16 complements Installation Guides Section: HEIGHT-ADJUSTABLE TABLES Date: Sept 2022 Page No: 16 of 19 Description: HA TABLES - QUICK CONNECT COM_136 ATTACH CONTROL BOX NOTE: Only for Extended Electric (9E) STEP 22: Attach Control Box to Wiring Bracket.
- Page 17 complements Installation Guides Section: HEIGHT-ADJUSTABLE TABLES Date: Sept 2022 Page No: 17 of 19 Description: HA TABLES - QUICK CONNECT COM_136 CONNECT WIRES NOTE: Can use Keypad (D06-4276) OR Toggle Switch (N01-7336) NOTE: Only for Extended Electric (9E) STEP 23: Connect wires as shown above.
- Page 18 complements Installation Guides Section: HEIGHT-ADJUSTABLE TABLES Date: Sept 2022 Page No: 18 of 19 Description: HA TABLES - QUICK CONNECT COM_136 REASSEMBLE FELT COVER SECURE FELT COVER NOTE: Only for Extended Electric (9E) NOTE: Only for Extended Electric (9E) STEP 24: Attach Felt Cover as shown above. STEP 25: Rotate the Screw Locks to secure the cover.
- Page 19 complements Installation Guides Section: HEIGHT-ADJUSTABLE TABLES Date: Sept 2022 Page No: 19 of 19 Description: HA TABLES - QUICK CONNECT COM_136 PLACE CABLE CLAMPS NOTE: Only for Extended Electric (9E) STEP 26: Attach Cable Clamps as shown above with screws provided...
Need help?
Do you have a question about the hiSpace Basic Height-Adjustable Extended Corner Complete Table YJS and is the answer not in the manual?
Questions and answers