
Related Manuals for Holman 47973


Summary of Contents for Holman 47973
- Page 1 Instruction Guide 47973 Holman Rancho Cordova, CA 95742 800-343-7486 InstallationSupport@Holman.com 20230412R4 DATE: __________________...
-
Page 2: Table Of Contents
Step 12 – Install Handle Bar Holder ......................13 Step 13 – Test Ladder Rack ........................13 Before You Begin Read all instructions prior to assembling or installing any Holman rack. Find your vehicle roof rail mounting locations prior to rack assembly. ... -
Page 3: Parts List
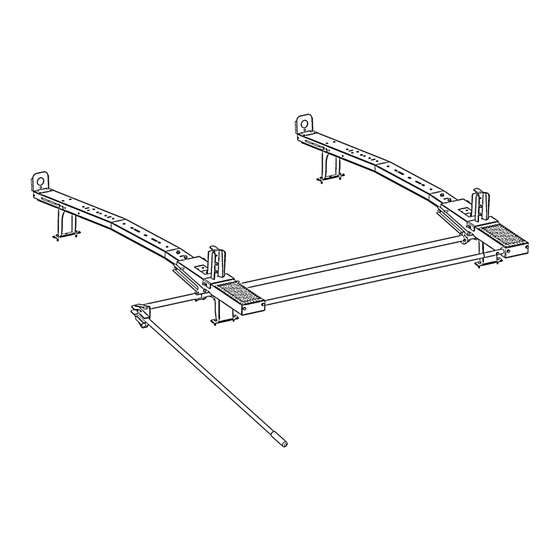
Instructions – 47973 Parts List For Technical Support Call: 800-343-7486, Monday-Friday, 7AM - 4 PM (PST). Page 2... -
Page 4: Hardware
Instructions – 47973 Hardware For Technical Support Call: 800-343-7486, Monday-Friday, 7AM - 4 PM (PST). Page 3... -
Page 5: Step 1 - Determine Installation Location
Instructions – 47973 Hardware (Continued) DO NOT EXCEED MANUFACTURERS WEIGHT CAPACITY FOR ROOF. Step 1 – Determine Installation Location Determine the approximate location for installation of mounting feet on closed service body or cap. The rack will require holes be drilled into the roof, so verify the following. -
Page 6: Step 2 - Assemble Feet
Instructions – 47973 Step 2 – Assemble Feet On the cross bows, use the slots that correspond to the measured distance between the mounts. Using two 3/8” x 3/4" hex head bolts, four 3/8” lock washers and four 3/8” flat washers to loosely attach foot to cross member. -
Page 7: Step 4 - Identify Front And Rear Bows
Instructions – 47973 Step 4 – Identify Front and Rear Bows The front bow will have a cap in one end of the torsion mechanism. REAR BOW FRONT BOW Step 5 – Install Torsion Bar Make sure the pan on each bow is flat against the bow. -
Page 8: Step 6 - Install Ladder Pan Stiffener
Instructions – 47973 Using three more 1/4” x 7/8” hex head screws, 1/4” washers, and 1/4” lock nuts, attach the opposite end of the torsion tube to the rear bow as shown below. REAR BOW Step 6 – Install Ladder Pan Stiffener ... -
Page 9: Step 7 - Install Handle
Instructions – 47973 Step 7 – Install Handle Remove the two 5/16” x 2” flanged head screw, four 5/16” washers, and two 5/16” lock nuts from front bow as circled below. Insert swaged end of operator arm into the torsion mechanism so the holes in the handle tube line up with the holes in the torsion mechanism on the front ladder pan. -
Page 10: Step 8 - Determine Ladder Stop Locations
Instructions – 47973 Step 8 – Determine Ladder Stop Locations NOTE: On each bow, there are two positions available for mounting the ladder stops and ladder hooks based on the size and type of ladder. Ladder stops may be installed either further inboard or further outboard, depending on the ladder to be used. -
Page 11: Step 9 - Install Ladder Stops
Instructions – 47973 Step 9 – Install Ladder Stops Using the hardware in the front bow, bolt ladder stop in orientation shown below. Be sure to place the tab on the ladder stop into the slot on the bow. -
Page 12: Step 11 - Mount Rack
Instructions – 47973 Step 11 – Mount Rack Set rack on top of service body and center rack side-to-side and square to the vehicle. CENTER RACK TO SERVICE BODY Make sure the following clearances and warnings are met. o Be sure front bow is towards front of the vehicle and handle is towards rear of vehicle. - Page 13 Instructions – 47973 Set rack on top of service body and align rack to holes drilled. Using two of the three-hole rubber pads, one 5/16” x 1-1/4” hex bolt, two 5/16” flat washers and two 5/16” lock nut, secure each foot to the service body. Apply sealant to bottom of upper rubber pad and around bolts.
-
Page 14: Step 12 - Install Handle Bar Holder
Instructions – 47973 Step 12 – Install Handle Bar Holder Determine best location for the installation of the handle bar. Most installs are at the rear of the van, on the backside of a shelving unit. This makes it easily accessible when the rear doors are open.
Need help?
Do you have a question about the 47973 and is the answer not in the manual?
Questions and answers