
Related Manuals for Holman 40913


Summary of Contents for Holman 40913
- Page 1 Instruction Guide 40913 Holman Rancho Cordova, CA 95742 800-343-7486 InstallationSupport@Holman.com 20230913R1 DATE: ________________...
-
Page 2: Table Of Contents
Tape Measure Rubber Mallet Before You Begin • Read all instructions prior to assembling or installing any Holman product. • Always locate your installation locations prior to performing any work. • ENSURE SAFETY WHILE INSTALLING OR DRILLING INTO VEHICLE. For Technical Support Call: 800-343-7486, Monday-Friday, 7AM - 4 PM (PST) -
Page 3: Parts List
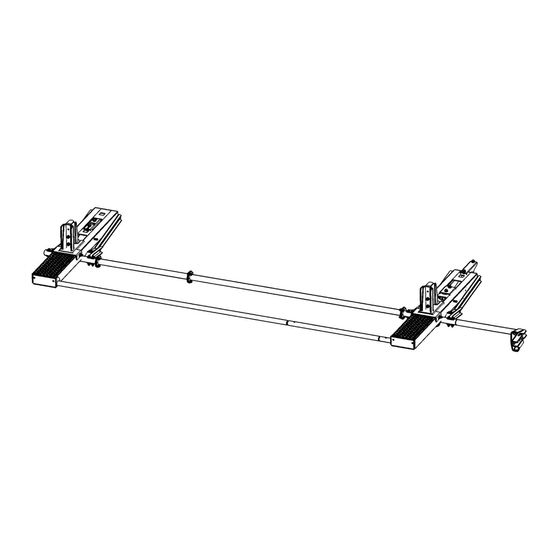
Instructions – 40913 Parts List For Technical Support Call: 800-343-7486, Monday-Friday, 7AM - 4 PM (PST) Page 2... -
Page 4: Hardware
Instructions – 40913 Hardware For Technical Support Call: 800-343-7486, Monday-Friday, 7AM - 4 PM (PST) Page 3... -
Page 5: Step 1 - Attach Dampener Mounts
Instructions – 40913 DO NOT EXCEED MANUFACTURERS WEIGHT CAPACITY FOR ROOF! Step 1 – Attach Dampener Mounts Front End Only: • Using 3/8” x 3/4” bolts, 3/8” lock washers, and 3/8” flat washers, bolt dampener mounting bracket underneath the crossbow, as shown below. -
Page 6: Step 3 - Attach Rear Pivot Assembly
Instructions – 40913 Step 3 – Attach Rear Pivot Assembly Rear End Only: You may need to un-bolt the crossbow from the mounting foot to complete this step. • Using 3/8” x 3/4” hex bolts, 3/8” lock washers, and 3/8” flat washers, bolt torque tube pivot assembly underneath the rear crossbow, as shown below. -
Page 7: Step 5 - Attach Torque Tube
Instructions – 40913 Step 5 – Attach Torque Tube • Using 1/4” x 7/8” hex bolts, 1/4” lock nuts, and 1/4” flat washers, attach the torque tube extension to the torque tube. • Check that the distance between feet on both driver and passenger side are EXACTLY the same to insure the bow assemblies are parallel. -
Page 8: Step 7 - Assemble Ladder Pan
Instructions – 40913 Step 7 – Assemble Ladder Pan • Align cutouts in ladder pan assembly with the roller wheels and guide the arms onto the torque tube pivot assembly. • As you lower the pan assembly onto the rollers, remove the bolt, washers, and spacers pre- installed on ladder pan and secure the arm with ladder pan. -
Page 9: Step 9 - Install Ladder Hooks And Ladder Stops
Instructions – 40913 Step 9 – Install Ladder Hooks and Ladder Stops • Next attach the ladder hooks and ladder stops. Attach ladder hooks to ladder pans on 5/16” studs in desired location. • Attach ladder stops to coincide with ladder hooks by removing 3/8” x 3/4” bolt and placing stop so the tab on the stop goes into the corresponding slot. -
Page 10: Step 10 - Attach Ladder Pan Stiffener
Instructions – 40913 Step 10 – Attach Ladder Pan Stiffener • First using 5/16” x 1-1/2” Hex bolt with two 5/16” flat washers and 5/16” lock nut to connect the ladder pan stiffener and USE sealant AROUND HOLES. • Attach ladder pan stiffener, in the closed position, using 5/16” x 5/8” bolts with 5/16” lock washers and 5/16”... -
Page 11: Step 11 - Install Rubber Bumpers
Instructions – 40913 Step 11 – Install Rubber Bumpers • Place the rubber bumper to both front and rear crossbow as shown below. GO BACK AND TIGHTEN ALL HARDWARE. INSTALLATION AND ASSEMBLY ARE COMPLETE. Front Rear For Technical Support Call: 800-343-7486, Monday-Friday, 7AM - 4 PM (PST)
Need help?
Do you have a question about the 40913 and is the answer not in the manual?
Questions and answers