
Subscribe to Our Youtube Channel
Related Manuals for Holman Pro II Truck with Cap Rack


Summary of Contents for Holman Pro II Truck with Cap Rack
- Page 1 Assembly and Installation Guide Pro II Truck with Cap Rack Holman Rancho Cordova, CA 95742 800-343-7486 InstallationSupport@Holman.com 20230508R5 DATE: __________________...
- Page 2 Instructions – Pro II with Cap For Technical Support Call: 800-343-7486, Monday-Friday, 7AM - 4 PM (PST) Page 1...
-
Page 3: Table Of Contents
Always check for wires, fuel tanks and lines, brake lines and other important vehicle functionality items prior to drilling and installing all products. Too much weight will greatly reduce the stability of your vehicle. Holman makes no representation or warranty as to the amount of weight your vehicle can safely carry. -
Page 4: Tools Needed
Torque Wrench * Included. Before You Begin Read all instructions prior to assembling or installing any Holman product. Always locate your installation locations prior to performing any work. ENSURE SAFETY WHILE INSTALLING OR DRILLING INTO VEHICLE. Side Channel Parts List Leg &... -
Page 5: Hardware
Instructions – Pro II with Cap Leg & Bar Kit Parts (Continued) Hardware For Technical Support Call: 800-343-7486, Monday-Friday, 7AM - 4 PM (PST) Page 4... - Page 6 Instructions – Pro II with Cap Hardware (Continued) For Technical Support Call: 800-343-7486, Monday-Friday, 7AM - 4 PM (PST) Page 5...
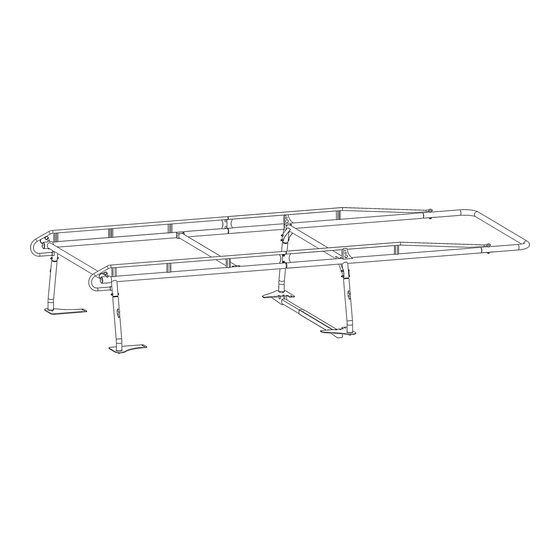
- Page 7 Instructions – Pro II with Cap PRO II TRUCK RACK EXPLODED VIEW For Technical Support Call: 800-343-7486, Monday-Friday, 7AM - 4 PM (PST) Page 6...
-
Page 8: Sealant Application
Instructions – Pro II with Cap Sealant Application Proper sealant application is critical to preventing water penetration inside the rack. Apply a healthy bead of sealant around every swaged joint as shown. Improper sealing can lead to water penetration and rust on inside surfaces. -
Page 9: Step 2 - Attach Front Tube
Instructions – Pro II with Cap Step 2 – Attach Front Tube Apply sealant to front side-channel swaged joint. Insert front side-channel swaged joint into front tube until bolt holes in tube and side-channel align. Loosely fasten front tube to side channel using 1/2”... -
Page 10: Step 5 - Attach Rear Legs
Instructions – Pro II with Cap Be sure to apply sealant between each washer and leg 3/8” X 3” HEX cup as you assemble. BOLT Fasten and seal leg to leg cup using two 3/8” x 3” hex head bolts, four 3/8”... -
Page 11: Step 6 - Attach Rear Crossbar
Instructions – Pro II with Cap Step 6 – Attach Rear Crossbar Apply sealant to around black cap fastening flanges. Using a mallet or dead blow hammer, tap black cap into rear crossbar tubing on the side opposite the gusset welded to the rear crossbar. -
Page 12: Step 8 - Mount Installation Preparation
Instructions – Pro II with Cap Using 1/2” x 1” hex bolts, 1/2” lock washers, and 1/2” flat washers, bolt the supported mounting plates to the bottom of the front legs. Snug tighten but allow movement. Using 1/2” x 1” hex bolts, 1/2” lock washers, and 1/2” flat washers, bolt the rear mounting plates to the bottom of the back legs. - Page 13 Instructions – Pro II with Cap Measure the inside dimension of the mount plates just above the support bar, and the outside dimension of the ridges (if any) on the bottom of your shell. It may be necessary to notch this ridge to avoid Ridge interference with the mount plates.
- Page 14 Instructions – Pro II with Cap Stake Pocket Mounting If the inside of your truck bed has a double wall and it is not possible to locate a bolt on the mounting plate nearest the leg, we recommend using our accessory STAKE POCKET T-NUTS to provide an ADDITIONAL attachment point.
-
Page 15: Step 9 - Mount Installation
Instructions – Pro II with Cap Step 9 – Mount Installation Set the mount plates back on the truck, in exactly the same location that they were before. Make certain each mount plate is square with the bed rail and dead horizontal. We recommend that you clamp each mount plate in position before drilling through the truck's bed rail. -
Page 16: Step 10 - Install Shell And Rack
Instructions – Pro II with Cap Step 10 – Install Shell and Rack Apply adhesive foam tape (NOT INCLUDED) between the footplates and camper shell, along the bed rail, and along the top of the bulkhead, to seal the gaps. ...
Need help?
Do you have a question about the Pro II Truck with Cap Rack and is the answer not in the manual?
Questions and answers