
Subscribe to Our Youtube Channel
Related Manuals for Holman 12004


Summary of Contents for Holman 12004
- Page 1 Installation Guide Pro Forklift Service Body Rack Holman Rancho Cordova, CA 95742 800-343-7486 InstallationSupport@Holman.com 20230526R1 DATE: __________________...
- Page 2 Always check for wires, fuel tanks and lines, brake lines and other important vehicle functionality items prior to drilling and installing all products. Too much weight will greatly reduce the stability of your vehicle. Holman makes no representation or warranty as to the amount of weight your vehicle can safely carry.
- Page 3 Instructions – PRO Forklift Service Body Rack 4. Standard mounting is on the rear panel. Check to ensure the rear panel of the service body is free of taillights or other obstructions (inside or out) in the area where the rear legs of the rack bolt to the body.
- Page 4 Instructions – PRO Forklift Service Body Rack For Technical Support Call: 800-343-7486, Monday-Friday, 7AM - 4 PM (PST) Page 3...
-
Page 5: Table Of Contents
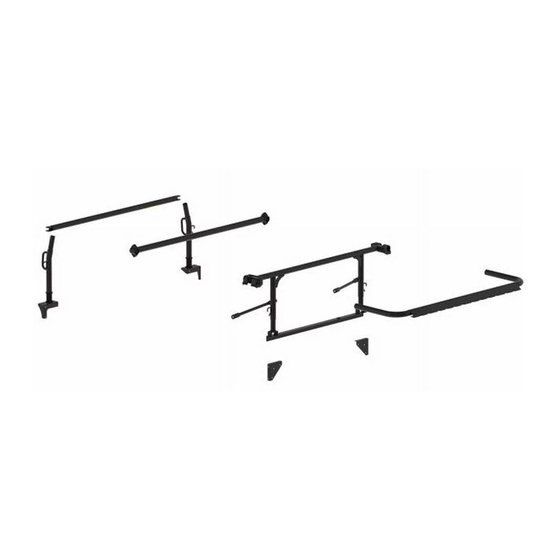
Instructions – PRO Forklift Service Body Rack Table of Contents Leg and Bar Kit Parts List ........................ 5 Hardware Kit ............................ 7 Hardware (Continued) ........................8 Sealant Application .......................... 9 Step 1 – Measure Service Body and Truck ..................9 Step 2 –... -
Page 6: Leg And Bar Kit Parts List
Instructions – PRO Forklift Service Body Rack Leg and Bar Kit Parts List For Technical Support Call: 800-343-7486, Monday-Friday, 7AM - 4 PM (PST) Page 5... - Page 7 Instructions – PRO Forklift Service Body Rack Side Channel Parts List * Extra crossbar is included in extended and crew cab kits only. For Technical Support Call: 800-343-7486, Monday-Friday, 7AM - 4 PM (PST) Page 6...
-
Page 8: Hardware Kit
Instructions – PRO Forklift Service Body Rack Hardware Kit For Technical Support Call: 800-343-7486, Monday-Friday, 7AM - 4 PM (PST) Page 7... -
Page 9: Hardware (Continued)
Instructions – PRO Forklift Service Body Rack Hardware (Continued) For Technical Support Call: 800-343-7486, Monday-Friday, 7AM - 4 PM (PST) Page 8... -
Page 10: Sealant Application
Instructions – PRO Forklift Service Body Rack Sealant Application Proper sealant application is critical to preventing water penetration inside the rack. Apply a healthy bead of sealant around every swaged joint as shown. Improper sealing can lead to water penetration and rust on inside surfaces. ... -
Page 11: Step 2 - Install Front Leg Angle Mount
Instructions – PRO Forklift Service Body Rack Step 2 – Install Front Leg Angle Mount Set front leg angle mount on top of the bulkhead, with flat face towards the rear. Center angle mount side-to-side. Mark location of holes in angle mount onto bulkhead. CENTER ... -
Page 12: Step 4 - Assemble Front Leg Assembly
Instructions – PRO Forklift Service Body Rack Using an 11/32” drill bit, drill a hole in each location marked. Be sure drilling location is clear of wires, fuel lines, brake lines and other important vehicle functionality items. Use a drill bit stop collar. ... -
Page 13: Step 6 - Attach Wind Deflector
Instructions – PRO Forklift Service Body Rack Driver-Side Side Channels Passenger-Side Side Channels Apply sealant to both top and bottom swage joints. Insert rear side-channel swaged joints into middle side-channel tubes until holes in splice plates align. Insert front side-channel swaged joints into middle side-channel tubes until holes in splice plates align. -
Page 14: Step 7 - Attach Front Tube
Instructions – PRO Forklift Service Body Rack Step 7 – Attach Front Tube Apply sealant to front side-channel swaged joint. Insert front side-channel swaged joint into front tube until bolt holes in tube and side-channel align. Apply sealant around top hole. ... -
Page 15: Step 10 - Attach Rear Legs
Instructions – PRO Forklift Service Body Rack Step 10 – Attach Rear Legs Flip rack upside down. Apply sealant to swaged joint on one leg and around holes in leg cup. Orient leg correctly with side channel, with rope hook away from center of rack, and then insert leg into leg cup until holes in leg and leg cup align. - Page 16 Instructions – PRO Forklift Service Body Rack Hook two of the side channel clamps into the slots on the head of the strapping bracket. Using a 5/16” x 1” hex bolt, a 5/16” lock washer, and 5/16” flanged lock nut, LOOSELY fasten each clamp to the head of the leg.
-
Page 17: Step 12 - Install Foot To Rack
Instructions – PRO Forklift Service Body Rack Step 12 – Install Foot to Rack Depending on the model of service body the rack is installed on, it may be necessary to install the rear feet pointed inwards instead of the typical rear foot installation pointed outwards. FEET DIRECTED OUTSIDE FEET DIRECTED INSIDE Also depending on the model of service body the rack is installed on, it may be necessary to install... -
Page 18: Step 13 - Install Rack Onto Service Body
Instructions – PRO Forklift Service Body Rack Step 13 – Install Rack onto Service Body Lift rack and set legs onto front leg angle mount. Loosely fasten front leg angle mount onto legs using two 1/2” x 1-1/4” hex bolts, two 1/2” lock washers, and two 1/2”... -
Page 19: Step 14 - Install Support Arm
Instructions – PRO Forklift Service Body Rack Step 14 – Install Support Arm Remove 1/2 lock nut and washer from ONLY one leg on side of rack. Position lower end of support arm against inside of service body. If necessary, support arm may need to be moved to opposite side of front leg. -
Page 20: Troubleshooting
Instructions – PRO Forklift Service Body Rack From front to back, with lock pin installed in rear take-out bar, tighten all side channel and upper front leg screws and bolts. Tighten front leg and crossbar hardware. Tighten mounting hardware. ... -
Page 21: Install Extra Crossbar
Instructions – PRO Forklift Service Body Rack Install Extra Crossbar Using 3/8” x 1” carriage bolts, 3/8” washers, and 3/8” thin lock nuts, bolt each end of extra crossbar to bottom tube of side channels. Tighten. Using 3/8” set screw, tighten telescoping crossbars. GO BACK AND TIGHTEN ALL HARDWARE.
Need help?
Do you have a question about the 12004 and is the answer not in the manual?
Questions and answers