
Subscribe to Our Youtube Channel
Related Manuals for Holman 40963


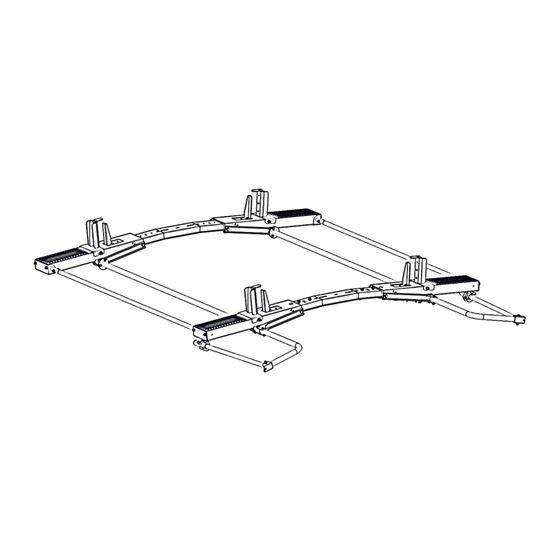
Summary of Contents for Holman 40963
- Page 1 Assembly Guide 40963 Holman Rancho Cordova, CA 95742 800-343-7486 InstallationSupport@Holman.com 20220908R2 DATE: ________________...
-
Page 2: Table Of Contents
Instructions – 40963 PLEASE READ ALL INSTRUCTIONS AND WARNINGS PRIOR TO ASSEMBLING, INSTALLING, AND USING THIS PRODUCT. Warning Always check for wires, fuel tanks and lines, brake lines and other important vehicle functionality items prior to drilling and installing all products. -
Page 3: Parts List
Instructions – 40963 Parts PART NUMBER 40800-05 40800-06 40800-07 40800-08 40800-16 40800-21 For Technical Support Call: 800-343-7486, Monday-Friday, 7AM - 4 PM (PST) Page 2... - Page 4 Instructions – 40963 PARTS Con’t For Technical Support Call: 800-343-7486, Monday-Friday, 7AM - 4 PM (PST) Page 3...
-
Page 5: Hardware List
Instructions – 40963 Hardware 1 of 2 For Technical Support Call: 800-343-7486, Monday-Friday, 7AM - 4 PM (PST) Page 4... - Page 6 Instructions – 40963 Hardware 2 of 2 For Technical Support Call: 800-343-7486, Monday-Friday, 7AM - 4 PM (PST) Page 5...
-
Page 7: Step 1 Remove Load Plates
Instructions – 40963 Step 1 – Load Plates If installed, remove load plates at the end of each bow, opposite from the pan mechanism. Repeat on both bows. NOTE: Determine front and rear pan. The rear pan will have two mounts on one arm. -
Page 8: Step 2 Cantilever Mechanism
Instructions – 40963 Step 2 – Mount Cantilever Mechanism Mount cantilever mechanism to the under side of the rear bow in the location shown. Use existing hardware. Be sure to have the flat-round piece towards the other bow assembly. -
Page 9: Step 3 Damper Mount
Instructions – 40963 Step 3 – Install Damper Mount Install dampers in orientation shown on the rear bow. Use existing 3/8” hardware for installation. Snug tighten. For Technical Support Call: 800-343-7486, Monday-Friday, 7AM - 4 PM (PST) -
Page 10: Step 4 Dampers
Instructions – 40963 Step 4 – Install Dampers Install dampers in orientation shown. NOTE: Shown without bow for clarity. Install end of damper to damper mount using 2” pin, cotter pin and plastic spacer in orientation shown. The plastic spacer goes in between two dampers. -
Page 11: Step 5 Latch Assembly
Instructions – 40963 Step 5 – Install Latch ASM Install latch assembly to the exposed end of the rear bow. Use 5/16” x 3/4" carriage bolts , 5/16” flat washers and 5/16” lock nuts in orientation shown. ... -
Page 12: Step 6 Rear Pan
Instructions – 40963 Step 6 – Install Rear Pan Place rear pan on top of wheels and bow. Be sure the wheel caps do NOT come off. Slide arm from bow, and align ONE hole with hole in the cantilever tube mechanism in the position shown. -
Page 13: Step 7 Handle
Instructions – 40963 Step 7 – Attach Handle Attach handle to rear pan using hardware removed in previous step. TIGHTEN. For Technical Support Call: 800-343-7486, Monday-Friday, 7AM - 4 PM (PST) Page 12... -
Page 14: Step 8 Front Mechanism
Instructions – 40963 Step 8 – Install Front Mechanism Place cantilever housing under bow as shown. Bolt cantilever housing to bow using existing bolts. Bolt together using existing hardware. There are three sets of hardware attaching the cantilever housing to the bow. -
Page 15: Step 9 Front Pan
Instructions – 40963 Step 9 – Install Front Pan Place front pan on top of front bow. Bolt pan arms to cantilever housing using existing bolts. Snug tighten, but allow movement. For Technical Support Call: 800-343-7486, Monday-Friday, 7AM - 4 PM (PST) -
Page 16: Step 10 Torque Tube
Instructions – 40963 Step 10 – Install Torque Tube Install torque tube to front pan assembly. Bolt to front pan assembly using 1/4” x 7/8” hex head bolts, 1/4" flat washers and 1/4" lock nuts. Repeat at both front and rear bows. -
Page 17: Step 11 Ladder Pan
Instructions – 40963 Step 11 – Install Ladder Pan Attach pan support to both front and rear bow using 5/16” x 5/8” hex head bolt, 5/16” split lock washer and a 5/16” flat washer. TIGHTEN. For Technical Support Call: 800-343-7486, Monday-Friday, 7AM - 4 PM (PST) -
Page 18: Step 12 Ladder Hooks
Instructions – 40963 Step 12 – Install Ladder Hooks Using the hardware and installed studs on the bows, loosen nuts and slide ladder hook into place. There are two sets of studs attached to the pans, use appropriate set depending on what ladder you are using. - Page 19 Instructions – 40963 GO BACK AND TIGHTEN ALL HARDWARE. INSTALLATION AND ASSEMBLY ARE COMPLETE. For Technical Support Call: 800-343-7486, Monday-Friday, 7AM - 4 PM (PST) Page 18...
Need help?
Do you have a question about the 40963 and is the answer not in the manual?
Questions and answers