Advertisement
Quick Links
Thank you for purchasing our product. Before installing/operating the product, read the instructions carefully and retain them
for future reference.
Attention!
● For installation, follow the steps described. Any damage caused by wrong installation shall be imputed to the users.
● To avoid a short circuit from occurring do not pull or modify the wires during installation.
● Do not disassemble or change any parts. Opening and dissassembling this unit will void any warranty.
● Maintenance and repairs should be executed by our professionals only.
Symbol description:
NOTE
Some procedures must be followed to avoid damages to the product.
WARNING!
Certain procedure must be followed to avoid damages to yourself, to the vehicle or to others.
1
Accessories
1
LCD meter X 1
6
Meter bracket X 1
11
12
M5 X 18L screw X 2
2-1
Wiring installation instructions
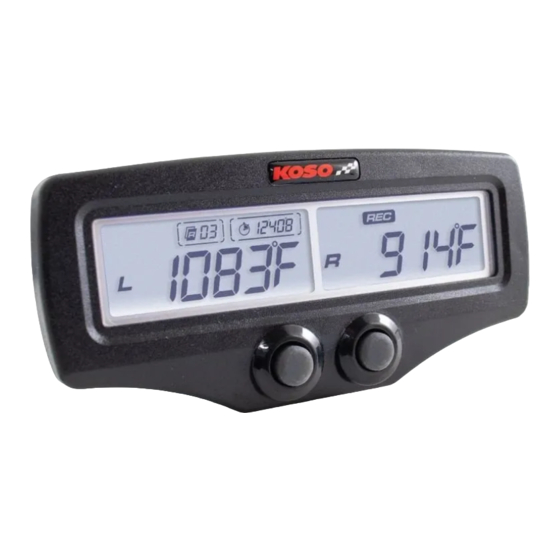
Temperature R
Temperature L
WARNING!
To avoid injuries caused by the engine heat, install the
sensor while engine is cold.
2-2
Installation instructions
2
3
Power wire X 1
7
8
Rubber X1 (A)
M4 washer X 2(A)
13
M5 washer X 2(B)
(A)
(B)
EGT temperature sensor(Option accessory 1)
Power wire(Accessory 2)
EGT temperature sensor
(Option accessory 1)
Exhaust clamp(Accessory 3)
When installing, follow the steps below
1.LCD meter(Accessory 1)
2.Meter bracket(Accessory 5)
3.M5 gasket x2(Accessory 11-B)
4.M5 x 18L screw x2(Accessory 10)
5.M4 x 18L screw x2(Accessory 9)
6.M4 gasket x2(Accessory 11-A)
EGT temperature
4
Exhaust clamp X 2
sensor
9
Rubber X 1 (B)
Steel plate X 1
14
M4 X P0.8 nut X 2
M3 allen key X 1
Black / Ground wire connect to
the vehicle body or the engine
(must be a good ground)
Regulator
Light
Red / Postive pole
(Connect to the battery DC 12V)
Mid-way connector
Flash
Hold the
Button
1 second
5
Mid-way connector X 1
10
M4 X 14L screw X 2
15
M4 allen key X 1
Stator
Engine
(Accessory 4)
Exhaust clamp
(Accessory 3)
7.Rubber(Accessory 6)
8.Rubber(Accessory 7)
9.Steel plate(Accessory 8)
10.M4 x P0.8 nut x2(Accessory 12)
wh006ba05a_P6-1
Light on
Hold the
Button
3 seconds
Advertisement

Related Manuals for Koso EGT-02 EVO


Summary of Contents for Koso EGT-02 EVO
- Page 1 Thank you for purchasing our product. Before installing/operating the product, read the instructions carefully and retain them for future reference. Attention! ● For installation, follow the steps described. Any damage caused by wrong installation shall be imputed to the users. ●...
-
Page 2: Basic Function Instructions
Basic function instructions Record Play mode Speed Backlight brightness ●Maximum number of recorded runs: 50 runs 1x rewind/pause 1/3x play/pause ●Setting range:1-5~5-5 ●Maximum recording time for a single record run: 99m 59s 9; 1x play/pause 3x play/pause ●Setting unit:1 recording will stop upon reaching the maximum time. ●... - Page 3 Over EGT L Warning Setting ●EX:To set the Warning for ●Example:Set the Warning for temp (EGT L) to 1200℉ value temp (EGT L) from 1000℉ to 11,000 RPM to 1200℉ ●Press the left button once to ●Press the left button once to choose the setting number.
-
Page 4: Backlight Brightness Setting
Backlight Brightness Setting ●Example:Set the backlight ●EX:To set backlight brightness brightness value from 3/5 to 5/5. value to 5/5. ●Press the left button once to ●Press the right button once to enter the main screen. choose the setting number. Now the setting value will blink. NOTE Setting range:1/5 ~ 5/5 ●Main screen... - Page 5 ●Recording screen, ●playback Screen。 Press the right & left buttons to enter the playback Screen. 5-3 Operating instruction of the playback screen ●Press the left button once to ●Recording screen, enter the play / stop screen. Press the right & left buttons to enter the playback screen.
-
Page 6: Troubleshooting
6 Troubleshooting The following situations do not indicate malfunctions of the product. Check the following before taking it in for repair. Trouble Check item Trouble Check item The meter doesn't ●The power isn't supplied to the gauge. Voltage doesn't ●Wiring might be poorly installed appear or appears work when the →Make sure the wiring is connected.
Need help?
Do you have a question about the EGT-02 EVO and is the answer not in the manual?
Questions and answers