Table of Contents
Advertisement
INTRODUCTION
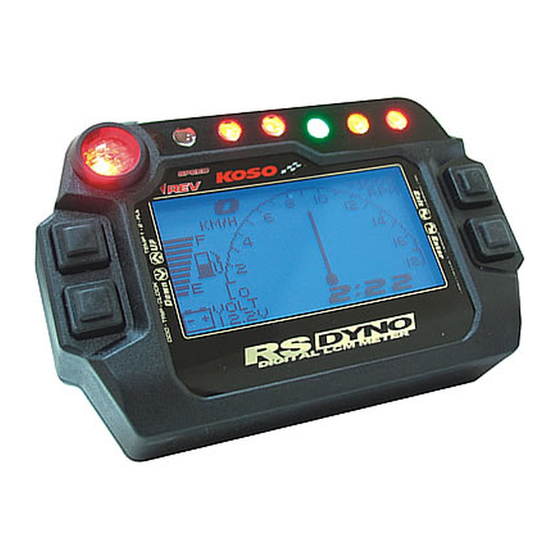
Thank you for purchasing KOSO RS DYNO digital LCM meter the meter is
displayed by lcm with led back light, before operating, please read the
instruction carefully and follow it to install the meter.
NOTICE
1.The lcd meter is apply for DC 12V.
2.For installation, please follow the steps described in manual. Any
damage caused by wrong installation shall be imputed to the users.
3.Don't break or modify the wire terminal. To avoid the short circuit, please
don't pull the wire when installing.
4.Do not disassemble or change any parts excluding the manual
description.
5.The interior examination or maintenance should be executed by our
professionals.
MARK MEANING:
You could get the installation details from the information behind the mark.
Some processes must be followed to avoid the affection caused by wrong installation.
WARNING!
Some processes must be followed to avoid damages to yourself or the public.
CAUTION!
Some processes must be followed to avoid the damage to the vehicle.
Content
1-1
1-2
2-1
2-2
3-2
3-5
3-6
4
1-1
Cortesia de www.motomarcadores.com
4-6 Over temperature (Water temperature)
4-7 Over temperature (Oil temperature)
4-8 Tire size adjustment/ sensor point setting
instruction
4-9 The clock setting instruction
4-10 Fuel sensor impedance & insufficient fuel
warning setting instruction
4-11 The target speed timer / target distance
timer setting
Target speed timer test
5-1
Target distance timer test
5-2
5-3
The top speed test
Trouble shooting
6
Guarantee & notice of products
7
Guaranty
8
Cortesia de www.motomarcadores.com
1-1
Accessory
1
2
Main wiring X 1
Meter X 1
RPM wire set
Temp sensor
4
5
(Type B) X 1
wire set X 2
Digital speed
D6 X 5L mm
7
8
signal sensor X 1
magnet X 6
M8/ S type speed
M10/ S type speed
10
11
sensor bracket X 1
sensor bracket X 1
Next page
RPM wire set
3
(Type A) X 1
PT1/8 water temp
6
sensor X 2
Connect
9
terminal X 7
M5 X 5L hexago-
12
nal bolt X 2
Advertisement
Table of Contents

Related Manuals for Koso RS DYNO


Summary of Contents for Koso RS DYNO
-
Page 1: Table Of Contents
Cortesia de www.motomarcadores.com INTRODUCTION Accessory Thank you for purchasing KOSO RS DYNO digital LCM meter the meter is RPM wire set displayed by lcm with led back light, before operating, please read the Main wiring X 1 Meter X 1 (Type A) X 1 instruction carefully and follow it to install the meter. -
Page 2: Accessory
Cortesia de www.motomarcadores.com Accessory Option accessory Meter bracket Oil temp sensor 2.5 mm spanner 4 mm spanner Disc magnet Active speed X 1 set adapter screw sensor 5/16-18 X 22.1L M12 X P1.5 X 15L M5 X P0.8 X 12L M14 X P1.25 X 15L M6 X P1.0 X 12.6L M14 X P1.5 X 15L... -
Page 3: Wiring Installation Instructions
Cortesia de www.motomarcadores.com Wiring installation instructions Meter (Accessory 1) Yellow / fuel (-) Orange / L turn signal (+12V) Green / white- neutral (-) Blue / R turn signal (+12V) Water temperature Gray / oil light (+12V/-) PT1/8 (Accessory 6) Please install the temp Temp sensor wire (Accessory 5) sensor to the position you want to measure. -
Page 4: Installation Instructions
Cortesia de www.motomarcadores.com MOTO/SCOOTER Installation instructions S type speed sensor bracket instruction Put the magnet into the brake Install the s type sensor Adjust the sensor bracket position disc screw hole. bracket. to make sure that the sensor could face the magnet to prevent bad speed signal or no signal! BELOW BELOW... -
Page 5: Basic Function Instruction
Cortesia de www.motomarcadores.com Basic function instruction Standard screen function instruction Water/ oil indicator Speedometer Indicator lights Indicator lights Display range: 0~360 km/h (0~223 MPH). Display range: 0~150 C (32~302 F) From left to right: over RPM, speeding, over temperature From left to right: over RPM, speeding, over temperature Display unit: km/h or MPH can be changed. -
Page 6: The Button Function Instruction
Cortesia de www.motomarcadores.com The button function instruction The screen switch instruction In setting screen: BUTTON Press button to get back to the main Press button one time to enter the screen. setting screen or to back to the main screen from any screens. In main screen: Press button to enter the... -
Page 7: Main Screen Function Switch Instruction
Cortesia de www.motomarcadores.com Digital screen function switch instruction Main screen function switch instruction In main screen: Press button to switch the In digital screen: Press button to switch the oil temperature to the fuel indicator. oil temperature to the fuel indicator. EX. -
Page 8: The Setting Screen Instruction
Cortesia de www.motomarcadores.com The setting screen instruction Function, setting instruction Display range: 0~360 km/h (0~223 MPH) Press button to select the screen you want , Speedometer in order of S-1, S-2 ,S-3. Display unit: km/h & MPH for alternative Press button to select the screen you Display internal <0.5 second... -
Page 9: Speed Unit Setting
Cortesia de www.motomarcadores.com Function, setting instruction Speed unit setting Display internal <0.5 second Press button once (Or the button times) to select the speed unit setting screen. Over temperature warning Setting range: 50~150 C (122~302 F) (water & oil) light Setting unit: 1 C ( F) Display range: 10 levels Fuel indicator... -
Page 10: Cycle/ Piston Setting
Cortesia de www.motomarcadores.com Cycle/ piston setting Press button to select the number Press button 2 times (Or the button you want to input. 10 times) to select the strokes/pistons setting screen. 2-stroke pistons are 1,2,3,4. 4-stroke pistons are 1,2,3,4,5,6,8,10,12. Now the 1 is flashing! CAUTION! Make sure the correct strokes and pistons before setting. -
Page 11: The Temperature Unit Setting
Cortesia de www.motomarcadores.com Cycle/ piston setting The temperature unit setting Press button to choose the range Press button 3 times (Or the button you need. 9 times) to select the temperature unit setting screen. The ranges for selection are 9,000 RPM and 18,000 RPM. -
Page 12: Speeding Warning Light Setting
Cortesia de www.motomarcadores.com Speeding warning light setting Press button to select the other Press button 4 times (Or the button 8 times) to select the speeding warning light setting screens. setting screen. P.S. P.S. The speeding warning light is set to be 60 km/h, the red light flashes when speeding. -
Page 13: Over Rpm Warning Light Setting
Cortesia de www.motomarcadores.com Over RPM warning light setting Press button to select the other Press button 5 times (Or the button 7 times) to select the over RPM warning light setting screens. setting screen. P.S. P.S. The over RPM warning light will light when the RPM reaches your setting. - Page 14 Cortesia de www.motomarcadores.com Over temperature (Water temperature) warning light 1 setting Press button to select the other Press button 6 times (Or the button 6 times) to select the over temperature warning setting screens. light 1 setting screen. P.S. P.S. If the warning light is set to be 90 C, the red light will flash when the oil...
- Page 15 Cortesia de www.motomarcadores.com Over temperature (Oil temperature) warning light 2 setting Press button to select the other Press button 7 times (Or the button 5 times) to select the over temperature warning setting screens. light 2 setting screen. P.S. P.S. If the warning light is set to be 90 C, the red light will flash when the oil...
- Page 16 Cortesia de www.motomarcadores.com Tire size adjustment/ sensor point setting instruction Press button to enter the sensor point Press button 8 times (Or the button 4 times) to select the tire size adjustment/ setting screen. sensor point setting screen. EX. Now the circumference is changed from 1,250 mm to 1,300 mm.
- Page 17 Cortesia de www.motomarcadores.com The clock setting instruction Press button to return to the clock setting Press button 9 times (Or the button times) to select the clock setting instruction instruction screen. setting screen. EX. The minute is changed from 0 to 1. If you just want to make the setting, press button to back to the main screen.
- Page 18 Cortesia de www.motomarcadores.com 4-10 Fuel sensor impedance & insufficient fuel warning setting instruction Press button to select the number Press button 10 times (Or the button you want to input. 2 times) to select the fuel impedance & insufficient fuel warning setting screen. The setting range: 10~50 % .
- Page 19 Cortesia de www.motomarcadores.com 4-11 The target speed timer/ target distance timer setting Press button to select the number Press button 11 times (Or the button once) to select the target speed timer/ target you want to input. distance timer setting The target distance timer setting range: 50~1000 m (1/32~20/32 mile).
- Page 20 Cortesia de www.motomarcadores.com Target speed timer test WARNING! P.S. P.S. 0 km/h 3 km/h Speed up 120 km/h Please use this function at racetrack to avoid traffic accidents. The timer and trip meter will In the power test screen, press once (Or the start to count automatically button...
- Page 21 Cortesia de www.motomarcadores.com Target speed timer test Target distance timer test Press button to save the record and then WARNING! enter the new record screen. Please use this function at racetrack to avoid When you save the new record, the traffic accidents.
- Page 22 Cortesia de www.motomarcadores.com Target distance timer test Press button to save the record and then P.S. P.S. enter the new record screen. 0km/h 3 km/h Speed up 63 km/h When you save the new record, the The timer and trip meter will previous record will be replaced.
- Page 23 Cortesia de www.motomarcadores.com The top speed test WARNING! P.S. P.S. 0 km/h 3 km/h Speed up 120 km/h Please use this function at racetrack to avoid traffic accidents. The timer is automatic, so when In the Power test screen, press 3 times (Or your bike start to move, the the button...
- Page 24 Cortesia de www.motomarcadores.com The top speed test Trouble shooting The following situation do not indicate malfunction of the meter. The record screen. Please check the following before taking it in for repair. If you already finished the test, press button Trouble Check item to back to the main screen.
- Page 25 Cortesia de www.motomarcadores.com Guarantee & notice of products We hope our products are perfect. Should it happened that our products were bad qualities, we would do our best to exchange the same items to you. Furthermore, we apologize we could not exchange the items with breakdowns or damages by human.
Need help?
Do you have a question about the RS DYNO and is the answer not in the manual?
Questions and answers