Advertisement
Quick Links
INSTALLATION
●
Thank you for purchasing the our product. Before installing, please read the instruction carefully and keep it for future reference.
Attention!
● For installation, please follow the steps described in manual. Any damage caused by wrong installation shall be imputed to the users.
●
Don't break or modify the wire. To avoid the short circuit, please don't pull the wire when installing.
● Do not disassemble or change any parts excluding the manual description.
● The interior examination or maintenance should be executed by our professionals.
◎ MARK MEANING:
NOTE
You could get the installation details from the information behind the mark.
Some processes must be followed to avoid the affection caused by wrong installation.
WARNING!
Some processes must be followed to avoid damages to yourself or the public.
CAUTION!
Some processes must be followed to avoid the damage to the vehicle.
1-1
Accessories
1
2
Meter X1
Main wiring harness X1
5
M10 / S type speed
6
M5x5xP0.8
sensor bracket X1
Hexagon screw X2
9
10
Meter bracket X1
M4X12Lmm Screw X2
13
4.0 mm Allen key X1
NOTE
Contact your local distributor, if the items received in the box are not the same as the items listed above.
1-2
Option accessory
1
Reed Sensor
NOTE
Some optional accessories may not be sold in your area. For more details, please contact your local distributor.
FLASH
LIGHT ON
PRESS THE
BUTTON
ONCE
3
4
M8 / S type speed
Passive speed sensor X1
sensor bracket X1
7
8
2.5 mm Allen key X1
D6xH5 mm magnet x6
11
12
M5X15 screw X2
M5 washer X2
2-1
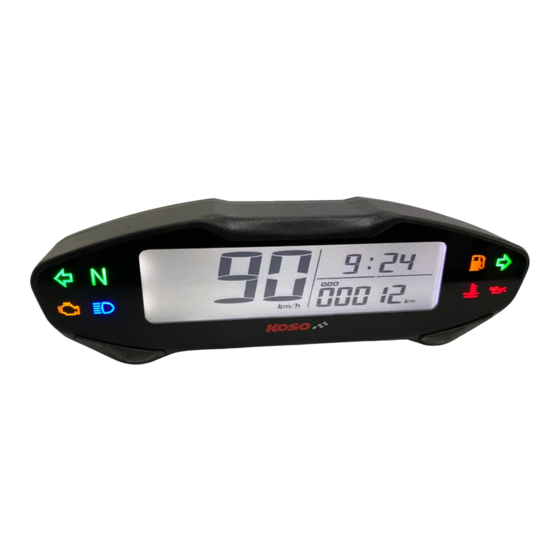
Wiring Installation Instructions
Blue-R turn signal light (+12V)
Yellow - High beam light ( +12V)
Green
-
Fuel
Purple - Engine light
Main wiring harness
(Accessory 2)
PRESS THE
BUTTON 3
SECONDS
Meter (Accessory 1)
MOTO / SCOOTER
S type speed sensor bracket instruction
Loose the screw on the caliper.
Install the S type bracket on the caliper.
Please adjust the bracket to the proper angle
and then screw it up.Please make sure the
disc screw could pass the hole on the bracket
for you to install the sensor into the same hole
for catching the speed signal.
When using the eletronic speed sensor(Hall Sensor), the meter must connect with DC 12V battery instead of using inner battery from the meter.
When using Reed Sensor, the meter could function normally when using only the inner battery.
2-2
Installation instruction
6.
5.
8.
Orange-L turn signal light (+12V)
Yellow-white
- Temperature
light (-)
light
(-)
Gray-Motor oil light (-)
(-)
White-Neutral light (-)
Passive speed sensor
(Accessory
3)
Or
Reed Sensor
(Option accessory 1)
Install the speed sensor(Accesory 3).
Adjusting the distance between the sensor
and screw to get the best speed signal.
Please make sure the distance is under 2 mm
to get the best signal.
2 mm
Follow this procedure for proper installation.
1. M5X15 screw X2 (Accessory
2. Meter bracket for handle bar (Accessory
3. Fix the bracket on handle bar
1.
4. Meter bracket clip (Accessory
2.
5. M4X12Lmm Screw X2 (Accessory 10)
6. M5 washer X2 (Accessory
7. Meter fixed board (Accessory
8. Meter (Accessory
NOTE
Adjust the meter to the proper viewing angle
before tightening the Allen screw.
3.
1.
4.
Special instruction for meter fit board.
5.
6.
7.
A. Push meter bracket
clip up to lock meter
fix board (with meter)
on bracket.
Mid-way connect
Red / Postive pole
(Connect to the battery DC 12V)
Black / Ground wire connect to
the negative pole of the battery.
11)
9)
9)
12)
9)
1)
B. Push meter bracket
clip down to release meter
fix board (with meter)
on bracket.
wh076ba01a(P3-1)
Advertisement

Related Manuals for Koso DB EX-03


Summary of Contents for Koso DB EX-03
- Page 1 Wiring Installation Instructions INSTALLATION ● Thank you for purchasing the our product. Before installing, please read the instruction carefully and keep it for future reference. Blue-R turn signal light (+12V) Orange-L turn signal light (+12V) Attention! Yellow - High beam light ( +12V) Yellow-white - Temperature light (-)
- Page 2 Basic Function Instruction Switch Function Instructions ● Instructions for select button Instructions for adjust button Speedometer Clock : 24H, 12H. ● ● Display range : 0~360 km/h(0~225 MPH). ● Stopwatch function : ●Press the Select button while on main ●While on odometer screen, press ●...
- Page 3 Setting Mode ●Press the Adjust button to go back to ●Press the Adjust button to enter the maintenance oil light setting screen. USER ODO setting. ●While on main screen, press the ●3-2-2 The clock (minute) setting ●Press the Select button to switch Adjust+Select buttons for 3 seconds ●Example : To set time(minute) as 05 from...
Need help?
Do you have a question about the DB EX-03 and is the answer not in the manual?
Questions and answers