Table of Contents
Advertisement
Quick Links
Thank you for purchasing our Koso EX-02 Speedometer. Before operating the unit, please read the instruction thoroughly and keep it for future
reference.
Notice
1.
The meter requires DC 12V power only.
.
2. For installation, please follow the steps described below. Any damage caused by a wrong installation shall be imputed to the users.
3. To avoid short circuits, do not pull the wires off the connector when installing the unit. Do not break or modify the wire terminal.
4. Do not disassemble or change any parts.
5. Repair and maintenance should be executed by our professionals only.
MARK MEANING:
Some procedures must be followed to avoid damage caused by a wrong installation.
WARNING!
Some procedures must be followed to avoid injuries.
CAUTION!
Some procedures must be followed to avoid any damage to the vehicle.
1-1
Accessories
1
Meter X1
5
1" 25.4mm Rubber X1
(
)
9
M4 x 12 Screw X1
13
4 mm Allen key X1
Please contact your local distributor if the items received are not the same as the above-listed ones.
1-2
Optional accessory
2
External button
Some optional accessories may not be sold in your area. For more details, please contact your local distributor.
INsTRUCTION
2
Meter plate X1
6
1 1/8" 28.6mm Rubber X1
M5 x 18 內六角螺絲支 X 1
(
)
10
M5 x 18 Screw X1
14
Mid-way connector X2
3
Handlebar bracket X1
7
1 1/4" 32 mm Rubber X1
(
)
11
M5 Washer X2
PRESS THE
PRESS THE
BUTTON ONCE
BUTTON 3
SECONDS
4
7/8" 22.2mm Rubber X1
(
)
11 8
M4 x 10 S crew X2
12
3 mm Allen key X1
Advertisement
Table of Contents

Subscribe to Our Youtube Channel
Related Manuals for Koso EX-02


Summary of Contents for Koso EX-02
- Page 1 INsTRUCTION Thank you for purchasing our Koso EX-02 Speedometer. Before operating the unit, please read the instruction thoroughly and keep it for future reference. Notice The meter requires DC 12V power only. 2. For installation, please follow the steps described below. Any damage caused by a wrong installation shall be imputed to the users.
- Page 2 Wiring installation instruction Mid-way connector Accessory 20 Red / Postive pole (Connect to the battery DC 12V Black / Ground wire to connect to the vehicle body or the engine (must be a good ground) Meter Accessory 1 External button (Optional accessory 1) Remove the waterproof plug before connecting the optional external button.
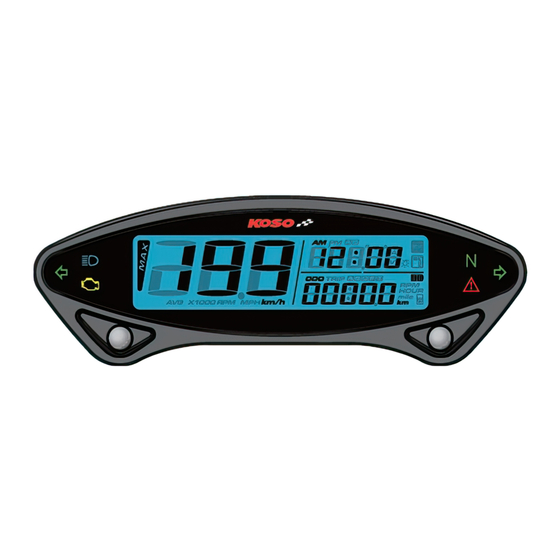
- Page 3 Basic function instruction Clock: 12 24 MODE Speedometer ● 、 Display range: 0~360km/h 0~225 MPH . ● Volt meter: DC 8~18 V ● Display unit: km/h MPH). ● Stopwatch function: ● can be either programmed for manual Odometer activation or by wheel activation Display range: 0~99,999 km mile , MAX Record function ●...
- Page 4 Switch function instructions ● Instructions for select button ● Instructions for adjust button ●Press the while on main ●While on main screen, press the Select button adjust button once to switch the screen to switch from Clock to function from odometer to trip A . Stopwatch.
- Page 5 Setting Mode ●While on main screen, press the ●4-4 The clock ( minute ) setting Adjust+Select 3 sec. to enter the tire EX. To change the setting to 14:05. ● circumference and sensing point Press the Select Button to choose ●...
- Page 6 ●4-9 ODO setting. switch to screen. ●From ● Press the again to view Adjust button the actual meter mileage under TOTAL. Ex. To set the customized mileage ● adjustment under USER. ●Press the Adjust button to enter the Backlight Brightness setting Press the Select Button to switch...
- Page 7 EX-02 ENDURO • Specific installation instructions FOR KTM FOR OTHER APPLICATIONS Magnetic bolt Magnets For Honda For Kawasaki Suzuki Yamaha 1. Remove the plastic fork guard. 2. a - For Kawasaki, Suzuki, Yamaha: Insert ONE magnet into one of the the disc-brake bolts 1.
Need help?
Do you have a question about the EX-02 and is the answer not in the manual?
Questions and answers