Advertisement
● Thank you for purchasing the TNT-B meter for Yamaha Bolt
Attention!
● For installation, please follow the steps described in manual. Any damage caused by wrong installation shall be imputed to the users.
●
Don't break or modify the wire. To avoid the short circuit, please don't pull the wire when installing.
● Do not disassemble or change any parts excluding the manual description.
● The interior examination or maintenance should be executed by our professionals.
◎MARK MEANING:
NOTE
You could get the installation details from the information behind the mark.
Some processes must be followed to avoid the affection caused by wrong installation.
WARNING!
Some processes must be followed to avoid damages to yourself or the public.
CAUTION!
Some processes must be followed to avoid the damage to the vehicle.
1
Accessories
1
LCD Meter X1
5
M5 nut X3
NOTE
Contact your local distributor, if the items received in the box are not the same as the items listed above.
2-1
Installation description
Please proceed as follows
❶
Bracket Bushing (Accessories 2)
❷
Collar
(Accessories 3)
❸
LCD Meter
(Accessories 1)
❹
M5
washer(Accessories 4)
❺
M5nut(Accessories 5)
NOTE
Please refer to the icon to disassemble. And install according to
the reverse order of disassembly.
. Before installing, please read the instruction carefully and keep it for future reference.
®
2
Bracket Bushing X2
FLASH
3
Collar X1
❷
❹
❺
LIGHT ON
PRESS THE
PRESS THE
BUTTON
BUTTON 3
ONCE
SECONDS
4
M5 washer X3
❸
❶
Advertisement
Table of Contents

Related Manuals for Koso TNT-B


Summary of Contents for Koso TNT-B
- Page 1 ● Thank you for purchasing the TNT-B meter for Yamaha Bolt . Before installing, please read the instruction carefully and keep it for future reference. ® Attention! ● For installation, please follow the steps described in manual. Any damage caused by wrong installation shall be imputed to the users.
-
Page 2: Installation Description
❶ ❷ ❷ ❶ plug the connector in with the vehicle 1.Push the waterproof cover of the KOSO 3.Wrap up insulation tape on waterproof cover, ❶ until the connector ❷ is main harness connector.❷ The pull back the BOLT Meter wiring PVC pipe and the gap between the exposed outside the cover. -
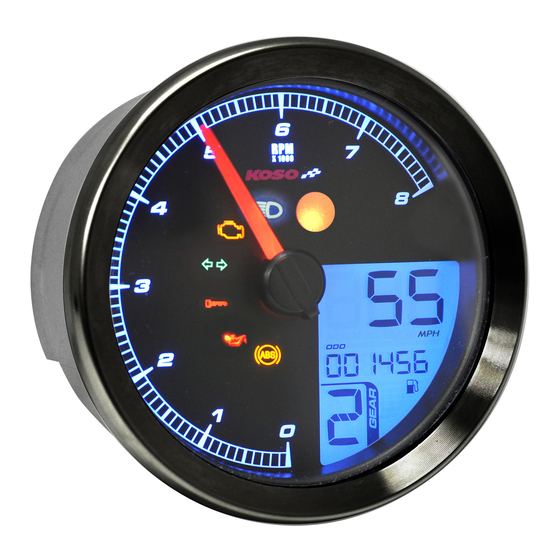
Page 3: Basic Function Instruction
Basic function instruction Speedometer :0~360 ● Speedometer (0~225 miles :1 Tachometer ● Display unit km (mile) ● Display range: 0 ~ 8,000 RPM Motor oil maintenance mileage ●Display range:User settings (500 ~ 16000 km / Indicator 300 ~ 10000 miles) ~ -999 km (miles), ●... - Page 4 ● Trip B screen, press the SELECT button ● In the temperature screen, press the SELECT once to switch to the mileage maintenance button once to switch to the voltage screen. screen. ●Hold the SELECT button for 3 seconds to clear the Trip B recordings.
- Page 5 Tire percentage settings ● In tire percentage screen, press and P.S. hold the SELECT button for 3 seconds to enter settings screen. ●You could define the valve as the starting point and ● Press the SELECT button to enter the measure the wheel gear learning setting screen.
-
Page 6: Troubleshooting
● Start the riding when "GO" is flashing. ● When the number 3 is flashing, put the motorcycle in 3rd gear and start riding ● Press the SELECT button once to start slowly until the meter detects the correct the gear learning. gear.
Need help?
Do you have a question about the TNT-B and is the answer not in the manual?
Questions and answers