Table of Contents
Advertisement
Quick Links
Advertisement
Table of Contents

Related Manuals for insys icom MRX


Summary of Contents for insys icom MRX
- Page 1 Installation and User Manual...
- Page 3 Copyright © January 2024 INSYS icom GmbH Any duplication of this manual is prohibited. All rights on this documentation and the devices are with INSYS icom GmbH Regensburg. Trademarks The use of a trademark not shown below is not an indication that it is freely availa- ble for use.
- Page 4 Content Preface ....................7 Defects Liability Terms ..................7 Applicability ......................7 Feedback ......................7 Marking of Warnings and Notes ................8 Symbols and the Formatting in this Manual ............9 Safety Instructions ................10 Intended Use ..................... 10 Permissible Technical Limits................11 Responsibilities of the Operator .................
-
Page 5: Table Of Contents
Contents MRcard PL ......................34 8.3.1 Technical Data ..................34 8.3.2 Connections as well as display and control elements ......36 8.3.3 Antennas ....................39 MRcard PD......................40 8.4.1 Technical Data ..................40 8.4.2 Connections as well as display and control elements ......41 MRcard SI ...................... - Page 6 Content 12.3 Profiles and Profile Handling ................93 12.3.1 Term definitions ..................93 12.3.2 Working with one profile ................ 93 12.3.3 Using several profiles ................94 12.3.4 ASCII Configuration ................96 12.3.5 Profile Mode ................... 97 Maintenance, Troubleshooting and Repair ........... 98 13.1 Maintenance .....................
- Page 7 We are looking forward to any of your feed- back. Please send an e-mail to support@insys-icom.de. We’d like to know your applications. Please send us a few headwords that we know the applications you solve using products of INSYS icom.
- Page 8 Preface Marking of Warnings and Notes Symbols and Key Words Danger! Risk of severe or fatal injury One of these symbols in conjunction with the key word Danger indicates an imminent danger. It will cause death or severe injuries if not avoided. Warning! Personal injury This symbol in conjunction with the key word Warning...
- Page 9 Preface Symbols and the Formatting in this Manual This section describes the definition, formatting and symbols used in this manual. The various symbols are meant to help you read and find the information relevant to you. The following text is structured like a typical operating instruction of this manual.
- Page 10 Safety Instructions Safety Instructions The Safety Instructions section provides an overview about the safety instructions, which must be observed for the operation of the product. The product is constructed according to the currently valid state-of-the-art technol- ogy and reliable in operation. It has been checked and left the factory in flawless condition concerning safety.
- Page 11 Safety Instructions Permissible Technical Limits The product is only intended for the use within the permissible technical limits specified in the data sheets. The following permissible limits must be observed: • The ambient temperature limits must not be fallen below or exceeded. •...
- Page 12 Safety Instructions Markings on the Product The identification plate of the product is either a print or a label on a face of the product. Amongst other things, it can contain the following markings, which are explained in detail here. Observe manual This symbol indicates that the manual of the product contains essential safety instructions that must be followed implicitly.
- Page 13 Safety Instructions Safety Instructions for Electrical Installation The electrical connection must only be made by authorized expert personnel ac- cording to the wiring diagrams. The notes to the electrical connection in the manual must be observed. Otherwise, the protection category might be affected. The safe disconnection of circuits, which are hazardous when touched, is only en- sured if the connected devices meet the requirements of VDE T.101 (Basic require- ments for safe disconnection).
- Page 14 Safety Instructions General Safety Instructions Caution! Electrostatic discharges may damage the product! Damage of the product. Observe the general safety precautions when handling electrostatic-discharge-sensitive parts. Caution! Incomplete voltage isolation! Damage of the product. To isolate the voltage from the device, disconnect any supply circuit with its respective isolation device if a redundant power supply is used.
- Page 15 Safety Instructions Caution! Short circuits and damage due to improper repairs and modifications as well as opening of maintenance areas! Fire hazard and damage of the product. It is not permitted to open the product for repair or modification exceeding the removal or installation of the designated plug-in cards.
- Page 16 IT Security IT Security Note Insecure configured router may compromise applications relevant to security! Follow the information under IT Security – Overview for protecting your router: https://docs.insys-icom.de/itsec/en_itsec_guide.html You will find there a Secure Configuration Guide (https://docs.insys- icom.de/itsec/en_itsec_secure_config_guide.html) for a configuration that complies with the accelerated security certification of the German Federal Office for Information Security (BSI).
- Page 17 Using Open Source Software General Information Our product MRX contains, amongst others, so-called open-source software that is provided by third parties and has been published for free public use. The open- source software is subject to special open-source software licenses and the copy- right of third parties.
- Page 18 Using Open Source Software Special Liability Regulations We do not assume any warranty or liability, if the open-source software programs contained in our product are used by the customer in a manner that does not com- ply any more with the purpose of the contract, which is the basis of the acquisition of our product.
- Page 19 Update of the Operating Principle section 1.12 Addition of MRcard PL450 / PLS 1.1 Profile description amended 1.13 Addition of MRX2 Update of the Operating Principle section 1.14 Addition of MRX Fiber and MRX2 LTES Update of the Technical Data of the MRcard Fiber...
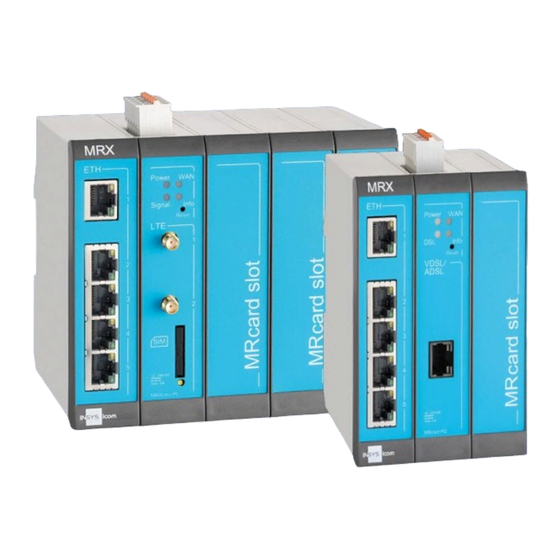
- Page 20 Figure 1: MRX2 Basic Variants The basic variants of the industrial router series MRX have in common that the two left slots are preallocated by a base card with integrated switch as well as a power supply card or a communication card with integrated power supply. The following basic variants are available in all housing widths at the moment: •...
- Page 21 Device Variants Plug-in Cards (MRcards) The MRcards allow a flexible extension of your router to a tailor-made device for your application. The left slot is always reserved for the base card with integrated 4+1 port switch that is already present in all basic variants. Depending on the basic variant, the second slot from the left is taken by a power supply card or a commu- nications card with integrated power supply.
- Page 22 Device Variants Figure 10: MRcard Fiber Figure 11: MRcard PL450 ▪ 2 SFP ports ▪ LTE incl. LTE450 ▪ 2 digital inputs ▪ Dual SIM ▪ 2 digital inputs...
- Page 23 • Industrial Router • Quick Installation Guide • Safety Instructions The scope of delivery does not include optional accessories. The following parts are available from your distributor or INSYS icom: • Cellular antennas • Antenna extensions • Din rail power supply units •...
- Page 24 Technical Information Technical Information Basic Variants The following specifications apply to the basic variants MRX2/3/5 LAN, DSL and LTE. If these variants differ, the different values will be indicated separately. The specifications of the MRcards can be found subsequently. 8.1.1 Technical Data 8.1.1.1 Physical Features All specified data was measured with nominal input voltage, at full load, and an ambient temperature of 25 C.
- Page 25 Technical Information Physical Feature Value Weight 255 g (MRX2 LAN) 270 g (MRX2 LTE/LTE450) 280 g (MRX2 DSL) 270 g (MRX2 Fiber) 280 g (MRX2 LTES) 305 g (MRX3 LAN) 320 g (MRX3 LTE/LTE450) 330 g (MRX3 DSL) 320 g (MRX3 Fiber) 395 g (MRX5 LAN) 410 g (MRX5 LTE/LTE450) 420 g (MRX5 DSL)
- Page 26 MRX DSL 0 … 60 °C -25 … 60 °C MRX Fiber -30 … 65 °C MRX DSL + MRcard PD/PL/PLS/Fiber/PL450 0 … 55 °C -25 … 55 °C MRX Fiber + MRcard PD/PL/PLS/Fiber/PL450 0 … 55 °C -30 … 55 °C Table 2: MRX2/3/5 –...
- Page 27 Technical Information 8.1.2 Connections and display elements ETH 1 Ethernet port 1 (RJ45, 10/100 BT) ETH 2 Ethernet port 2 (RJ45, 10/100 BT) ETH 3 Ethernet port 3 (RJ45, 10/100 BT) ETH 4 Ethernet port 4 (RJ45, 10/100 BT) ETH 5 Ethernet port 5 (RJ45, 10/100 BT) Figure 12: Basic variants –...
- Page 28 3 W plus 0.5 W per inserted SFP module Table 5: Power consumption estimation Add the values from above table of the MRcards installed in your MRX to the value of the base card (incl. 4+1-port switch). Don't forget to consider the MRcard (PM, PL, PL450, PD oder Fiber) already contained in the basic variants.
- Page 29 Technical Information 8.1.5 Connecting the connectors 8.1.5.1 Connectors at the top The connectors are delivered encoded and cannot be interchanged between differ- ent MRcards. The wires are contacted maintenance-free in the connector via a spring clip. Rigid wires (stripped) or stranded wires with end sleeves are only in- serted into the connectors to clamp them.
- Page 30 Technical Information 8.1.6 Approvals The router provides the following approvals: • EMC, Emission: EN 61000-6-3, EN 55032 Class B • EMC, Immunity: EN 61000-6-2, EN 55035 • Product safety: EN 60950-1, IEC/EN 62368-1 The conformity of the whole device depends on the used plug-in cards and corre- sponds to the “least common denominator”...
- Page 31 Technical Information MRcard PM 8.2.1 Technical Data The MRcard PM is integral part of the MRX2/3/5 LAN and contains the power sup- ply of the MRX. Physical Feature Value Weight 70 g Dimensions (Width x Height x Depth) 27 x 117 x 81 mm Table 9: MRcard PM –...
- Page 32 Technical Information Colour Function blinking 1x during soft reset green via V+ Power Supply 3x during reset to orange via V+ default settings green WAN chain inactive establishing established orange Profile active saved ≠ Info Boot process not Failure Reset completed Table 10: MRcard PM –...
- Page 33 Technical Information 8.2.2.2 Digital inputs The card provides two different digital inputs. Input IN1 is low-active, i.e. active, if connected to GND. Input IN2 is high-active and based on the electrical requirements of the PLC standard DIN EN 61131-2 for digital inputs type 1. You'll find more infor- mation under Technical Data in Table 1.
-
Page 34: Mrcard Pl
The MRcard PL is al- ready contained in the basic variant MRX LTE. The technical data of the basic vari- ant MRX LAN are extended by the following data with inserted MRcard PL. - Page 35 Technical Information 8.3.1.2 Technological Features Technological Feature Description LTE frequency bands (4G) 1 (2100), 2 (1900), 3 (1800), 4 (2100/1700 Band (MHz) AWS), 5 (850), 7 (2600), 8 (900), 12 (700), MRcard PL 1.1 13 (700), 18 (850), 19 (850), 20 (800), 26 (850), 28 (700), 38 (2600), 40 (2300), 41 (2500), 66 (2100) LTE Cat 4 (DL: 150 Mbit/s, UL: 50 Mbit/s)
-
Page 36: Connections As Well As Display And Control Elements
Technical Information The maximum data rates of the wireless interface with LTE Cat 3/4 are usually not achieved in practice. Among other things, they are limited by the performance of the Ethernet interface (100 Mbit/s), the current reception conditions (network signal strength), the antenna (use of MIMO/Rx Diversity (refer to Antennas), performance and positioning) and support of the respective provider (contract extent and network utilisation). - Page 37 Technical Information Colour Function blinking 1x during soft reset green via V+ Power Supply 3x during reset to orange via V+ default settings green inactive establishing established chain logged in (field green no signal strength see Table ) Signal Signal or logged PDP context estab- orange...
- Page 38 Technical Information Digital input 2 (can also be marked with IN Digital input 1 (can also be marked with IN Ground Power supply, redundant positive terminal 2 Power supply, redundant positive terminal 1 Figure 17: MRcard PL – connections at the connector 8.3.2.1 Redundant supply connections The description of the power supply can be found in the basic variant section.
-
Page 39: Antennas
Technical Information 8.3.3 Antennas As per EN 2014/53/EU, the operator of a radio equipment must comply with the harmonisation legislation. This includes in particular the selection and utilisation of suitable antenna systems. It must be ensured in particular that devices with radio technology are not operated without a suitable antenna system for an extended period. -
Page 40: Mrcard Pd
The MRcard PD is already contained in the basic variant MRX DSL. The technical data of the basic variant MRX LAN are ex- tended by the following data with inserted MRcard PD. The MRcard PD is available in two variants, MRcard PD-A and MRcard PD-B, that only differ in the supported DSL standards. -
Page 41: Connections As Well As Display And Control Elements
Technical Information 8.4.1.2 Technological Features Technological Feature Description Supported standards VDSL2 G.993.2 Profile 8a, 8b, 8c, 8d, 12a, 12b, MRcard PD-A 17a. 30a VDSL2 Vectoring G.993.5 ADSL G.992.1 Annex A, G.992.3. Annex A/L/M, G.992.5 Annex A and M, T1.413 Supported standards VDSL2 G.993.2 Profile 8a, 8b, 8c, 8d, 12a, 12b, MRcard PD-B 17a. - Page 42 Technical Information Colour Function blinking 1x during soft re- green via V+ Power Supply 3x during reset to orange via V+ default settings green WAN chain inactive establishing established establishing established green (handshake / (showtime) DSL connec- no con- training) tion nection orange...
- Page 43 Technical Information Digital input 2 (can also be marked with IN Digital input 1 (can also be marked with IN Ground Power supply, redundant positive terminal 2 Power supply, redundant positive terminal 1 Figure 20: MRcard PL – connections at the connector not connected not connected not connected...
- Page 44 Technical Information 8.4.2.2 Digital inputs The card provides two different digital inputs. Input IN1 is low-active, i.e. active, if connected to GND. Input IN2 is high-active and based on the electrical requirements of the PLC standard DIN EN 61131-2 for digital inputs type 1. You'll find more infor- mation under Technical Data in Table 1.
-
Page 45: Mrcard Si
Technical Information MRcard SI The MRcard SI is a plug-in card for extending the basic variants and contains two digital inputs, two digital outputs (changeover relays), a USB connection, a serial RS232 interface as well as a serial RS485 interface. The technical data of the basic variants are extended by the following data with inserted MRcard SI. -
Page 46: Connections And Display Elements
Technical Information 8.5.2 Connections and display elements USB 2.0 interface (socket type A) RS232 Serial RS232 interface (D-Sub connector, V.28) RS485 Serial RS485 interface (EIA-485) Figure 23: MRcard SI – connections and display elements at the front Colour Function green Input 1 not active (LOW) active (HIGH) - Page 47 Technical Information Digital output 2 normally closed (opening contact, NC) – Digital output 2 common contact (COM) – Digital output 2 normally open (closing contact, NO) – Ground Digital input 2 Digital output 1 normally closed (opening contact, NC) – Digital output 1 common contact (COM) –...
- Page 48 Technical Information 8.5.2.2 Digital outputs Both outputs are implemented as change-over relays. The figure below shows an ex- emplary connection. Figure 26: MRcard SI – Digital outputs – connection example 8.5.2.3 USB interface The USB interface is not yet supported by the firmware. The USB interface is designed as USB 2.0 host.
- Page 49 Technical Information 8.5.2.5 RS485 interface Description Common (frame GND) Data line positive Data line negative Table 23: Description of the pin allocation of the RS485 interface The properties of the RS485 interface are configured using a 4-pole DIP switch on the circuit board.
-
Page 50: Mrcard Es
Technical Information MRcard ES The MRcard ES is a plug-in card for extending the basic variants by a 4-port switch. The technical data of the basic variants are extended by the following data with in- serted MRcard ES. 8.6.1 Technical Data 8.6.1.1 Physical Features Physical Feature Value... -
Page 51: Connections And Display Elements
Technical Information 8.6.2 Connections and display elements ETH 1 Ethernet port 1 (RJ45, 10/100 BT) ETH 2 Ethernet port 3 (RJ45, 10/100 BT) ETH 3 Ethernet port 4 (RJ45, 10/100 BT) ETH 4 Ethernet port 5 (RJ45, 10/100 BT) Figure 29: MRcard ES – connections and display elements at the front Each switch port has a green and a yellow LED. -
Page 52: Technical Data
Technical Information 8.7.1 Technical Data 8.7.1.1 Physical Features All specified data was measured with nominal input voltage, at full load, and an ambient temperature of 25 °C. The limit value tolerances are subject to the usual variations. Physical Feature Value Power consumption Typ. - Page 53 Technical Information The maximum temperature range of the router may be limited by narrower temperature ranges of the inserted MRcards (see Table 2). 8.7.1.2 Technological Features Technological Feature Description LTE frequency bands (4G) 1 (2100), 2 (1900), 3 (1800), 4 (2100/1700 Band (MHz) –...
-
Page 54: Connections As Well As Display And Control Elements
Technical Information Two different versions of the MRcard PLS are currently available. They differ in the supported frequency bands. If the Hardware version displayed in the Status menu on the device info page is ≤ 2, the card version is 1.0. ... - Page 55 Technical Information Colour Function blinking 1x for soft reset not pre- 3x for resetting Power green Supply present sent to default set- tings green WAN chain inactive establishing established logged in (field no sig- green strength see Ta- nal or ble ) Signal Signal...
- Page 56 Technical Information Digital input 2 Digital input 1 Ground Digital output (open collector) Power supply, positive terminal Figure 31: MRcard PLS – connections at the connector The SIM card slot is under the front cover on the top of the device (see also page 78 for this).
- Page 57 Technical Information Figure 33: MRcard PLS – Digital inputs – connection examples 8.7.2.4 Digital output The router provides a digital output that is designed as open collector output. You'll find more information in Table . The figure below shows two examples for the con- nection of the output, the connection of a relay on the left and the connection of an LED on the right.
-
Page 58: Antennas For Mimo / Rx Diversity
Technical Information 8.7.3 Antennas for MIMO / Rx Diversity For information regarding antennas for MIMO / Rx Diversity, refer to the MRcard PL section on page 38. MRcard IO The MRcard IO is a plug-in card to extend the basic variants and include four digital inputs, four digital outputs (normally open relay), three analogue inputs as well as an analogue output. - Page 59 Technical Information 8.8.1.2 Technological Features Technological Feature Description Analogue inputs 0 … 20 mA or 0 … 10 V changeable via SW isolated against each other Accuracy ±0,3 % plus ±100 ppm/K temperature drift Resolution 16 Bit Input resistance Voltage range >...
-
Page 60: Connections And Display Elements
Technical Information 8.8.2 Connections and display elements AI 1 Analogue input 1 AI 2 Analogue input 2 AI 3 Analogue input 3 AO 1 Analogue output 1 Figure 35: MRcard IO – connections and display elements at the front Colour Function green blinks upon DI change... - Page 61 Technical Information Digital input – common contact Digital input 4 Digital input 3 Digital input 2 Digital input 1 Digital output 4 – normally open Digital output 3 – normally open (closing contact) Digital output – common contact Digital output 2 – normally open (closing contact) Digital output 1 –...
-
Page 62: Mrcard Fiber
Technical Information 8.8.2.2 Digital outputs The digital outputs are implemented as normally open relays. The figure below shows an exemplary connection. Figure 38: MRcard IO – Digital outputs – connection example 8.8.2.3 Analogue inputs Description Voltage input (0 … 10 V) Common –... -
Page 63: Technical Data
Technical Information 8.9.1 Technical Data 8.9.1.1 Physical Features All specified data was measured with nominal input voltage, at full load, and an ambient temperature of 25 °C. The limit value tolerances are subject to the usual variations. Physical Feature Value Power consumption Typ. -
Page 64: Connections As Well As Display And Control Elements
Technical Information 8.9.2 Connections as well as display and control elements SFP1 SFP cage 1 SFP2 SFP cage 2 Figure 39: MRcard Fiber – connections, display and control elements at the front Colour Function blinking 1x for soft reset green via V+ Power Supply... - Page 65 Technical Information The WAN LED is only active for cards in slot #2 and indicates there the status for the whole device. Designation Operation Meaning Reset Press once for a short time. Resets the software and restarts it. (Soft reset) Press at least 3 seconds.
-
Page 66: Mrcard Pl450
LTE450 bands besides standard LTE bands. The MRcard PL450 is al- ready contained in the basic variant MRX LTE450. The technical data of the basic variant MRX LAN are extended by the following data with inserted MRcard PL450. - Page 67 Technical Information Physical Feature Value Max. transmission power cellular engine EGSM 900 +33 dBm GSM 1800 +30 dBm LTE 450/700/800/850//900/1800/2100/2600 +23 dBm Weight 85 g Dimensions (Width x Height x Depth (w/o 27 x 117 x 81 mm protruding connectors)) Max.
-
Page 68: Connections As Well As Display And Control Elements
Technical Information In order to ensure a long function, it is necessary to use so-called M2M SIM cards. Compared to standard SIM cards, M2M SIM cards provide significantly increased write cycles and support frequent transitions with this, which may occur in M2M or IoT applications. ... - Page 69 Technical Information Colour Function blinking 1x during soft reset green via V+ Power Supply 3x during reset to orange via V+ default settings green inactive establishing established chain logged in (field green no signal strength see Table ) Signal Signal or logged PDP context estab- orange...
- Page 70 Technical Information Digital input 2 (can also be marked with IN Digital input 1 (can also be marked with IN Ground Power supply, redundant positive terminal 2 Power supply, redundant positive terminal 1 Figure 43: MRcard PL450 – connections at the connector ...
-
Page 71: Antenna
Technical Information 8.10.3 Antenna As per EN 2014/53/EU, the operator of a radio equipment must comply with the harmonisation legislation. This includes in particular the selection and utilisation of suitable antenna systems. It must be ensured in particular that devices with radio technology are not operated without a suitable antenna system for an extended period. -
Page 72: Mrcard Installation
MRcard Installation MRcard Installation The industrial router MRX is available in different basic variants and allows a flexi- ble extension of these basic variants with the additionally available MRcards. Pro- ceed as follows to remove or install an MRcard. Caution! The MRX and the MRcards contain electrostatic-discharge- sensitive parts. -
Page 73: Positions And Combinations Of Mrcards
MRX3 with three slots and the MRX5 with five slots. This plug-in card is necessary for the operation of the MRX and can only be inserted in this slot; it is also not pos- sible to insert a different MRcard in this slot. Therefore, do not remove this plug-in card. -
Page 74: Slot For Power Supply
MRcard Installation 9.1.2 Slot for power supply Each MRX must be equipped with at least one MRcard with power supply (identi- fied by a Power LED) in the second slot from the left (#2). If a basic variant that is... -
Page 75: Slots For Extensions
MRcard Installation 9.1.3 Slots for extensions Only the replacement of the MRcard in the second slot (#2) by another MRcard with power supply is possible for the MRX2. Any other MRcard can be inserted in the third slot (#3) of the MRX3. Any combination of MRcards can be inserted in the other slots (#3 …... -
Page 76: Removal Of An Mrcard
The connectors are disconnected. The MRX is not connected to the power supply. Insert the ball-pen as shown in the following figure vertically from above in the snap-in recess (red arrow) and press it down slightly to release the MRcard or front cover. Repeat the procedure at the bottom. -
Page 77: Installation Of An Mrcard
The connectors are disconnected. The MRX is not connected to the power supply. Place the MRX with its back onto the desktop. Insert the card with the board in the guides or the front cover from above into the slot from above. -
Page 78: Removal Of A Terminal /Sim Slot Cover
Depending on the MRcard to be installed, it might be necessary to remove one or two terminal covers at the top of the MRX to provide an opening for the terminal connectors to the MRcard or insert a SIM card. -
Page 79: Installation Of A Terminal / Sim Slot Cover
When you have removed an MRcard with terminal connector, replaced it by one without terminal connector or inserted/removed a SIM card, you need to insert the terminal /SIM slot cover(s) at the top of the MRX again to re-establish the integrity of the housing. -
Page 80: Device Label
MRcard Installation Device Label The devices of the industrial router series MRX in their basic variants have a device label attached to one side face that contains various information, which specify the device at hand exactly and also meet legal requirements. If a basic variant will be extended by one or more MRcards, this device label must also be modified accord- ingly. -
Page 81: Mounting
Mounting Mounting This section describes how to mount the MRX to a DIN rail, connect the power supply and uninstall it again. Observe the instructions in the "Safety" section of this manual, in particular the "Safety Instructions for Electrical Installation" for that purpose unconditionally. - Page 82 Mounting Figure 54: MRX – dimensions Mounting the device to the DIN rail How to mount the router to a DIN rail: Position the device at the DIN rail as seen in the following diagram. There are two snap-in hooks at the upper DIN rail groove. Hook them into place behind the upper edge of the DIN rail when connecting the device.
- Page 83 Mounting Fold down the device perpendicular to the DIN rail until the lower, flexible snap-in hook engages in the DIN rail. (similar representation) The router is now readily mounted. Connecting the power supply The device has already been mounted to the DIN rail. ...
- Page 84 Mounting Removing the device from the DIN rail How to uninstall the router from a DIN rail in a switch cabinet: You will need a flat-blade screwdriver (max. 3.5 mm width). The power supply of the switch cabinet is switched off and secured against being switched on accidentally.
- Page 85 Mounting The plastic spring of the snap-in hook is stretched. While you hold the plastic spring apart with the lower snap-in hook, pull the device away from the DIN rail. Un-hook the device and take it off perpendicularly to the DIN rail. ...
-
Page 86: Commissioning
Commissioning Commissioning This chapter describes how to activate the MRX, i.e. how to connect it to a PC, and how to prepare it for the configuration. Inserting the SIM card (only MRX LTE or MRX LAN with MRcard PL or PL450 with SIM card slot at the front, for MRcard PLS and second SIM card slot of the MRcard PL450, refer to next section). - Page 87 Locate the RJ-45 socket of the network card at the PC. Plug one end of the network cable into the RJ45 socket of the PC, and the other end into the ETH 1 socket in the left slot of the MRX. ...
- Page 88 Make sure that the DHCP client is enabled for the PC (Obtain an IP address automatically). The integrated DHCP server of the MRX will then allocate an address from the according address range to your network card. ➢ Alternatively, you can change the IP address of the network card to which the device is connected to an address that starts with 192.168.1.
-
Page 89: Operating Principle
Operating Principle Operating Principle This chapter describes how to operate and configure the router. There are different options for configuration and operation: • Via a web-based user interface (UI). This is displayed and operated using a web browser. Operation via UI and access via HTTPS protocol are described in the following. - Page 90 Operating Principle Access to the user interface How to access the user interface basically. The device is ready for operation and you have access to it (refer to Commissioning section). The device is in delivery condition and default settings. Start the web browser and enter the host name “https://insys.icom”...
-
Page 91: Access Via Https Protocol
Operating Principle 12.2 Access via HTTPS Protocol The user interface only allows secure configuration using the HTTPS protocol in default settings. The HTTPS protocol allows an authentication of the server (i.e. the router) as well as an encryption of the data transmission. It is not recommended to enable access via the HTTP protocol. -
Page 92: Authentication Via An Own Certificate Structure
Operating Principle 12.2.2 Authentication via an own certificate structure A more secure alternative is to use your own certificate structure and load a self-generated certificate/key combination onto the router and then use this for access via an HTTPS connection. Proceed as follows in coordination with the IT security department of your company to ensure a secure availability of the router: 1. -
Page 93: Profiles And Profile Handling
Operating Principle 12.3 Profiles and Profile Handling The configuration of the router is called profile. Several profiles can be stored on one device so that the configuration of a device can be changed quickly. 12.3.1 Term definitions The following terms or conditions are to be distinguished for profiles: •... -
Page 94: Using Several Profiles
Operating Principle 12.3.3 Using several profiles The versatile possible applications of the router suggest the use of several profiles. The following sections describe the profile handling. 12.3.3.1 Storing a profile When settings made in the opened profile are stored, they will not become effec- tive in the running profile with this. - Page 95 Operating Principle 12.3.3.4 Creating a profile A new profile can be created from: • the running profile • stored profiles • the default settings A new profile can be created: • In the new UI in the "Administration" menu on the "Profiles" page by clicking (Add) button and selecting "Create new profile"...
-
Page 96: Ascii Configuration
Operating Principle 12.3.3.7 Deleting a profile A stored profile can also be deleted again. A stored profile can be deleted: • In the new UI in the "Administration" menu on the "Profiles" page by clicking (Edit) button of the respective profile and a click on the (Delete) button •... -
Page 97: Profile Mode
Operating Principle 12.3.5 Profile Mode The router provides two profile modes from firmware version 5.7, the permanent and the volatile profile mode. The configuration of this function is currently only available in the classic web interface. The router is in permanent profile mode in normal operation. All modifications are permanently saved and survive a restart. -
Page 98: Maintenance, Troubleshooting And Repair
If a failure occurs during the operation of the product, you will find troubleshooting tips on our support page (https://www.insys-icom.com/en/help/). If you need fur- ther support, please contact your reseller or INSYS icom. You can contact our sup- port team via e-mail under support@insys-icom.de. -
Page 99: Waste Disposal
Waste Disposal Waste Disposal 14.1 Repurchasing of Legacy Systems According to the new WEEE guidelines, the repurchasing and recycling of legacy systems for our clients is regulated as follows: Please send those legacy systems to the following address, carriage prepaid: Frankenberg-Metalle Gaertnersleite 8 D-96450 Coburg... -
Page 100: Declaration Of Conformity
Declaration of Conformity 15.1 Devices with Radio Technology Hereby, INSYS icom GmbH declares that the device type MRX is in compliance with Directives 2014/53/EU and 2011/65/EU. The full text of the EC Declaration of Conformity is available under the following Internet address: www.insys-icom.com/manual... -
Page 101: Fcc Statement
FCC Statement FCC Statement Note: Certain variants of this device comply with part 15 of the FCC Rules (this is indicated by the FCC symbol on the label). Operation is subject to the following two conditions: (1) This device may not cause harmful interference, and (2) this device must accept any interference received, including interference that may cause unde- sired operation. -
Page 102: Export Restriction
Export Restriction Export Restriction The chip sets for analogue modems and cellular radio adapters used by INSYS icom GmbH are subject to export restrictions as per US ECCN classification (5A991). Therefore, it is not allowed to export these communication devices into the follow- ing countries (at the time when this publication has been issued): Cuba, Iran, North Korea, Sudan, Syria The currently effective country list can be found in section „Country Group E“... -
Page 103: Glossary
Glossary Glossary This describes the most important terms and abbreviations of this manual. APN: Access Point Name, computer name that provides cellular subscribers of the GPRS network with Internet access. AT command: Commands to devices such as modems to set up this device. Broadcast: Data packet that is sent to all participants of a network. - Page 104 Glossary IP net: An Ethernet-based interface that can become a LAN or a WAN inter- face. LAN: Local Area Network; a network of computers which are located rela- tively close to each other. LAN interface: An interface that is assigned to a local network (plant network, machine network, local network);...
- Page 105 Glossary Socket: Data connections that are established using ->TCP or ->UDP use sock- ets for addressing. A socket consists of an IP address and a port (cf. address: street name and number) Switch: A device that can connect several machines with the Ethernet. In con- trast to a hub, a switch will "think”...
-
Page 106: Tables And Diagrams
Tables and Diagrams Tables and Diagrams 19.1 List of Tables Table 1: MRX2/3/5 physical features ..............25 – – Table 2: MRX2/3/5 physical features – temperature range ........26 Table 3: MRX2/3/5 technological features ............26 – Table 4: Basic variants meaning of the display elements ........ - Page 107 Tables and Diagrams Table 35: MRcard IO – meaning of the display elements ........60 Table 36: MRcard IO – Description of the pin allocation of the analogue inputs ..62 Table 37: MRcard IO – Description of the pin allocation of the analogue outputs .. 62 Table 38: MRcard Fiber –...
-
Page 108: List Of Diagrams
Tables and Diagrams 19.2 List of Diagrams Figure 1: MRX2 ....................... 20 Figure 2: MRX3 ....................... 20 Figure 3: MRX5 ....................... 20 Figure 4: MRcard SI ....................21 Figure 5: MRcard PL ....................21 Figure 6: MRcard ES ....................21 Figure 7: MRcard PD .................... - Page 109 Figure 51: Terminal cover Installation ..............79 – Figure 52: Example for MRX device label ............... 80 Figure 53: Example for label supplement of an MRcard ......... 80 Figure 54: MRX – dimensions ................. 82 Figure 55: Profile handling – activating configuration modifications ...... 93...
-
Page 110: Index
Index Index Access Point Name ....... 104 Explosive atmosphere ..... 10 Accessories ........23 Firewall .......... 104 Additional information ....... 9 Formatting ......... 9 AI1 LED ........... 60 Gateway ........104 AI2 LED ........... 60 General safety instructions ....14 AI3 LED ........... - Page 111 Index O1 LED ..........46 Serial interface ......46, 54 O2 LED ..........46 Server ..........105 Open Source ........17 Service Center Number ....105 Operating voltage ......24 SFP ..........64 Operation ......... 90 SFP1 LED ........65 Output ........
Need help?
Do you have a question about the MRX and is the answer not in the manual?
Questions and answers