
Subscribe to Our Youtube Channel
Related Manuals for Taurus IC70 Smart


Summary of Contents for Taurus IC70 Smart
- Page 1 Assembly and Operating Instructions max. 150 kg ~ 60 Min. 47 kg L 114 | W 58 | H 145 TFIC70PROS.01.02 Art. No. TF-IC70PRO-S Taurus IC70 Smart...
- Page 2 IC70 Smart...
-
Page 3: Table Of Contents
Content GENERAL INFORMATION Technical Data Personal Safety Set-Up Place ASSEMBLY General Instructions Scope of Delivery Assembly Battery Replacement OPERATING INSTRUCTIONS Console Display Button Functions Emergency Brake Turning on and Setting Up the Equipment Energy Saving Mode Training Instructions 3.6.1 Quick Start Function 3.6.2 Setting Target Values Compatibility Training Apps 3.7.1 Connection with Kinomap... - Page 4 ORDERING SPARE PARTS Serial Number and Model Name Parts List Exploded Drawing WARRANTY CONTACT IC70 Smart...
- Page 5 Taurus is a well-known and experienced brand for equipping professional rooms for fi tness studios and business customers. The focus of Taurus fi tness equipment is on what matters most in sports: maximum performance! Therefore, the devices are developed in close consultation with athletes and sports scientists.
- Page 6 This notice indicates potentially hazardous situations which, if not avoided, will result in death or serious injuries! NOTICE This notice indicates further useful information. Retain these instructions in a safe place for future reference, maintenance or when ordering replacement parts. IC70 Smart...
-
Page 7: General Information
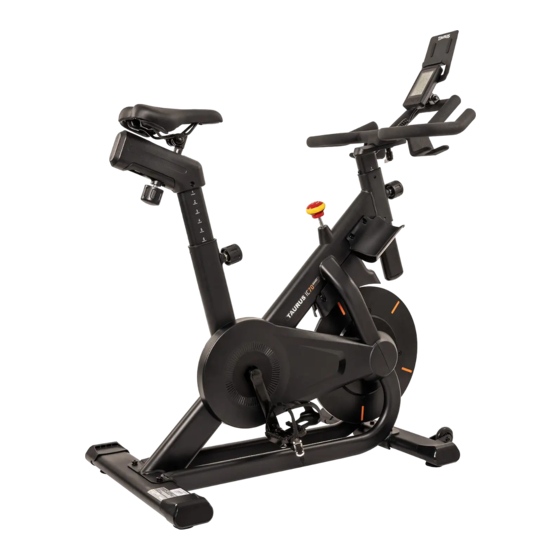
GENERAL INFORMATION Technical Data LCD Display: Training time Speed Revolutions per minute (RPM) Distance Calories burned Pulse (when using a compatible chest strap) Watt Resistance level Resistance system: manual magnetic brake system Resistance levels: Flywheel mass: 14 kg Wattage Min. and max. watts at 60 RPM: 19 - 450 W Min. - Page 8 Tablet holder Console Handlebar Seat Holder for small dumbbells Brake system Handlebar height adjustment Horizontal seat adjustment Bottle holder Seat height adjustment Flywheel Transportation wheels Pedal Setting screws for aligning the equipment IC70 Smart...
-
Page 9: Personal Safety
Personal Safety ⚠ DANGER Before you start using the equipment, you should consult your physician that this type of exercise is suitable for you from a health perspective. Particularly aff ected are persons who: have a hereditary disposition to high blood pressure or heart disease, are over the age of 45, smoke, have high cholesterol values, are overweight and/or have not exercised regularly in the past year. -
Page 10: Set-Up Place
(over 70%) like swimming pools. A fl oor protective mat/equipment underlay can help to protect high-quality fl oor coverings (parquet, laminate, cork, carpets) from dents and sweat and can help to level out slight unevenness. IC70 Smart... -
Page 11: Assembly
ASSEMBLY General Instructions ⚠ DANGER Do not leave any tools, packaging materials such as foils or small parts lying around, as otherwise there is a danger of suff ocation for children. Keep children away from the equipment during assembly. ⚠ WARNING Pay attention to the instructions attached to the equipment in order to reduce the risk of injuries. -
Page 12: Scope Of Delivery
Part no. Description Quantity Main Frame Front Stabilizer Rear Stabilizer Seat Post Handlebar Computer Fixing Plate Computer Left Seat Protective Cover Right Seat Protective Cover Left Pedal Right Pedal Seat Left Bottle Holder Right Bottle Holder Hardware Pack IC70 Smart... -
Page 14: Assembly
(33). Attach the rear stabilizer (3) to the main frame (1) with two bolts (32), two spring washers (34) and two fl at washers (33). Tighten the bolts with the tool. If added previously, now remove the styrofoam. IC70 Smart... - Page 15 Step 2: Assembly of the Handlebar, Seat Post and Pedals Attach the handlebar (6) to the front post (5) with one L knob (90) and one fl at washer (91). Insert the seat post (4) into the main frame (1) by unscrewing and then pulling the L knob (50). ⚠...
- Page 16 Attach the seat (60) to the seat post (4) and retighten the bolt connection with the wrench. Attach the left and right seat protective covers (12L & 12R) to the seat post (4) with one screw (69) each. Tighten the bolts and screws with the tools. IC70 Smart...
- Page 17 Step 4: Assembly of the Computer Remove the four pre-assembled screws (70) from the rear side of the computer (10). ATTENTION Make sure not to pinch the cables when performing the following steps. Pull the upper computer cable (104) through the hole of the computer fi xing plate (9) like shown in Fig.
- Page 18 In the following step, make sure the knob audibly engages in one of the adjustment holes. Release the knob (50). Reighten the knob (50). Tilt Adjustment (A-3) Loosen the bolt connection underneath the seat until the tilt can be adjusted. Adjust the desired tilt. Retighten the bolt connection. IC70 Smart...
- Page 19 Step 7: Adjustment of the Handlebar Height Adjustment (B-1) ⚠ CAUTION The front post is marked with “STOP” for the minimum insertion depth. When adjusting, make sure not to exceed the minimum insertion depth. Loosen and pull the knob (50) to adjust the height of the front post. ⚠...
-
Page 20: Battery Replacement
Insert two new 1.5V AA-batteries (Fig. C). Close the battery compartment (Fig. D). Reattach the computer to the computer fi xing plate with the previously removed screws (Fig. E). Fig. A Fig. B Fig. C Fig. D Fig. E IC70 Smart... -
Page 21: Operating Instructions
OPERATING INSTRUCTIONS NOTICE Familiarise yourself with all the functions and setting options of the device before starting training. Have the proper use of this product explained to you by a specialist. Console Display Display of the training time in minutes TIME Display range: 00:00 - 99:59 Setting range: 00:00 - 99:00 (in 01:00 min. - Page 22 A heart symbol blinks when a pulse is detected Display of the watt value in watts WATT Display range: 0 - 1355 Display of the resistance level LOAD Display range: 1 - 99 Setting range: 1 - 99 IC70 Smart...
-
Page 23: Button Functions
Button Functions Press to enter setting of target values Press to confi rm setting MODE Press to lock value function when displayed in scan mode Press and hold for 2 seconds to reset the current setting value to 0 Press once to increase setting by one Press and hold for fast increase setting In MODE or SET, press once to clear current data RESET... -
Page 24: Turning On And Setting Up The Equipment
The console enters energy saving mode (sleep mode) when the pedals have not moved for four minutes. Press any button to restart the console. The training data remains. NOTICE If the console does not react, check the batteries and/or if the console cables are properly connected. IC70 Smart... -
Page 25: Training Instructions
Training Instructions The indoor cycle is equipped with a simple console displaying the most important training data. By default, the parameters time, distance and calories are displayed in alternation of 5-second intervals. To lock a certain value (time, distance and calories), you can press MODE when the value is displayed. For easy and immediate training, simply start pedaling and the console will display the training data. -
Page 26: Setting Target Values
15. To skip the setting for BPM and start the training, press MODE again. 16. To select and enter a value for BPM, press SET. 17. To set the desired pulse, press SET (press and hold for fast increase) until the desired value is reached. IC70 Smart... - Page 27 18. To confi rm the setting and start the training and countdown of set target values, press MODE and start pedaling. All set values (time, distance and calories) will count down from the set target values to 0. Any remaining target values will count up. The values for speed, RPM and Watt will be displayed according to your training input.
-
Page 28: Compatibility Training Apps
Open Kinomap on your mobile device. On the main screen, select “More” in the bar at the bottom. Now select “Device management” on this page. Currently connected devices are displayed here. To add a new device, tap the “+” at the top right. IC70 Smart... - Page 29 For the IC70 Smart, select Indoor Cycle. 10. On the next page you will see the diff erent brands. Select “Taurus” and then the IC70 Pro Smart. 11. Now all Bluetooth sources in the surrounding area are displayed. Select a Bluetooth source that begins with i-Console ..
-
Page 30: Storage And Transport
After that, you easily can move the equipment to a new position. For long transport distances the equipment should be disassembled and safely packed. Select the new location by following the instructions in the section 1.3 of this manual. IC70 Smart... -
Page 31: Troubleshooting, Care And Maintenance
TROUBLESHOOTING, CARE AND MAINTENANCE General Instructions ⚠ WARNING Do not make any improper changes to the equipment. ⚠ CAUTION Damaged or worn components may aff ect your safety and the life of the equipment. Safety can only be guaranteed if you check the equipment regularly for wear and damage. Immediately replace damaged or worn components. -
Page 32: Error Codes And Troubleshooting
Error Codes and Troubleshooting The electronics of the equipment continuously carries out tests. In case of deviations, an error code appears on the display and normal operation is stopped for your safety. Please contact the contract partner for technical support. IC70 Smart... -
Page 33: Maintenance And Inspection Calendar
Maintenance and Inspection Calendar To avoid damage from body sweat, the equipment must be cleaned with a damp towel (no solvents!) after each training session. The following routine tasks must be performed at the specifi ed intervals: Part Weekly Monthly Display console Plastic covers Screws and cable connections... -
Page 34: Recommended Accessories
Of course, you can also contact our customer service: by telephone, e-mail, in one of our branches or via our social media channels. We will be happy to advise you! chest strap fl oor mat chest strap contact gel silicone spray pedals IC70 Smart... - Page 35 The serial number of your equipment is unique. It's located on a white sticker. The exact position of this sticker is shown in the following illustration. Enter the serial number in the appropriate fi eld. Serial number: Brand / Category: Taurus / indoor cycle Model Name: IC70 Smart Article Number: TF-IC70PRO-S...
- Page 36 Anti-loosen nut M10*1.25*10T 70501-6-2775-N0 M10*1.25*10T C-clip(D22.5*D18.5*1.2T) 55519-1-2312-DA D22.5*D18.5*1.2T Waved 55120-5-2705-DA D27*D20.3*0.5T washer(D27*D20.3*0.5T) Flat washer(D26*D21*1.5T) 55120-1-2615-NA D26*D21*1.5T 23L/23R Pedal set(L&R) 58029-6-1160-B2 JD-005,9/16" Allen bolt M6x1.0x15L 50106-5-0012-C0 M6x1.0x15L Nylon nutM6x1.0x6T 55206-1-2006-CA M6x1.0x6T Bearing(#6002-2RS) 58006-6-1014-00 #6002-2RS C-clipS-15,1T 55515-1-0010-D0 S-15,1T,15 Flywheel shaft 850A1-6-3171-00 D15*135L IC70 Smart...
- Page 37 Fixed ring 71600-6-3178-B0 D13*D10*1.9 Anti-loosen nut 18600-6-3175-N1 3/8"-26UNFx6.5T 3/8"-26UNFx6.5T Allen nut D9.5x8T 55295-2-3008-NA D9.5x8T(3/8"- 26UNFx8T) Allen bolt M8x1.25x60L 50308-5-0060-F3 M8x1.25x60L Flat washerD16xD8.5x1.2T 55108-1-1612-FA D16xD8.5x1.2T Spring washer D15.4xD8.2x2T 55108-2-1520-FA D15.4xD8.2x2T Adjustable wheel 76100-6-2174-B0 D50*M10*1.5 Allen nut M10*1.5*8T 55210-2-2008-NA M10*1.5*8T Round wheel 84302-6-2175-00 D70.5*23 Allen bolt M8*1.25*40L...
- Page 38 55330-3-3171-B8 31*71*30 Computer fi xing plate 850A1-6-2726-J0 BoltM5x0.8x30L 52605-2-0030-F0 M5x0.8x30L Flat washerD15*D5.2*3T 55105-1-1530-FA D15*D5.2*3T L knob 52710-1-0035-N0 M10*35L Flat washerD31.8*D10.5*3T 55110-1-3135-FA D31.8*D10.5*3T Protection Strip 815S5-6-2278-B0 50*10*3T Buff er strip (1) 850A1-6-2088-B0 85*10*2T Buff er strip (2) 815S5-6-2089-B0 85*15*2T IC70 Smart...
- Page 39 Open-end wrentch 58030-6-1050-C0 153*6.5T Cross screwdriver 58030-6-1058-B0 PH2*100 Flat washerD18*D8.5*1.0T 55108-1-1810-W8 D18*D8.5*1.0T Bushing 24500-6-2704-F0 D13*D8.5*40L VR regulator 850A1-6-2583-00 65*15 Sensor bracket 71900-6-2565-B0 24*22*2.5T Adjustable rod 850A1-6-2228-N2 48.5*9*1.0T Round cross bolt 50805-2-0012-F0 M5*0.8*12L Nylon nut M5*0.8*5T 55205-1-2005-FA M5*0.8*5T Upper computer cable 850A1-6-2572-01 790L Round magnet...
- Page 40 Exploded Drawing IC70 Smart...
- Page 41 WARRANTY Training equipment from Taurus® is subject to strict quality control. However, if a fi tness equipment purchased from us does not work perfectly, we take it very seriously and ask you to contact our customer service as indicated. We are happy to help you by phone via our service hotline.
- Page 42 For that reason, we also want to resolve your queries quickly and in a straightforward manner. Thus, please always keep your customer number and the serial number of the faulty equipment handy. IC70 Smart...
- Page 43 CONTACT TECHNIK TEKNIK OG SERVICE TECHNIQUE & SERVICE �� �� �� +49 4621 4210-900 80 90 16 50 +33 (0) 189 530984 +49 4621 4210-945 +49 4621 42 10 933 �� +49 4621 4210-698 �� �� info@fi tshop.dk info@fi tshop.fr ��...
- Page 44 The company employs numerous sports scientists, fi tness trainers and competitive athletes. Visit us also on our social media platforms or our blog! IC70 Smart...
- Page 45 Notes...
- Page 46 Notes IC70 Smart...
- Page 48 Taurus IC70 Smart...
Need help?
Do you have a question about the IC70 Smart and is the answer not in the manual?
Questions and answers