Table of Contents
Advertisement
Advertisement
Table of Contents

Related Manuals for Taurus UltraForce TF-UF


Summary of Contents for Taurus UltraForce TF-UF
- Page 1 Assembly and operating instructions Multi-gym UltraForce TF-UF...
- Page 2 UltraForce...
- Page 3 Thank you for deciding for a high-quality training equipment of the brand Taurus, the brand that makes athlete‘s hearts beat faster. Taurus offers a wide range of home fitness equipment like elliptical cross trainers, ergometers, treadmills and rowing machines. Taurus equipment is the optimal equipment for all those who want to train at home independent of goals and fitness level.
- Page 4 UltraForce...
-
Page 5: Table Of Contents
CONTENTS GENERAL INFORMATION 1.1 Technical data 1.2 Personal safety 1.3 Set-up place ASSEMBLY INSTRUCTIONS, MAINTENANCE AND CARE 2.1 General instructions 2.2 Faults and Troubleshooting 2.3 Maintenance and service calendar ASSEMBLY 3.1 Parts overview 3.2 Warning notes/warning sticker 3.3 Assembly WORKOUT INSTRUCTIONS 4.1 General training instructions 4.2 Exercise and safety notes 4.3 Exercise manual... -
Page 6: General Information
GENERAL INFORMATION Technical data Weight and dimensions: Article weight (gross, including packaging): 88.6 kg Article weight (net, without packaging): 87 kg Packaging dimensions of the box (L x W x H): No. 1 approx. 151 cm x 49 cm x 22 cm, weight: 42 kg (gross, including packaging) No. -
Page 7: Personal Safety
Personal safety Before you start using the equipment, you should consult your physician that this type of exercise is suitable for you from a health perspective. Particularly affected are persons who: have a hereditary disposition to high blood pressure or heart disease, are over the age of 45, smoke, have high cholesterol values, are overweight and/or have not exercised regularly in the past year. -
Page 8: Set-Up Place
Set-up place The equipment should only be used indoors, in a sufficiently heated and dry area (ambient temperature between 10°C and 35°C). The equipment should not be used outdoors or in rooms with high humidity (over 70%) like swimming pools. The equipment should only be stored in surroundings with an ambient temperature between 5°C and 45°C. -
Page 9: Assembly Instructions, Maintenance And Care
You should therefore immediately replace damaged or worn components. Please contact your contract partner in such a case. The equipment should no longer be used until it has been repaired. When needed, only use original Taurus spare parts. Check the tightness of all screw connections once a month. -
Page 10: Faults And Troubleshooting
Faults and Troubleshooting The equipment runs through regular quality controls during production. Nevertheless, errors or malfunctions on the equipment may occur. Individual parts are often the cause of faults and replacement is usually sufficient. Please use the following overview to see the five most common errors and how to repair them. -
Page 11: Assembly
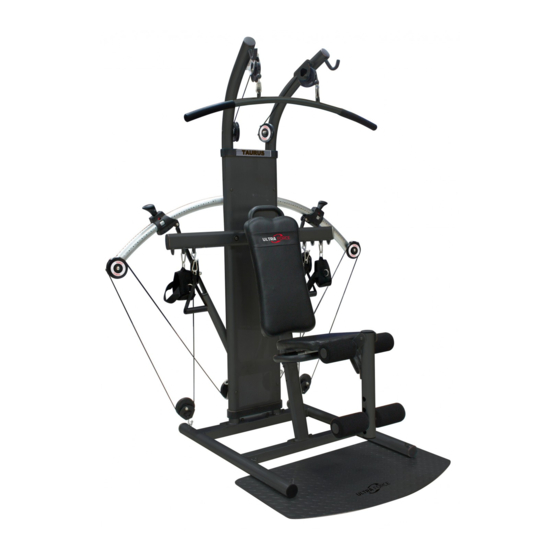
ASSEMBLY Parts overview Note: All position specifications - front, back, left, right - from these instructions are coming from the seated position of the user on the equipment whereby the user looks forward. -
Page 12: Warning Notes/Warning Sticker
Warning notes/warning sticker IMPORTANT: Please observe the attachment of the following warning and attention stickers on your equipment: CAUTION LABEL 1 If you are not using the lat bar, always hang it in the holder. WARNING LABEL 1 If you do not read and follow the safety instructions provided in the user instructions and video, this MAY RESULT IN SERIOUS INJURIES OR DEATH. - Page 13 WARNING LABEL 3 Crushing hazard! Keep hands away while using! WARNING LABEL 5 (6 positions) Do not touch the pulleys and mobile parts.
- Page 14 WARNING LABEL 4 (2 positions) WARNING! Make sure that the pin is locked in the position before you begin the exercise. WARNING LABEL 7 (2 positions) WARNING! When you do exercises while standing, keep your feet on the ground plate. UltraForce...
- Page 15 CAUTION LABEL 2 NOTE! In order to transport the equipment, we recommend doing this with two persons. WARNING LABEL 5 (6 positions) WARNING! Do not touch the pulleys and mobile parts. WARNING LABEL 6 (2 positions) WARNING! Crushing hazard - only use adjusting arm with free hands. WARNING LABEL 8 (2 positions) WARNING! Content under pressure;...
-
Page 16: Assembly
Assembly In a few cases, our products contain parts that were pre-lubricated in the factory. During assembly and during training, we recommend protecting your floor with the mat. Make sure that you have completely read the instructions and all parts and tools on p. 17 are available. - Page 17 Packaging contents Place the parts in front of you as in this image. Become familiar with the part numbers and names. Make sure that the delivery is complete.
- Page 18 Required parts for step 1: Step 1: Assembly base frame 1. Turn the main frame with the warning notes downward. 2. Position the ground plate on the main frame on the opposite side of the transport wheels and make sure that the bent side of the ground plate shows outward. 3.
- Page 19 Required parts for step 2: Step 2: Assembly of rear frame 1. Turn around the rear frame so that it is on the auxiliary strut and the warning notes point downwards. 2. Place the perforated cover and the crossbar on the frame and align the holes.
- Page 20 All nuts and screws are brought in from the front to back - with the nut on the backside. Required parts for step 3: Step 3: Assembly backrest supporting frame 1. Loosen the screws from the handle of the backrest. 2.
- Page 21 Required parts for step 4: Step 4: Assembly frame components 1. Carefully straighten up the rear frame and place it on the rear traverse of the main frame. The crossbar and the per- forated cover point forward. Mount the parts with four screws and spring washers and tighten these by hand.
- Page 22 2. Position the frame with the backrest by aligning the holes of the main frame with the holes of the frame with the backrest. Tighten the parts with two screws and spring washers. 3. Align the holes on the upper end of the backrest with the central holes in the crossbar. Mount the two Allen screws and two cap nuts and tighten these by hand.
- Page 23 Required parts for step 5: Step 5: Assembly covers 1. Remove the two (M6 x 29mm) hex head screws from the upper cover plates of the perforated metal plate with the Phillips wrench (included in delivery) and separate the front and back sides.
- Page 24 Required parts for steps 6 and 7: Step 6: Assembly of seat 1. Loosen the screws from the underside of the seat. Place the seat frame on the backside of the seat and make sure that the long socket pin and the bracket are in the same direction as the small end of the seat.
- Page 25 Step 7: Assembly of leg extension 1. Place the upper end of the leg extension tube on the bracket from the removable leg extension unit. Note: The warning note points towards the seat. Slide the barrel nut through the removable leg extension unit and the leg extension tube.
- Page 26 Required parts for step 8: Step 8: Assembly swivel arms and cylinder Place yourself behind the station. 1. Slide the right swivel arm on the supportive bar on the upper crossbar of the main frame. The label from the swivel arm points forward. Mount the right swivel arm with a large washer and a hex head screw.
- Page 27 All nuts and screws are brought in from the front to back - with the nut on the backside. 4. Lift the right swivel arm and the resistance cylinder. Mount the upper end of the cylinder with the lower part of the right adjusting unit with a cap nut and a hex head screw.
- Page 28 Required parts for step 9: Step 9: Assembly pulleys 1. Determine the positions of the individual pulley holders, see markings. 2. Take the two pulleys without the UltraForce logo and the two pulley brackets, which are designated for the lower end of the main frame. Mount the pulleys on the lower backside of the main frame with two Allen screws and two cap nuts.
- Page 29 Required parts for step 10: Step 10: Assembly of the cable 1. Lay out and unwind cable. Slide the chrome pulley to one end of the cable. Slide the other two pulleys to the other end of the cable. This keeps the cable unwind during installation. 2.
- Page 30 UltraForce...
- Page 31 Accessories: 1. Mount the lat bar on the large snap hook on the upper frame. Then place the lat bar in the designated hook on the upper frame. 2. Mount the handles with the large snap hook on the end of the cable on the crossbar. Note: The foot loops can now be suspended on the hook from the leg extension unit.
- Page 32 Step 11: Transport We recommend you use 2 people when moving the equipment. Make sure nothing is in your way before moving exerciser. Grab frame securely from behind the Bio Force exerciser, place your foot on the rear cross member (as shown in figure 1), tilt back until wheels engage, roll across the floor to your desired location (figure 2).
-
Page 33: Workout Instructions
WORKOUT INSTRUCTIONS The Taurus UltraForce is a multi-functional multi-gym for achieving many training targets. Muscle toning and tightening are possible as well as an improvement of strength-endurance and an effective support in losing weight. We have compiled some important training tips for you so you can achieve your training targets as effectively, safely and lastingly as possible. -
Page 34: Exercise And Safety Notes
Clothing All training clothing should sit loosely and comfortably (for enough freedom of movement) and give self-confidence. Never wear rubber and synthetic clothing; such materials impair the evaporation of sweat and may cause a dangerous increase in body temperature. Wear comfortable, supportive sport shoes with anti-slip soles like running or aerobic shoes. -
Page 35: Exercise Manual
Exercise manual A detailed description of all exercises can be found in the included training instructions. Equipment settings Set resistance with glide-n-lock technology The resistance setting is done quickly. Simply pull up the glide-n-lock slider to unlock it from its current position. - Page 36 UltraForce...
-
Page 37: Stretching Exercises
Stretching exercises for leg & chest muscles 1. Exercise: Stretching of front thigh / leg extension (quadriceps) • Stable position, grab arches of feet • Pull heel towards buttocks, knee points downwards (no abduction) • Straight upper body, avoid tilting the pelvic forward (hollow back) by tensing the abdominal muscles •... - Page 38 3. Exercise: Stretching the calf muscles (gastrocnemius) • Place feet parallel to each other pointing forward, the heels touch the floor • Support yourself on a chair coming from a lunge • Move your body weight to the front leg, press your heel from the rear leg towards the floor and hold the contact •...
-
Page 39: Workout Journal
Workout journal Date Time (min.) Training weight Calories burnt Body weight Ø Pulse Distance Resistance level I feel ... -
Page 40: Warranty Information
WARRANTY INFORMATION Taurus fitness equipment is subject to strict quality controls. However, if a fitness equipment purchased from us does not work perfectly, we take it very seriously and ask you to contact our customer service as indicated. We are happy to help you by phone via our service hotline. - Page 41 Warranty service Within the warranty period, equipment which develops faults as a result of material or manufacturing defects, will be repaired or replaced at our discretion. Ownership of equipment or parts of equipment which have been replaced is transferred to us. The warranty period is not extended nor does a new warranty period begin following repair or replacement under the warranty.
-
Page 42: Disposal
DISPOSAL At the end of its operational life, this equipment cannot be disposed of in normal household waste. Instead, it must be disposed of via an electricals recycling centre. Further information can be obtained from your local authority‘s recycling service. The materials can be recycled as per their symbols. -
Page 43: Ordering Spare Parts
10 am - 5 pm 9:00 am - 6:00 pm Serial number and model name Before assembling your equipment, find the serial number on the white sticker and enter it in the appropriate space. Serial number: Brand / category: Model name: Taurus multi-gym UltraForce... -
Page 44: Parts List
Parts list Description Qty. UPRIGHT FRAME PULLEY WHEEL WITH LOGO PLATE TAPPING SCREW q;2x4mm PULLEY WHEEL REARING PLASTIC PULLEY COVER OIL BEARING BOTTOM PULLEY BRACKET PERFORATED COVER FRONT TOP COVER CAP FRONT BOTTOM COVER CAP REAR COVER CAP ALUMINIUM LOGO PLATE M4X10 PHILLIPS BOLT (TAPPING SCREW q;3.5x10mm ) M60 ROUND TUBE CAP PHILLIPS BOLT M6x29mm... - Page 45 Description Qty. BASE FRAME PAD PHILLIPS SCREW M4X20mm (TAPPING SCREW q;4x20mm) TOP FRAME TUBE (L) PULLEY WHEEL(A) WITH LOGO PLATE CHRAME PULLEY ASSEMBLY ALLEN BOLT M10x38mm(THREAD LENGTH 10mm) TOP FRAME TUBE (R) TOP PULLEY WHEEL BRACKET (L) FOAM GRIP <t14x<t12x125 SWING ARM ASSEMBLY BRACKET (L) OIL BEARING CALIBRATION STICKER(L)
- Page 46 Description Qty. CYLINDER HOUSING TUBE RESISTANCE PLASTIC CAP RESISTANCE PLASTIC CAP W/PIVOT CABLE LARGE CLIP HANDLES SEAT SUPPORT FRAME SEAT HANDLE BAR SEAT HANDLE BAR GRIPS <t31.4x<t25.4x470 ALLEN BOLT M6x12mm SPRING WASHER REMOVABLE LEG TUBE BUMPER 80+118 SHORT HITCH PIN WITH LANYARD 81+118 LONG HITCH PIN W/LANYARD LEG LIFT TUBE...
- Page 47 Description Qty. HEX BOLT M8x20mm M9 LARGE WASHER q;30xq;9x2.0t M9 SMALL WASHER q;20xq;9x2.0t HEX BOLT M8x49mm(THREAD LENGTH 10mm) ACORN NUT M8 ALLEN SPACER BOLT ALLEN BOLT 5mm ALLEN BOLT M10x98mm(THREAD LENGTH 15mm) ALLEN BOLT M10x115mm(THREAD LENGTH 15mm) ALLEN BOLT M8x25 ALLEN WRENCH 6mm ALLEN WRENCH 8mm ALLEN WRENCH+SCREW DRIVER 5mm...
-
Page 48: Exploded Drawing
Exploded drawing UltraForce... - Page 49 DISCLAIMER ©2011 TAURUS is a registered brand of the company Sport-Tiedje GmbH. All rights reserved. Any use of this trademark without the explicit written permission of Sport-Tiedje is prohibited. Product and manual are subject to change. Technical data can be changed without advance notice.
-
Page 50: Exercise Manual
UltraForce BIO FORCE EXERCISE INDEX ® EXERCISE MANUAL Developing Your Bio Force Workout The choices you make about the frequency (how often), the duration (how long), and intensity (how The choices you make about the frequency (how often), the duration (how long), and hard) at which you will workout, will directly influence your results. - Page 51 BIO FORCE EXERCISE INDEX ® CHEST & BACK 72. Single Arm Seated Front Raise 73. Seated Lateral Raise 32. Seated Chest Press 74. Single Arm Seated Lateral Raise 33. Single Arm Seated Chest Press 75. Rotator Cuff - Low External Rotation 34.
- Page 52 UltraForce Exercises Legs BIO FORCE EXERCISES ® LEGS SQUAT SEAT: LEG LIFT: Stand facing frame. Feet hip width START: apart on base. Grip handles at shoulders. ACCESSORIES: Handles Flex knees, hips and ankles. MOTION: Lower until thighs are parallel to floor or slightly higher.
- Page 53 Exercises Legs BIO FORCE EXERCISES ® LEGS On/Top SEATED LEG EXTENSION SEAT: Position Sit facing away. Knees over top START: LEG LIFT: leg pads. Ankles under bottom leg bar pads. Grip handles next to seat. ACCESSORIES: None Extend knees until legs are MOTION: straight.
- Page 54 UltraForce Exercises Legs BIO FORCE EXERCISES ® LEGS STRAIGHT BAR SEAT: DEAD LIFT LEG LIFT: Stand facing frame. Feet hip START: ACCESSORIES: width apart on base with knees bent. Bar/Front Position Bend forward at hips and grip lat bar in front of shins. MOVABLE PULLEY POSITIONS Extend hips and back.
- Page 55 Exercises Legs BIO FORCE EXERCISES ® LEGS EVERSION CALF SEAT: RAISES LEG LIFT: Stand facing frame. Feet hip START: ACCESSORIES: width apart on base. Toes facing Handles outward. Grip handles at sides of body. Raise heels, bending at balls MOTION: MOVABLE PULLEY POSITIONS of feet.
- Page 56 UltraForce Exercises Legs BIO FORCE EXERCISES ® LEGS STANDING LEG PRESS SEAT: LEG LIFT: Stand facing frame. Foot harness/ START: cuff on one ankle, other foot on base. ACCESSORIES: Grip handle at top of seat with both Foot harness/ hands. Bend hip and knee of Ankle cuff working leg.
- Page 57 Exercises Legs BIO FORCE EXERCISES ® LEGS STANDING HIP SEAT: ABDUCTION LEG LIFT: Stand facing side. Foot harness/ START: ACCESSORIES: cuff on outside ankle, inside foot on Foot harness/ base. Grip handle at top of seat. Ankle cuff Lift leg to side, toes facing front. MOTION: MOVABLE PULLEY POSITIONS...
- Page 58 UltraForce Exercises Legs BIO FORCE EXERCISES ® LEGS LYING HIP SEAT: ABDUCTION/ LEG LIFT: ADDUCTION ACCESSORIES: Lie on back facing away, shoulders START: Foot harness/ on base. Foot harnesses/cuffs on ankles. Ankle cuff Grip base of frame. Lift legs 6 inches MOVABLE PULLEY off floor.
- Page 59 Exercises Legs BIO FORCE EXERCISES ® LEGS LYING SINGLE SEAT: LEG PRESS LEG LIFT: START: ACCESSORIES: MOVABLE PULLEY POSITIONS MOTION: TIPS: MUSCLE GROUPS EXERCISED: LEVEL OF DIFFICULTY: SCISSOR KICKS SEAT: LEG LIFT: START: ACCESSORIES: MOTION: MOVABLE PULLEY POSITIONS TIPS: MUSCLE GROUPS EXERCISED: LEVEL OF DIFFICULTY: FLUTTER KICKS SEAT:...
- Page 60 UltraForce Exercises Legs BIO FORCE EXERCISES ® LEGS LYING HIP ROTATION SEAT: LEG LIFT: Lie on back facing away, shoulders START: on base. Foot harnesses/cuffs on ankles. ACCESSORIES: Grip base of frame. Lift legs 6 inches Foot harness/ off floor. Ankle cuff MUSCLE GROUPS Open both legs to the side.
- Page 61 Exercises Legs BIO FORCE EXERCISES ® LEGS On/Bottom SEATED SINGLE LEG SEAT: Position ABDUCTION LEG LIFT: Sit facing side. Foot harness/cuff START: on outside ankle, other foot on floor. Lift Foot ACCESSORIES: leg parallel to floor. Grip top of seat. harness/Ankle cuff Open leg to the side, toes MOTION:...
- Page 62 UltraForce Exercises Legs BIO FORCE EXERCISES ® LEGS On/Top SEAT: SEATED ANKLE Position INVERSION LEG LIFT: Sit facing side. Foot harness/cuff START: on inside ankle, other foot on floor. Grip Foot ACCESSORIES: edge of seat. Lift leg off floor and rotate harness/Ankle cuff ankle so toes face outward.
- Page 63 Exercises Chest & Back BIO FORCE EXERCISES ® CHEST & BACK On/Top SEATED CHEST PRESS SEAT: Position Sit facing away. Grip handles with START: LEG LIFT: palms down. Elbows bent 90 degrees at shoulder level. Cables under arms. ACCESSORIES: Handles Extend elbows and press arms MOTION: straight forward.
- Page 64 UltraForce Exercises Chest & Back BIO FORCE EXERCISES ® CHEST & BACK On/Top SINGLE ARM SEAT: Position INCLINE CHEST PRESS LEG LIFT: Sit facing away. Grip one handle START: with palm down. Elbow bent 90 degrees ACCESSORIES: at shoulder level. Cable over arm. Handles Extend elbow and press arm to MOTION:...
- Page 65 Exercises Chest & Back BIO FORCE EXERCISES ® CHEST & BACK On/Top INCLINE CHEST FLY SEAT: Position Sit facing away. Grip handles with START: LEG LIFT: arms open to sides. Palms facing front. ACCESSORIES: Close and angle arms upward MOTION: Handles to head height.
- Page 66 UltraForce Exercises Chest & Back BIO FORCE EXERCISES ® CHEST & BACK On/Top CLOSED GRIP SEAT: Position CHEST PRESS LEG LIFT: Sit facing away. Grip handles with START: palms facing in. Elbows bent 90 degrees ACCESSORIES: at waist level. Cables under arms. Handles Extend elbows and press arms MOTION:...
- Page 67 Exercises Chest & Back BIO FORCE EXERCISES ® CHEST & BACK On/Bottom SEAT: SINGLE ARM Position OVERHAND PULL DOWN LEG LIFT: Sit facing frame. Grip one START: ACCESSORIES: handle with palms facing forward. Handles/Lat Tower Lean back slightly. MOVABLE PULLEY POSITIONS Bend elbow and pull handle MOTION:...
- Page 68 UltraForce Exercises Chest & Back BIO FORCE EXERCISES ® CHEST & BACK On/Bottom SEAT: NEUTRAL GRIP Position PULL DOWN LEG LIFT: Sit facing frame. Lean back START: slightly. Grip handles in neutral ACCESSORIES: position with palms facing in. Handles/Lat Tower Bend elbows and pull handles MOTION: MOVABLE PULLEY...
- Page 69 Exercises Chest & Back BIO FORCE EXERCISES ® CHEST & BACK On/Bottom SEAT: SINGLE ARM Position SEATED PULL OVER LEG LIFT: Sit facing away. Feet on base. START: Grip one handle with palm facing forward. ACCESSORIES: Handles/Lat Tower Pull arm forward and down MOTION: until handle is at waist level.
- Page 70 UltraForce Exercises Chest & Back BIO FORCE EXERCISES ® CHEST & BACK On/Bottom STANDING ROW - SEAT: Position NEUTRAL POSITION LEG LIFT: Stand facing frame. Rest legs START: against pads. Bend knees slightly. Grip ACCESSORIES: handles with thumbs facing up. Handles Bend elbows and pull handles MOTION:...
- Page 71 Exercises Chest & Back BIO FORCE EXERCISES ® CHEST & BACK On/Bottom SINGLE ARM SEAT: Position STANDING ROW - OVERHAND POSITION LEG LIFT: Stand facing frame. Rest legs START: ACCESSORIES: against pads. Bend knees slightly. Grip Handles one handle with thumb facing inward. MOVABLE PULLEY POSITIONS Bend elbow and pull handle...
- Page 72 UltraForce Exercises Chest & Back BIO FORCE EXERCISES ® CHEST & BACK STANDING STRAIGHT SEAT: ARM PULL DOWN LEG LIFT: Stand facing frame. Feet hip width START: ACCESSORIES: apart on base. Grip lat bar in wide grip Lat Bar/Lat Tower with palms facing down.
- Page 73 Exercises Schoulders BIO FORCE EXERCISES ® SHOULDERS On/Top SEAT: SEATED SHOULDER Position PRESS LEG LIFT: Sit facing away. Grip handles START: with thumbs facing in. Elbows bent ACCESSORIES: 90 degrees at shoulder level. Handles Extend elbows and press MOTION: MOVABLE PULLEY POSITIONS arms overhead.
- Page 74 UltraForce Exercises Schoulders BIO FORCE EXERCISES ® SHOULDERS SEAT: UPRIGHT ROW LEG LIFT: Stand facing frame. Feet hip width START: apart on base. Grip lat bar in front of ACCESSORIES: thighs with thumbs facing in. Bar/Front Position Bend elbows and pull bar up MOTION: to chest level.
- Page 75 Exercises Schoulders BIO FORCE EXERCISES ® SHOULDERS SEAT: TANDING LATERAL RAISE LEG LIFT: Stand facing away. Feet hip width START: ACCESSORIES: apart on base. Grip handles with arms Handles at sides, thumbs facing front. Raise arms laterally. Pause at MOTION: MOVABLE PULLEY POSITIONS top of motion.
- Page 76 UltraForce Exercises Schoulders BIO FORCE EXERCISES ® SHOULDERS SEAT: SINGLE ARM STANDING REAR LEG LIFT: DELTOID ROWS ACCESSORIES: Stand facing frame. Feet hip width Handles START: apart on base. Grip one handle in front of body with palm facing down. MOVABLE PULLEY POSITIONS Bend elbow and pull up and...
- Page 77 Exercises Schoulders BIO FORCE EXERCISES ® SHOULDERS On/Top SEAT: SINGLE ARM SEATED Position FRONT RAISE LEG LIFT: Sit facing away. Grip one handle START: with arm at side, thumb facing in. ACCESSORIES: Handles Raise arm in front of body. MOTION: Pause at top of motion.
- Page 78 UltraForce Exercises Schoulders BIO FORCE EXERCISES ® SHOULDERS SEAT: ROTATOR CUFF - LOW EXTERNAL ROTATION LEG LIFT: Stand facing side. Bend outside START: ACCESSORIES: elbow 90 degrees and grip handle in Handles front of waist. Grip back of seat with inside hand.
- Page 79 Exercises Schoulders BIO FORCE EXERCISES ® SHOULDERS SEAT: STRAIGHT ARM PULL-BACK LEG LIFT: Stand facing frame. Feet hip width START: ACCESSORIES: apart on base. Grip handles in front of Handles body with thumbs facing up. Pull arms straight back behind MOTION: MOVABLE PULLEY POSITIONS...
- Page 80 UltraForce Exercises Arms BIO FORCE EXERCISES ® ARMS SEAT: STANDING BICEPS CURL LEG LIFT: Stand facing away. Feet hip START: ACCESSORIES: width apart on base. Grip handles in Handles underhand grip with thumbs facing outward. MOVABLE PULLEY POSITIONS Bend elbows and curl handles MOTION: toward front of shoulders.
- Page 81 Exercises Arms BIO FORCE EXERCISES ® ARMS SEAT: SINGLE ARM STANDING HAMMER LEG LIFT: CURL ACCESSORIES: Stand facing away. Feet hip Handles START: width apart on base. Grip one handle in neutral grip with thumb facing forward. MOVABLE PULLEY POSITIONS Bend elbow and curl handle MOTION: toward front of shoulder.
- Page 82 UltraForce Exercises Arms BIO FORCE EXERCISES ® ARMS SEAT: CURVED BAR BICEPS CURL LEG LIFT: Stand facing frame. Feet hip width START: ACCESSORIES: apart on base. Grip lat bar in underhand Bar/Front Position grip with thumbs facing outward. Bend elbows and curl bar toward MOTION: MOVABLE PULLEY POSITIONS...
- Page 83 Exercises Arms BIO FORCE EXERCISES ® ARMS On/Bottom SEAT: SEATED WRIST CURL Position Sit facing away. Lean forward START: LEG LIFT: and rest forearms on lower thighs. Grip handles in underhand grip with palms ACCESSORIES: facing up and wrists extended. Handles Flex wrists and curl handles MOTION:...
- Page 84 UltraForce Exercises Arms BIO FORCE EXERCISES ® ARMS On/Top SEAT: SINGLE ARM Position OVERHEAD TRICEPS EXTENSION LEG LIFT: Sit facing away. Grip one handle START: ACCESSORIES: behind head. Point elbow front at Handles shoulder height. MOVABLE PULLEY POSITIONS Extend elbow and press handle MOTION: overhead.
- Page 85 Exercises Arms BIO FORCE EXERCISES ® ARMS SEAT: SPLIT GRIP TRICEPS PUSHDOWN LEG LIFT: Stand facing frame. Feet hip width START: ACCESSORIES: apart on base. Grip handles at waist Handles/Lat Tower level. Bend elbows 90 degrees. Position Extend elbows and press MOTION: MOVABLE PULLEY POSITIONS...
- Page 86 UltraForce Exercises Arms BIO FORCE EXERCISES ® ARMS SEAT: SINGLE ARM TRICEPS KICKBACK LEG LIFT: Stand facing frame. Grip one START: ACCESSORIES: handle in overhand grip with palm Handles facing down. Bend elbow 90 degrees. Lean forward slightly and place other MOVABLE PULLEY hand on seat back.
- Page 87 Exercises Arms BIO FORCE EXERCISES ® ARMS SEAT: TWO ARM REVERSE GRIP TRICEPS LEG LIFT: KICKBACK ACCESSORIES: Stand facing frame. Grip handles Handles START: in underhand grip with palms facing up. Bend elbows 90 degrees. MOVABLE PULLEY POSITIONS Extend elbows and pull handles MOTION: down and back.
- Page 88 UltraForce Exercises Arms BIO FORCE EXERCISES ® ARMS On/Top SEAT: CROSS-BODY TRICEPS Position EXTENSION LEG LIFT: Sit facing away. Bend one elbow START: and reach across body to grip handle at ACCESSORIES: opposite shoulder. Handles Extend elbow and press handle MOTION: MOVABLE PULLEY POSITIONS...
- Page 89 Exercises Abs & Lower Back BIO FORCE EXERCISES ® ABS & LOWER BACK On/Bottom SEAT: AB CRUNCH Position Sit facing away. Grip handles at START: LEG LIFT: shoulder level. Elbows point front. ACCESSORIES: Curl spine, pulling bottom of MOTION: Handles/Lat Tower ribcage down toward hips.
- Page 90 UltraForce Exercises Abs & Lower Back BIO FORCE EXERCISES ® ABS & LOWER BACK SEAT: SIDE BEND LEG LIFT: Stand facing side. Feet hip width START: apart on base. Grip one handle with ACCESSORIES: inside hand. Handles Flex trunk laterally, away from MOTION: handle.
- Page 92 Multi-gym UltraForce...
Need help?
Do you have a question about the UltraForce TF-UF and is the answer not in the manual?
Questions and answers