
Related Manuals for Taurus TF-IC90P


Summary of Contents for Taurus TF-IC90P
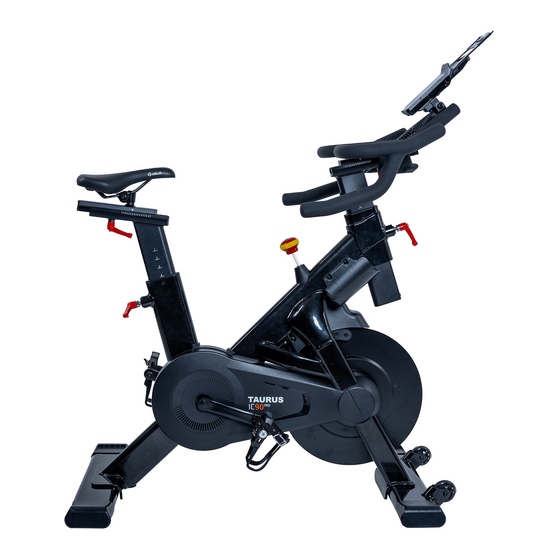
- Page 1 Assembly and Operating Instructions max. 180 kg ~ 60 Min. 51 kg L 117 | W 58 | H 143 FSTFIC90P.01.03 Art. No. TF-IC90P Taurus IC90 Pro...
- Page 2 IC90P...
-
Page 3: Table Of Contents
Content GENERAL INFORMATION Technical Data Personal Safety Electrical Safety Set-Up Place ASSEMBLY General Instructions Scope of Delivery Assembly OPERATING INSTRUCTIONS Console Display Button Functions Turning on the Console and Standby Mode Manual Mode Recovery Function Resistance Calibration Wireless Connection and Fitness Apps STORAGE AND TRANSPORT General Instructions Transportation Wheels... - Page 4 WARRANTY CONTACT IC90P...
- Page 5 European VAT Number: DE813211547 Disclaimer © TAURUS is a registered brand of the company Fitshop GmbH. All rights reserved. Any use of this trademark without the explicit written permission of Fitshop is prohibited. Product and manual are subject to change. Technical data can be changed without advance notice.
- Page 6 ABOUT THIS MANUAL Please carefully read the entire manual before installation and fi rst use. The manual will help you to quickly set up the system and explains how to safely use it. Make sure that all persons exercising with the equipment (especially children and persons with physical, sensory, mental or motor disabilities) are informed about this manual and its contents in advance.
- Page 7 Please pay close attention to the safety and maintenance instructions given here. The contract partner cannot be held liable for damage to health, accidents or damage to the equipment when it is not used in accordance with these instructions. The following safety instructions may appear in this manual: ATTENTION This notice indicates potentially hazardous situations which, if not avoided, may result in property damage.
-
Page 8: General Information
GENERAL INFORMATION Technical Data LED Display: Training time Speed Rotations per minute Distance Calories burned Pulse (when using a compatible chest strap) Watt Resistance level Resistance system: Manual generator Resistance levels: Flywheel mass: 13 kg Wattage Min. and max. watt at 60 RPM: 19 - 650 W Min. -
Page 9: Personal Safety
Personal Safety ⚠ DANGER Before you start using the equipment, you should consult your physician that this type of exercise is suitable for you from a health perspective. Particularly aff ected are persons who: have a hereditary disposition to high blood pressure or heart disease, are over the age of 45, smoke, have high cholesterol values, are overweight and/or have not exercised regularly in the past year. -
Page 10: Electrical Safety
⚠ CAUTION Be aware that if adjustment devices are left protruding, they may impede the user’s movement. ATTENTION Do not insert any objects of any kind into the openings of the device. To protect the equipment from use by unauthorised third parties, always remove the power cable (if existing) when not in use and store it in a safe place that is inaccessible to unauthorised persons (e.g. -
Page 11: Set-Up Place
Set-Up Place ⚠ WARNING Do not place the equipment in main corridors or escape routes. ⚠ CAUTION Choose a location in which to place the equipment such that there is enough free space/ clearance to the front, the rear and to the sides of the equipment. The training room should be well ventilated during training and not be exposed to any draughts. -
Page 12: Assembly
ASSEMBLY General Instructions ⚠ DANGER Do not leave any tools, packaging materials such as foils or small parts lying around, as otherwise there is a danger of suff ocation for children. Keep children away from the equipment during assembly. ⚠ WARNING Pay attention to the instructions attached to the equipment in order to reduce the risk of injuries. -
Page 13: Scope Of Delivery
Scope of Delivery The scope of delivery consist of the following parts. At the beginning, check whether all parts and tools belonging to the device are included in the scope of delivery and whether damage has occurred. In the event of complaints, the contractual partner must be contacted directly. ⚠... - Page 14 IC90P...
-
Page 15: Assembly
Assembly Before assembly, take a close look at the individual assembly steps shown and carry out the assembly in the order given. NOTICE First loosely screw all parts together and check that they fi t properly. Tighten the screws using the tool only when you are instructed to do so. - Page 16 Step 1: Assembly of the Stabalizers and Bottle Holder Assemble the front and rear stabilizer (2 & 3) to the main frame (1) with two Allen bolts (33) each. Assemble the left and right bottle holders (82L $ 82R) to the main frame (1) with two screws (69) each.
- Page 17 Step 2: Assembly of the Seat Post, Seat and Pedals Unscrew and pull the round knob (50). Insert the seat post (4) into the main frame (1) ⚠ CAUTION Make sure the round knob (50) audibly engages in one of the adjustment holes of the seat post (4).
- Page 18 Step 3: Assembly of the Handlebar Fix the handlebar (6) to the front post (5) with the L knob (90). NOTICE The L knob (90) is under the front post (5). Should the handlebar (6) be loose after the assembly, push the L knob (90) slightly down: Tighten the bolt under the L knob (90) with the Allen key.
- Page 19 Step 4: Assembly of Computer Fixing Plate and the Computer Disassemble the four screws (70) from the computer (10). Assemble the computer fi xing plate (9) to the handlebar (6) with two bolts (88) and two washers (89). ATTENTION Be careful not to pinch the cables during the following steps. Pass the upper computer cable (104) through the opening of the computer fi xing plate (36).
- Page 20 Step 5: Alignment of the Feet If the fl oor is uneven, you can stabilize the equipment by turning the two setting screws under the main frame. Lift the equipment on the desired side and rotate the setting screws under the main frame. Rotate the screws clockwise in order to remove them and to raise the equipment.
- Page 21 Step 7: Adjusting the Handlebar Position Height Adjustment ⚠ CAUTION The front post is marked with “STOP” for the minimum insertion depth. When adjusting, make sure not to exceed the minimum insertion depth. Loosen and pull the round knob (50) to adjust the height of the front post.
-
Page 22: Operating Instructions
OPERATING INSTRUCTIONS NOTICE Familiarise yourself with all the functions and setting options of the device before starting training. Have the proper use of this product explained to you by a specialist. Always start your training with low intensity and increase evenly and gently. End your training with a cool-down phase. -
Page 23: Button Functions
Display of the wattage WATT Display range 0-999 Display of rotations per minute Display range 0 - 999 LOAD (Resistance Display of the resistance level level) The resistance level is displayed in colored segments (green, orange and red). Green - low; Red - high Display range 0 - 99 Button Functions START/PAUSE... -
Page 24: Turning On The Console And Standby Mode
Turning on the Console and Standby Mode Turn on the console. NOTICE The console turns on once the pedals are set into motion. After the console is turned on, the LED display lights up for 2 seconds. After that, the preset value for the wheel diameter is displayed for 1 second and the time setting is shown. ... - Page 25 Tap on START/STOP and start your workout. The values appear on the display. When adjusting the VR (variable resistor), the matrix and LOAD are synchronized. Tap on START/STOP to pause your workout. Tap on RESET to get back to the time settings (TIME).
-
Page 26: Recovery Function
Recovery Function The recovery function calculates your resting heart rate after your workout. NOTICE For this function you must wear a compatible chest strap. ⚠ WARNING Your training equipment is not a medical device. The heart rate measurement of this equipment may be inaccurate. -
Page 27: Wireless Connection And Fitness Apps
Wireless Connection and Fitness Apps This console is equipped with a wireless interface. Please take note that your mobile device needs to be compatible with the wireless interface of the treadmill. To use training apps you will have to activate the wireless connection function on your mobile device (tablet or smart phone) and start the fi tness app. -
Page 28: Storage And Transport
STORAGE AND TRANSPORT General Instructions ⚠ WARNING The storage location should be chosen so that improper use by third parties or children can be prevented. If your equipment does not have transportation wheels, the equipment must be disassembled before transportation. ATTENTION Make sure that the equipment is protected from moisture, dust and dirt in the selected storage location. -
Page 29: Troubleshooting, Care And Maintenance
TROUBLESHOOTING, CARE AND MAINTENANCE General Instructions ⚠ WARNING Do not make any improper changes to the equipment. ⚠ CAUTION Damaged or worn components may aff ect your safety and the life of the equipment. Therefore, immediately replace damaged or worn components. In such a case, contact the contract partner. -
Page 30: Error Codes And Troubleshooting
Error Codes and Troubleshooting The electronics of the equipment continuously carries out tests. In case of deviations, an error code appears on the display and normal operation is stopped for your safety. Please contact the contract partner for technical support. IC90P... -
Page 31: Maintenance And Inspection Calendar
Maintenance and Inspection Calendar To avoid damage from body sweat, the equipment must be cleaned with a damp towel (no solvents!) after each training session. The following routine tasks must be performed at the specifi ed intervals: Part Weekly Monthly Display console Plastic covers Screws and cable connections... -
Page 32: Recommended Accessories
RECOMMENDED ACCESSORIES To make your training experience even more effi cient and pleasant, we recommend that you add suiting accessories to your fi tness equipment. For indoor cycles this could for example be a fl oor mat, which makes your fi tness equipment stand more securely and also protects the fl oor from sweat or silicone spray to keep moving parts in good shape. -
Page 33: Ordering Spare Parts
The serial number of your equipment is unique. It’s located on a white sticker. Enter the serial number in the appropriate fi eld. Serial number: Brand / Category: Taurus / indoor cycle Model Name: Taurus IC90 Pro Indoor Cycle Article Number: TF-IC90P... -
Page 34: Parts List
Parts List Name Supplier Parts No. Specifi cation Qty. Main frame 850G1-3-1000-BA2 2 spray 2 bake Front stabilizer 850G1-3-2100-BA0 2 spray 2 bake Rear stabilizer 850G1-3-2112-BA0 2 spray 2 bake Seat post 850G1-3-2200-AF1 Laser marking Front post 850G1-3-2000-AF0 Handlebar 850G1-3-2400-B0 Motorized generator 850G1-3-3102-00 D290*47L 11KG... - Page 35 Hex nut D9.5x8T(3/8"-26UN- 55295-2-3008-NA D9.5x8T(3/8"-26UNFx8T) Fx8T) Anti-loosen nut 3/8"-26UNFx6.5T 18600-6-3175-N1 3/8"-26UNFx6.5T Bolt(M8x1.25x60L) 50308-5-0060-F3 M8x1.25x60L Allen bolt M8x1.25x20L 25600-6-3191-F0 M8x1.25x20L "Countersunk head tapered 51405-2-0010-F0 M5*0.8*10L screw M5*0.8*10L" Adjustable wheel 76100-6-2174-B0 D50*M10*1.5 Seat tube limiter 850G1-6-2273-F0 363*19*3T Round wheel 84302-6-2175-00 D70.5*23 Allen bolt M8*1.25*40L 50308-5-0040-F3 M8*1.25*40L Nylon nut M8*1.25*8T...
- Page 36 Left chaincover 850A1-6-4501-B0 378.6*196.6*62.5 Right chaincover 850G1-6-4502-B0 625.5*299*75.3 Hole cover of chain cover 850A1-6-4505-B0 312.9*145.7*7.9 Front left decorative cover 850G1-6-4523-B0 159.2*94.6*75.3 Front right decorative cover 850G1-6-4546-B0 159.2*79.5*75.3 Flywheel cover 850A1-6-4528-B0 234.8*148.2*73.8 ScrewST4.2*15L 52842-2-0015-F0 ST4.2*15L ScrewM5x0.8x15L 52605-5-0015-F0 M5x0.8x15L Round cross 50935-2-0012-F0 ST3.5*1.41*12L bolt(ST3.5*1.41*12L) Screw M4*0.7*8L...
- Page 37 BoltM6*1.0*20L 54006-5-0020-F0 M6*1.0*20L Flat washerD18*D8.5*1.0T 55108-1-1810-W8 D18*D8.5*1.0T Bushing 24500-6-2704-F0 D13*D8.5*40L VR regulator 850A1-6-2583-00 65*15 Sensor bracket 71900-6-2565-B0 24*22*2.5T Adjustable rod 850A1-6-2228-N2 52*9*0.5T Round cross bolt 50805-2-0012-F0 M5*0.8*12L Nylon nut M5*0.8*5T 55205-1-2005-FA M5*0.8*5T Upper computer cable 850G1-6-2572-00 500L+200 Round magnet 174R4-6-2574-00 Screw M8*1.25*12L 51608-5-0012-F0 M8*1.25*12L...
-
Page 38: Exploded Drawing
Exploded Drawing IC90P... - Page 39 WARRANTY Products from TAURUS® are subject to strict quality control. However, if a fi tness equipment purchased from us does not work perfectly, we take it very seriously and ask you to contact our customer service as indicated. We are happy to help you by phone via our service hotline.
- Page 40 Warranty Conditions For the warranty to be valid, the following steps must be taken: Please contact our customer service by email or phone. If the product under warranty has to be sent in for repair, the seller bears costs. After expiry of the warranty, the buyer bears the costs of transport and insurance.
- Page 41 CONTACT TECHNIK TEKNIK OG SERVICE CUSTOMER SUPPORT �� �� �� +49 4621 4210-900 80 90 16 50 00800 2020 2772 +494621 4210 944 +49 4621 4210-945 �� +49 4621 4210-698 �� �� info@fi tshop.dk info@fi tshop.co.uk �� technik@fi tshop.de �� ��...
- Page 42 LIVE FITNESS WEBSHOP AND SOCIAL MEDIA Fitshop is Europe’s largest specialist store for www.fi tshop.co.uk home fi tness equipment with currently over 70 www.fi tshop.de/blog stores and one of the world’s most renowned online mail order companies for fi tness equipment.
- Page 44 Taurus IC90 Pro...
Need help?
Do you have a question about the TF-IC90P and is the answer not in the manual?
Questions and answers