Table of Contents
Advertisement
Quick Links
Advertisement
Table of Contents

Subscribe to Our Youtube Channel
Related Manuals for GVM GVM-PRO-YU600C


Summary of Contents for GVM GVM-PRO-YU600C
- Page 1 GVM-PRO-YU600C...
-
Page 2: Table Of Contents
CONTENTS Important Safety Instructions ---------------------------------------------- Page 1~2 Product introduction ---------------------------------------------------------- Page 3 Warning ------------------------------------------------------------------------ Page 3 Disclaimers -------------------------------------------------------------------- Page 4 Product parameter ------------------------------------------------------------ Page 4 Product structure analysis ---------------------------------------------------- Page 5 Installation method -------------------------------------------------------- Page 6~8 Description of product control keys ------------------------------------------ Page 9 Function introduction &... -
Page 3: Important Safety Instructions
IMPORTANT SAFETY INSTRUCTIONS First and foremost: this product is professional lighting and staging equipment and should be used by a professional lighting technician or under the guidance of a professional. When using this product, you must always follow the cautions below: 1.Read the product manual carefully before use. - Page 4 15.When cleaning the device, do not wipe it with a wet cloth. Use a dry and soft cloth to wipe off the dirt. 16.If an extension cord is required, it needs to have the necessary capacity to power the respective unit. Using an extension cord with a lower current capacity than the devices need may cause overheating.
-
Page 5: Product Introduction
PRODUCT INTRODUCTION Welcome to use " GVM-PRO-YU600C”, this product is specially designed for senior photography enthusiasts. The product is suitable for live streaming / outdoor / studio photography, and also for YouTube video shooting. The main features of the product are: 1.APP control, which can be controlled by your iOS and Android smart mobile... -
Page 6: Disclaimers
3. Design and specifications are subject to change without notice. PRODUCT PARAMETER ◆ Brand: GVM ◆ Product odel: GVM-PRO-YU600C ◆ Product Name: Photography light ◆ Product ype: Photography fill light ◆ Features: Multi-scene mode / High-display finger light beads ◆... -
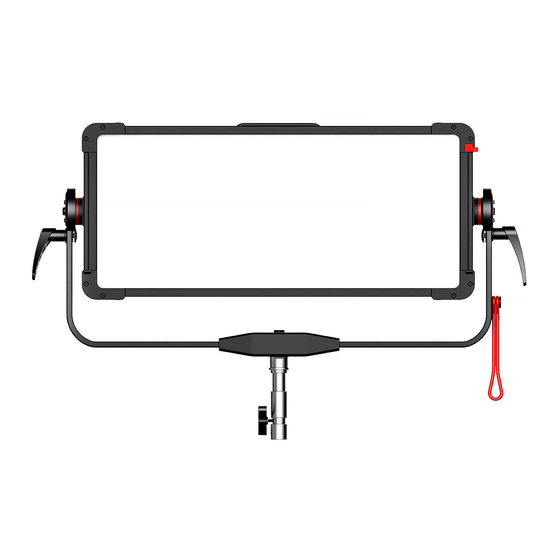
Page 7: Product Structure Analysis
PRODUCT STRUCTURE DIAGRAM Accessory lock Locking screw handle Harness storage rope U Shaped bracket Light stand fixing knob BACK ON/OFF/COOL Key Display MODE MENU Multifunctional coding knob①: INT/SELECTOR/R MODE BACK MENU ON/OFF COOL INT/SELECTOR/R CCT/HUE/G SAT/GM/B Multifunctional coding knob②: CCT/HUE/G PUSH Multifunctional coding DMX-IN... -
Page 8: Installation Method
INSTALLATION METHOD Loosen the light stand fixing knob, install the light to the light stand as shown below, and then tighten the light stand fixing knob. Loosen the locking screw handle, adjust the angle of the light, and then turn the locking screw handle tightly. - Page 9 Connect the AC power cord for the power supply. AC power cord connector The DC battery cable is connected to the power supply. DC/Battery powered interface (①+/②-)
- Page 10 The installation steps of the barn door are shown on the right. The installation steps of the Honeycomb Grid are shown on the right. The installation steps of the softbox are shown on the right.
-
Page 11: Description Of Product Control Keys
DESCRIPTION OF PRODUCT CONTROL KEYS Knob ①: INT/SELECTOR/R, multi-functional code knob, by pressing or rotating can be "selected" or "brightness/red" adjustment. knob ②: CCT/HUE/G,Multifunctional coding knob, can be adjusted by rotating “color temperature/hue/green". knob ③: SAT/GM/B, Multifunctional coding knob, can be adjusted by turning “Saturation/Green Shift/Blue". -
Page 12: Function Introduction & Instructions For Use
FUNCTION INTRODUCTION & INSTRUCTIONS FOR USE ① MENU : Press the MENU button to enter the menu settings page. Menu interface contains DMX settings, dimming curve, wireless settings, studio mode settings, frequency settings, fan settings, language, and system settings.The menu interface contains DMX settings, dimming curve, wireless settings, studio mode settings, frequency settings, fan settings, language, and system settings. - Page 13 Figure 6 FAN SETTINGS Set the cooling (Figure6) fan mode. Figure 7 LANGUAGE Set system language. (Figure7) Figure 8 SYSTEM SETTINGS View system (Figure8) information and restore factory settings. ② MODE : 6 lighting modes : CCT, HSI, RGB, GEL color paper, light source matching, and field light effect.
-
Page 14: App Control
GEL color paper mode : There are two color paper types, ROSCO and LEE, and each of the two color papers has 30 color swatches. Rotate and short press [Select ] key to select GEL mode, select 3200K or 5600K color temperature (CCT), and select the corresponding color paper of Rosco or LEE brand to output the desired light. - Page 15 Adding Devices Figure 2 ① Before adding devices, please make sure you have turned on the Bluetooth and network data function of your phone, and reset the Bluetooth of your lighting device. ② Click the "Add Device" button on the "My Devices" page to find the nearby Bluetooth lighting devices that have been opened, and select the device to be connected to the network.
-
Page 16: Quick Troubleshooting
QUICK TROUBLESHOOTING Phenomenon Check the product Solution Ensure that the AC power cable 1.When the AC power supply is used, connector is in good contact. check whether the AC port is properly connected to the power supply. The light is not on after turning on 2.Check whether the DC port is properly Make sure the DC cable plugs are in... -
Page 17: Use And Preservation
USE AND PRESERVATION Do not place the product in a high humidity, strong electromagnetic field, direct sunlight, or high-temperature environment. If the product will not be used for a long time, please disconnect power and remove the battery. Clean: Before cleaning, disconnect the power plug. And use a damp cloth instead of any detergent or soluble liquids to avoid damaging the surface layer. -
Page 18: Product Warranty
PRODUCT WARRANTY Dear user, this warranty card is an important proof for applying for warranty service. Please cooperate with the salesperson to fill it out and keep it properly. Thank you! Model Number Product Barcode Product Information Name Contact Number User Information Mailing Address... - Page 19 8.Other malfunctions or damages not caused by quality issues of the product itself. In such cases, you should seek solutions from the relevant responsible parties, and GVM will not be held liable. Malfunctions or damages caused by components, accessories, or software not covered by the warranty or beyond the warranty scope that render the product unable to function properly are not covered by the warranty.
- Page 20 Download APP GVM Official website Facebook Huizhou City Latu Photographic Equipment Co., Ltd. Web: www.gvmled.com B&H Email: bh@gvmled.com GVM Email: support@gvmled.com Amazon Email: amazonsupport@gvmled.com Warehouse Address: 12285 MCNULTY RD, STE 105 PHILADELPHIA, Pennsylvania 19154, USA...
Need help?
Do you have a question about the GVM-PRO-YU600C and is the answer not in the manual?
Questions and answers