Table of Contents
Advertisement
Available languages
Available languages
Quick Links
The Balanced Body®
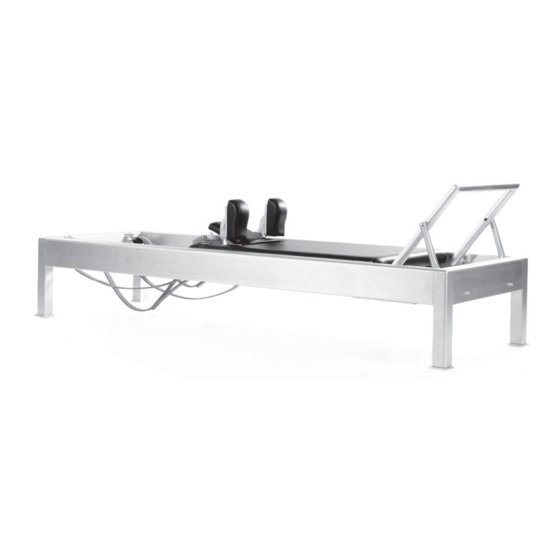
Contrology™ Classical Reformer
THIS IS A MEDICAL DEVICE
Statement of Intended Use
The Contrology™ Classical Reformer device is intended by the manufacturer to be used by people for the purposes of physiotherapy, rehabilitation, the prevention,
treatment and relief of injuries, supportive, functional therapy for a disability or for general strengthening and improving the mobility of the human body. Should
injury occur during usage please report to the manufacturer and competent authority of the Member State in which the user and/or patient is established.
For printed instructions contact Balanced Body.
Balanced Body, Inc.
5909 88th St,
Sacramento, CA 95828 USA
Contact Us
1-800-PILATES | +1-916-388-2838
pilates.com | info@pilates.com
16526 | 2021-12
EC
Balanced Body, In
Sacramento, CA
001-916-388-2838
Advertisement
Table of Contents

Related Manuals for Balanced Body Contrology


Summary of Contents for Balanced Body Contrology
- Page 1 Statement of Intended Use The Contrology™ Classical Reformer device is intended by the manufacturer to be used by people for the purposes of physiotherapy, rehabilitation, the prevention, treatment and relief of injuries, supportive, functional therapy for a disability or for general strengthening and improving the mobility of the human body. Should injury occur during usage please report to the manufacturer and competent authority of the Member State in which the user and/or patient is established.
- Page 3 Medium – The support The Contrology Classical Reformer was designed to be the best block rests on the notch in version of the original Pilates Reformer as developed and used the middle of the support by Joseph Pilates.
- Page 4 Center the carriage in the rails, then loosen the bolt that holds the side wheel, adjust the wheel as necessary and retighten the The Contrology Classical Reformer comes with a wood “drop-in” bolt. See Figure E. Typical gap is the thickness of a business card Gear Block.
- Page 5 NOTE: If using the 89” Contrology Reformer and the ADJUSTING THE STRAPS springbar is in the first gear, traveling the entire rail length without the Carriage Block can over stretch the springs. Under the carriage where the leather strap connects, the eye bolt has the option to adjust in/out.
- Page 6 If the hook shows a lot of wear, discontinue using the spring to the quality of the equipment. This guide was created to help immediately and call Balanced Body to replace spring or snap. you use and maintain your equipment for optimum safety. Please See Figure 2.
- Page 7 If you notice wear on the slider knob Disconnect the springs and clean the entire length of the tracks pins, please call Balanced Body to replace. Using the PTB in this with a soft cloth and Balanced Body Cleaner, mild soap with condition could cause injury.
- Page 8 Only trained, experienced users should use the PTB. A spotter should always maintain control of the bar with one hand. Figure 8. If your chair is a Balanced Body If the user should lose control of the bar, the spotter can maintain Split-step Pedal Chair (Combo Chair), control of it.
-
Page 9: Replacement Parts
Date and description of each repair, including name and www.pilates.com contact information for person or company performing 5909 88th Street, Sacramento, CA 95828 USA the repair. Click here for Balanced Body Patent Data. MAINTENANCE SCHEDULE ASSEMBLY AND MAINTENANCE PODCASTS All Equipment Wk. Mo. - Page 11 Assembling the Contrology™ Classical Reformer Balanced Body, In Sacramento, CA 001-916-388-2838 Contact Us Balanced Body, Inc. 1-800-PILATES | +1-916-388-2838 5909 88th St, pilates.com | info@pilates.com Sacramento, CA 95828 USA 16526 | 2021-12...
- Page 12 607-509 Leather Straps 707-306 Leather Handles 707-305 1 pair Figure C Contrology Reformer Springs SPR9600 INSTALL THE SPRINGBAR Contrology Springbar 623-518 Place the springbar with hook ends facing up into the gear angle Wooden Gear Block Stopper 950-294 as shown in Figure D. Connect at least (1) spring to an eye bolt on the springbar.
- Page 13 INSTALL THE OPTIONAL JUMPBOARD (86”/218cm and The Gear Block, used by all Reformer lengths, at the foot end is 89”/226cm models only) installed on the left side rail of the gear positions as shown in Figure F. The Gear Block has two settings, short and long. Figure F shows the short position, when spring bar is in the middle or Correct installation of the jumpboard is very important.
-
Page 14: Cleaning And Maintenance
Please call Balanced Body immediately. solution may also be used. » Be sure to dry thoroughly. QUESTIONS? » For heavier soiling please call Balanced Body Technical Please call Balanced Body Technical Support at 1-800-PILATES Support. (U.S.) or +1-916-388-2838 (International). -
Page 15: Safety And Maintenance
» Keep hands and feet away from all moving parts. When the » Remove hair and debris from the axles of the wheels. Debris Contrology Reformer is not in use, leave at least two springs can create pressure on the wheels, causing them to wear. If connected to the frame. - Page 16 Inspect headrest screws and attachments. Replace with any 3. Reset, check and clean all equipment after use sign of wear. 3. During a session Contrology Reformer 1. Reformer reset a. When the footbar is up, make sure the support is fully against the inside of the frame.
- Page 17 Crep Figure A NOTE: This is not a Contrology spring but kink will look similar Figure B QuickLink not fastened. (first pic) QuickLink fastened. (second pic) Figure C Bad snap: excessive wear on hook. (not a Contrology snap but wear will look similar).
- Page 18 Contrology Reformer Exercises WARNING: This machine is potentially dangerous and should only be used under the supervision of a trained professional. Please consult your physician before beginning an exercise program using this equipment. THE FOOTWORK – TOES SKILL LEVEL Reps: 10...
- Page 19 THE HUNDRED SKILL LEVEL – BEGINNING Reps: 10 sets Apparatus Set-Up: Springs: 4, 3 or 2 Footbar: Down Headrest: Up Additional Equipment: Straps and Handles Precautions: Neck issues, shoulder issues, weak lower back - please consult a physician before performing this exercise. Skills needed to perform basic exercise: Ability to lift head, ability to lift the legs from the center without strain.
- Page 20 THE FROGS SKILL LEVEL - BEGINNING Reps: 5 to 6 Apparatus Set-Up: Springs: 2 Footbar: Down Headrest: Up Additional Equipment: Straps, handles, extension straps Figure A Precautions: Weak lower back, sensitive feet - please consult a physician before performing this exercise. Skills needed to perform exercise: Adequate flexibility to place the feet in the straps.
- Page 21 THE SHORT BOX - ROUND SKILL LEVEL - BEGINNING Reps: 3 - 5 Apparatus Set-Up: Springs: 2 Footbar: Down Headrest: Down Figure A Additional Equipment: Box, black pad – Foot straps Precautions: Weak low back, inability to flex feet - please consult a physician before performing this exercise.
- Page 22 THE ELEPHANT SKILL LEVEL - BEGINNING Reps: 8 - 10 Apparatus Set-Up: Springs: 2 Footbar: Up Headrest: Up Precautions: Hip issues, inversion issues, low blood pressure - please consult a physician before performing this exercise. Skills needed to perform exercise: Figure A None.
- Page 23 THE KNEE STRETCH SERIES – ROUND SKILL LEVEL – BEGINNING Reps: 8 - 10 Apparatus Set-Up: Springs: 2 Footbar: Up Headrest: Up Precautions: Knee issues, inability to flex the foot or toes - please consult a physician before performing this exercise. Figure A Skills needed to perform exercise: Roll back on the mat.
- Page 24 Declaración de uso previsto El dispositivo Contrology Classical Reformer está diseñado con fines de fisioterapia, rehabilitación, prevención, tratamiento y alivio de lesiones, terapia de apoyo y funcional para una discapacidad o para el fortalecimiento general y la mejora de la movilidad del cuerpo humano. En caso de que se produzcan lesiones durante su uso, reporte al fabricante y a la autoridad competente del Estado miembro en el que está...
- Page 26 Medio: el bloque de apoyo descansa en la muesca El Contrology Classical Reformer fue diseñado para ser la mejor que tiene en el medio. Ver versión del Reformador de Pilates original desarrollado y utilizado figura B.
- Page 27 Levante el carro para sacarlo de la estructura y colóquelo en el suelo. Coloque un trapo o toallas en la superficie de los carriles El Contrology Classical Reformer viene con un bloque de de rodadura del carro. Coloque el Reformer nuevamente en la engranajes de madera de uso directo.
- Page 28 Figura G » Sin muelles: se utiliza para agregar dificultad en ejercicios en NOTA: si se utiliza el Contrology Reformer de 89" los que el usuario tiene que controlar el carro (abdominales de y la barra de resorte está en el primer engranaje, el rodillas, elefante, series de estiramiento largo).
- Page 29 Todos los resortes de Balanced Body deben ser reemplazados por lo menos cada dos CÁNCAMOS, TUERCAS Y TORNILLOS años. Ciertos entornos y usos pueden acortar la vida útil de los resortes y es posible que deba reemplazarlos con mayor frecuencia.
- Page 30 Desconecte los resortes y limpie toda la longitud de los rieles con Lubricación. Nunca rocíe silicona cerca o dentro de las ruedas un paño suave y con Balanced Body Cleaner, un jabón suave con agua o un limpiador comercial suave como Fantastik® o 409®. No - esto puede remover el lubricante de los rodamientos y utilice limpiadores abrasivos o almohadillas, ya que pueden dañar...
- Page 31 Cactus Springtree. Si los pasadores no permanecen en los orifi cios de los tubos, es necesario cambiar las perillas. Llame a Balanced Body para Figura 8: Arandela de fi bra obtener piezas de repuesto.
-
Page 32: Programa De Mantenimiento
Balanced Body para obtener piezas de repuesto. Clic aquí para obtener datos de patentes de Balanced Body. Clic aquí para obtener datos de patentes de Balanced Body. REGISTRO DE INSPECCIÓN Y MANTENIMIENTO DEL... - Page 33 Cinta de los pies 210-072 Cintas extensoras 607-509 Correas de cuero 707-306 Agarraderas de cuero 707-305 1 par Muelles del Contrology SPR9600 Figura C Reformer Barra de resortes del INSTALACIÓN DE LA BARRA DE RESORTES 623-518 Contrology Tope de madera de bloque...
- Page 34 INSTALAR LA PLATAFORMA DE SALTO OPCIONAL El bloque de engranajes, utilizado por todas las longitudes de (solo modelos de 86”/218 cm y 89 ”/226 cm) Reformer, al extremo del pie, se instala en el riel lateral izquierdo de las posiciones de engranajes, como se muestra en la Figura F. El bloque de engranajes tiene dos configuraciones, corta y larga.
-
Page 35: Limpieza Y Mantenimiento
Balanced Body ofrece la solución desinfectante EN CASO DE DAÑOS POR FLETE Balanced Body Clean™ . El uso de cualquier otra solución (especialmente aquellas que contienen aceites esenciales) Si hay daños con su carga, asegúrese de guardar todo el material acortarán la vida útil de algunos equipos y no se recomiendan. -
Page 36: Seguridad Y Mantenimiento
» Revise y apriete todos los tornillos y pernos. Sustituya los tornillos, pasadores de retención y otras piezas que falten. » No coloque el Contrology Reformer en posición vertical si no tiene el juego de ruedas. » Revise mensualmente los pernos de la barra para los pies para asegurarse de que aún estén apretados. - Page 37 Consultar la imagen «C» al final de este documento. 3. Restablecer, revisar y limpiar todo el material después del uso Barra de pies Contrology Reformer i. Comprobar los tornillos laterales y apretarlos si es 1. Restablecimiento del Reformer necesario.
- Page 38 Retorcimiento Figura A NOTA: Este no es un resorte de Contrology, pero la torcedura se verá similar Figura B QuickLink no está sujeto. (primera foto) QuickLink está sujeto. (segunda foto) Figura C Mal encaje: desgaste excesivo del gancho. (no esta el chasquido del Contrology pero el desgaste se verá...
- Page 39 Ejercicios para el Contrology Reformer ADVERTENCIA: Esta máquina es potencialmente peligrosa y debe usarse solo bajo la supervisión de un profesional capacitado. Consulta con tu médico antes de comenzar un programa de ejercicios usando este aparato. TRABAJO DE PIES: DEDOS DE LOS PIES NIVEL DE DIFICULTAD Repeticiones: 10 Preparación del aparato:...
- Page 40 LOS CIEN NIVEL DE DIFICULTAD Repeticiones: 10 series Preparación del aparato: Muelles: 4, 3 o 2 Barra de pies: abajo Reposacabezas: arriba Equipamiento adicional: correas y asas. Precauciones: Problemas de cuello, problemas de hombros, debilidad en la zona lumbar: consultar a un médico antes de realizar este ejercicio. Habilidades necesarias para realizar el ejercicio básico: Posibilidad de levantar la cabeza y de levantar las piernas desde el centro sin dificultad.
- Page 41 LA RANA NIVEL DE DIFICULTAD: PRINCIPIANTE Repeticiones: 5 to 6 Preparación del aparato:: Muelles: 2 Barra de pies: abajo Reposacabezas: arriba Equipamiento adicional: Correas, asas y correas de extensión. Imagen A Precauciones: Espalda baja débil, pies sensibles: consultar a un médico antes de realizar este ejercicio.
- Page 42 LA CAJA CORTA: REDONDA NIVEL DE DIFICULTAD: PRINCIPIANTE Repeticiones: 3 - 5 Preparación del aparato: Muelles: 2 Barra de pies: abajo Reposacabezas: abajo Imagen A Equipamiento adicional: Caja, almohadilla negra y correas para los pies. Precauciones: Espalda baja débil, incapacidad para flexionar los pies: consultar a un médico antes de realizar este ejercicio.
- Page 43 EL ELEFANTE NIVEL DE DIFICULTAD: PRINCIPIANTE Repeticiones: 8 - 10 Preparación del aparato: Muelles: 2 Barra de pies: arriba Reposacabezas: arriba Precauciones: Problemas de cadera, problemas con inversiones, presión arterial baja: consultar a un médico antes de realizar este ejercicio. Imagen A Habilidades necesarias para realizar el ejercicio: Ninguna Posición inicial (imagen A)
- Page 44 SERIE DE ESTIRAMIENTO DE RODILLAS: RONDA NIVEL DE DIFICULTAD: PRINCIPIANTE Repeticiones: 8 - 10 Preparación del aparato: Muelles: 2 Barra de pies: abajo: arriba Reposacabezas: arriba Precauciones: Problemas de rodilla, incapacidad para flexionar el pie o los dedos: consultar a un médico antes de realizar este ejercicio. Imagen A Habilidades necesarias para realizar el ejercicio: Rodar hacia atrás sobre la colchoneta.
- Page 45 In caso di infortuni durante l’utilizzo, rapporto al produttore e all’autorità competente dello Stato membro in cui è stabilito l’utilizzatore e / o il paz iente. Per le istruzioni stampate contatta Balanced Body. Balanced Body, In...
- Page 47 Il Reformer classico Contrology è stato realizzato a partire dalla migliore versione esistente del Reformer Pilates, come progettato Medio – Il blocco di e usato da Joseph Pilates.
- Page 48 (ruote rivolte verso l'alto) sugli asciugamani. Centrare il carrello nelle guide, quindi Il Reformer classico Contrology è dotato di un meccanismo di allentare il bullone che fissa la ruota laterale, regolare la ruota a blocco "a incasso".
- Page 49 Figura G » Nessuna molla: utilizzata per aggiungere difficoltà agli NOTA: se si utilizza il Reformer Contrology 89”, la barra esercizi nei quali l'utente ha bisogno di controllare il carrello a molle deve essere posizionata nella prima posizione e...
- Page 50 Pilates. Per oltre 35 anni, Balanced Body ha introdotto innovazioni in Moschettoni fatto di sicurezza nelle attrezzature di Pilates. Molti dei nostri Controllare che i moschettoni non presentino usura, con...
- Page 51 Sganciare le molle e pulire le guide su tutta la lunghezza con un panno morbido e il Cleaner Balanced Body, acqua e sapone Spruzzare direttamente una piccola quantità di silicone asciutto neutro o un detergente comune tipo: Fantastik®...
- Page 52 Se non serrano nei fori dei tubi, è valutate l’upgrading al modello necessario sostituire il meccanismo di tiraggio della manopola. Cactus Springtree). Contattare Balanced Body per richiedere i pezzi di ricambio. Barra push-through (PTB) con regolazione punta a T. Per gli Figura 8: Rondella in fi bra esercizi con le molle fi ssate in basso, se la testa del cliente è...
-
Page 53: Pezzi Di Ricambio
1. una descrizione della macchina, compreso il numero di serie, la data, il luogo di acquisto e il produttore. Tutte queste Fare clic qui per i dati sui brevetti di Balanced Body. Fare clic qui per i dati sui brevetti di Balanced Body. - Page 54 Collocare la barra a molle all'estremità del gancio rivolta verso l'alto nell'angolo del meccanismo, come indicato nella figura D. Collegare almeno 1 molla alla vite ad occhiello della barra a molle. Barra a molle Contrology 623-518 Blocco del meccanismo in...
- Page 55 INSTALLAZIONE DELLA JUMPBOARD OPZIONALE Il blocco del meccanismo utilizzato sui Reformer di tutte le (unicamente per i modelli 86”/218 cm e 89”/226 cm) lunghezze, all'estremità inferiore, è installato sul lato sinistro della guida delle posizioni di blocco, come indicato nella figura F. Il blocco del meccanismo presenta due regolazioni, corta e lunga.
-
Page 56: Pulizia E Manutenzione
L'attrezzatura è rivestita con BeautyGard®, in grado di offrire protezione antibatterica. Se si desidera maggiore disinfezione, DANNI DURANTE IL TRASPORTO Balanced Body offre la soluzione Balanced Body Clean™ (particolarmente quelle contenenti oli essenziali), che potrebbe In caso di danni durante il trasporto, assicurarsi di... -
Page 57: Sicurezza E Manutenzione
Balanced Body il medico. » Controllare e serrare tutte le viti e i bulloni. Sostituire eventuali » Non posizionare l’Contrology Reformer in verticale senza il kit viti, perni di tenuta o altri componenti mancanti. ruote. » Controllare mensilmente i bulloni del poggiapiedi per assicurarsi che siano sempre ben fissati. - Page 58 Controllare le viti e stringerle, se necessario. 3. Rettificare, controllare e pulire tutta l’attrezzatura dopo l’uso f. Carrello i. Ispezionare le viti della barra poggiatesta e gli attacchi. Reformer Contrology Sostituirli in caso di segni di usura. 1. Rettifica Reformer 3. Durante la sessione a.
- Page 59 Crep Figura A NOTA: questa non è la primavera di una Contrology ma il nodo sarà simile. Figura B QuickLink non è fissato. (la prima foto) QuickLink è fissato. (la seconda foto) Figura C Moschettone in cattive condizioni: usura eccessiva sul gancio.
- Page 60 Esercizi sul Reformer con il metodo Contrology ATTENZIONE: Questa macchina è potenzialmente pericolosa e dovrebbe essere utilizzata sotto la guida di un professionista qualificato. Assicurarsi di consultare il proprio medico, prima di iniziare qualsiasi nuovo programma di allenamento con questa attrezzatura.
- Page 61 LIVELLO DI DIFFICOLTÀ I CENTO Ripetizioni: 10 set Impostazione dell’attrezzatura: Molle: 4, 3 or 2 Barra poggiapiedi: verso il basso Barra poggiatesta: verso l’alto Attrezzatura aggiuntiva: Cinghie e maniglie Precauzioni: Problemi al collo, alle spalle, zona lombare debole consultare un medico prima di eseguire gli esercizi.
- Page 62 LE RANE LIVELLO DI DIFFICOLTÀ - PRINCIPIANTI Ripetizioni: 5 a 6 Impostazione dell’attrezzatura: Molle: 2 Barra Poggiapiedi: Verso il basso Poggiatesta: Su Attrezzatura aggiuntiva: Cinghie, maniglie, cinghie per estensione. Figura A Precauzioni: Zona lombare debole, piedi sensibili - consultare un medico prima di svolgere l’esercizio.
- Page 63 SHORT BOX - LIVELLO DI DIFFICOLTÀ CURVA - PRINCIPIANTI Ripetizioni: 3 - 5 Impostazione attrezzatura: Molle: 2 Poggiapiedi: verso il Passo Poggiatesta: verso il basso Figura A Attrezzatura aggiuntiva: Box, cuscinetto nero - Cinghie per i piedi Precauzioni: Zona lombare debole, impossibile flettere i piedi, consultare un medico prima di svolgere l’esercizio.
- Page 64 L’ELEFANTE LIVELLO DI DIFFICOLTÀ - PRINCIPIANTI Ripetizioni: 8 - 10 Impostazione attrezzatura: Molle: 2 Barra poggiapiedi: verso l’alto Poggiatesta: verso l’alto Precauzioni: Problemi alle anche, problemi di inversione, pressione bassa - consultare un medico prima di svolgere l’esercizio. Prerequisiti per l’esecuzione di questo esercizio: Figura A Nessuno.
- Page 65 SERIE ALLUNGAMENTO DELLE GINOCCHIA – LIVELLO DI DIFFICOLTÀ CURVA - PRINCIPIANTI Ripetizioni: 8 - 10 Impostazione attrezzatura: Molle: 2 Barra poggiapiedi: verso l’alto Poggiatesta: verso l’alto Precauzioni: Problemi alle ginocchia, impossibilità di flettere il piede o le dita dei piedi, consultare un medico prima di svolgere l’esercizio. Figura A Prerequisiti per l’esecuzione di questo esercizio: Roll back sul tappetino.
- Page 66 Déclaration spécifiant l’usage prévu L’appareil Reformer Classique Contrology a été conçu pour être utilisé à des fins de physiothérapie, de réhabilitation, de prévention, de traitement et de soulagement des blessures, de thérapie fonctionnelle et de soutien dans le cadre d’un handicap, ou de renforcement global et d’amélioration de la mobilité du corps humain. Si une blessure se produit au cours de l’utilisation, signalér au fabricant et à...
-
Page 68: Caractéristiques
être placé près d'une source de chaleur. Le Reformer Classique Contrology a été créé pour être la meilleure version de l'appareil original destiné à faire travailler Position moyenne : le bloc absolument toutes les parties du corps, appareil développé... - Page 69 à la barre d'appui, avec les deux mains sur la barre de ressorts jusqu'à atteindre la position souhaitée. Placer Le Reformer Classique Contrology est livré avec un chariot bien la barre de ressorts dans l'encoche qui convient et s'assurer centré, pour qu'il coulisse parfaitement sur les rails, dans le cadre.
- Page 70 RÉGLAGE DE LA LONGUEUR DES RESSORTS Sous le chariot, là où les lanières de cuir sont attachées, l'anneau Le Reformer Classique Contrology est livré avec les bons réglages de levage possède une option de réglage, dans deux sens. Avec concernant l'espace entre la barre de ressorts et le chariot, et la l'usure, les lanières vont se détendre et devenir plus longues.
-
Page 71: La Sécurité Avant Tout
: un guide pour un bon entretien et une utilisation sûre de votre équi- pement Pilates. Mousquetons Depuis plus de 35 ans, Balanced Body introduit des innovations en Contrôlez l’état d’usure des mousquetons (mensuellement). Tout matière de sécurité dans les équipements Pilates. Beaucoup de nos d’abord, vérifi ez que le mousqueton fonctionne correctement. - Page 72 Déconnectez les ressorts et nettoyez les rails avec un chiffon l’intérieur des roues - cela pourrait éliminer le lubrifi ant des doux et un nettoyant Balanced Body, du savon doux et de l’eau roulements et endommager les roulements. Vous pouvez acheter ou un nettoyant du commerce doux comme Fantastik®...
- Page 73 Balanced de sécurité. Pour les exercices Body propose une solution de désinfection à ressorts inférieurs, la sangle Balanced Body CleanTM . L’utilisation ou la chaîne de sécurité doit de toute autre solution (en particulier toujours fi xer la barre.
-
Page 74: Calendrier D'entretien
Les broches des curseurs ne doivent pas sortir des trous. Si une étape les broches ne restent pas dans les trous du tube, les boutons de traction doivent être remplacés ; appelez Balanced Body pour obtenir des pièces de rechange. PIÈCES DE RECHANGE Pour commander des pièces de rechange ou si vous avez des... - Page 75 Ressorts Reformer SPR9600 Contrology INSTALLATION DE LA BARRE DE RESSORTS Barre de ressorts Contrology 623-518 Mettre la barre d'appui dans le sens indiqué dans la Figure D. Connecter au moins (1) ressort à un anneau de levage sur la Gear Block en bois 950-294 barre d'appui.
- Page 76 INSTALLATION DE L'ÉQUIPEMENT POUR LE Le Gear Block, utilisé pour toutes les longueurs de Reformer, au JUMPBOARD (en option - uniquement pour les modèles niveau de l'endroit où se situent les pieds, est installé sur le côté gauche des rails comme indiqué dans la Figure F. Le Gear Block de 2,18 m et de 2,26 m) possède 2 réglages, «...
-
Page 77: Nettoyage Et Entretien
Si un niveau plus important de désinfection est recherché, Balanced Body EN CAS DE DOMMAGES CONSTATÉS LORS DE LA propose Balanced Body Clean™ . L'utilisation de solutions (en LIVRAISON particulier celles contenant des huiles essentielles) raccourcira la durée de vie de certains des accessoires et elle n'est pas... -
Page 78: Sécurité Et Entretien
» Tenez les mains et les pieds à l’abri des pièces mobiles. Quand l’Contrology Reformer n’est pas utilisé, laissez au moins » Enlevez les cheveux et les débris des axes des roulettes. deux ressorts fixés au châssis. - Page 79 Chariot i. Inspectez les vis et les attaches de l’appui-tête. Remplacez toute pièce présentant un signe d’usure. Contrology Reformer 1. Réinitialisation du Reformer Lors d’une séance a. Lorsque le cale-pied est relevé, assurez-vous que le support est entièrement appuyé contre l’intérieur du cadre.
- Page 80 Figure A NOTER : Ceci n’est pas un ressort de Contrology mais le virage sera similaire Figure B QuickLink il n’est pas fixé. (la première image) QuickLink il est attaché. (la deuxième photo) Figure C Mousqueton incorrect : Usure excessive du crochet. (ce n’est pas un snap Contrology mais l’usure sera similaire).
- Page 81 Exercices du Contrology Reformer AVERTISSEMENT : Cette machine est potentiellement dangereuse et ne doit être utilisée que sous la supervision d’un professionnel qualifié. Veuillez consulter votre médecin avant de commencer un programme d’exercice avec cet équipement. LE TRAVAIL DES PIEDS – NIVEAU D’EXPÉRIENCE ORTEILS Répétitions: 10...
- Page 82 NIVEAU D’EXPÉRIENCE HUNDRED Répétitions: 10 sets Configuration de l’appareil: Ressorts: 4, 3 ou 2 Footbar: Down Headrest: Up Équipement supplémentaire : Sangles et poignées Précautions : Problèmes de cou, problèmes d’épaules, faiblesse du bas du dos : veuillez consulter un médecin avant d’effectuer cet exercice. Compétences nécessaires pour faire l’exercice : Capacité...
- Page 83 GRENOUILLE NIVEAU D’EXPÉRIENCE - DÉBUTANT Répétitions: 5 to 6 Configuration de l’appareil: Ressorts: 2 Cale-pied : Abaissé Appuie-tête : Élevé Équipement supplémentaire : Sangles, poignées, sangles d’extension Précautions : Figure A Faiblesse du bas du dos, pieds sensibles : veuillez consulter un médecin avant d’effectuer cet exercice.
- Page 84 LA BOITE COURTE - NIVEAU D’EXPÉRIENCE - DÉBUTANT Répétitions: 3 - 5 Configuration de l’appareil: Ressorts: 2 Cale-pied : Abaissé Appuie-tête : Abaissé Image A Équipement supplémentaire : Boîte, coussin noir, Sangles des pieds Précautions : Faiblesse du bas du dos, incapacité à fléchir les pieds : veuillez consulter un médecin avant d’effectuer cet exercice.
- Page 85 L’ÉLÉPHANT NIVEAU D’EXPÉRIENCE - DÉBUTANT Répétitions: 8 - 10 Configuration de l’appareil: Ressorts: 2 Cale-pied : Élevé Appuie-tête : Élevé Précautions : Problèmes de la hanche, problèmes d’inversion, hypotension artérielle : veuillez consulter un médecin avant d’effectuer cet exercice. Compétences nécessaires pour faire l’exercice : Image A Aucun.
- Page 86 SÉRIES D’EXTENSION DES GENOUX - NIVEAU D’EXPÉRIENCE - DÉBUTANT Répétitions: 8 - 10 Configuration de l’appareil: Ressorts: 2 Cale-pied : Élevé Appuie-tête : Élevé Précautions : Problèmes de genou, incapacité à fléchir le pied ou les orteils : veuillez consulter un médecin avant d’effectuer cet exercice. Image A Compétences nécessaires pour faire l’exercice : Se pencher en arrière sur le tapis.
- Page 88 Angabe der bestimmungsgemäßen Verwendung Das Gerät Contrology™ Classical Reformer wurde vom Hersteller für die Verwendung durch Personen zu Zwecken der Physiotherapie, der Rehabilitation, der Vorbeugung, Behandlung und Linderung von Verletzungen, der unterstützenden, funktionellen Therapie bei einer Behinderung oder zur allgemeinen Stärkung und Verbesserung der Mobilität des menschlichen Körpers vorgesehen.
- Page 89 Hals verletzt. Classical Reformer enthält entflammbare Materialien, setzen sie ihn also bitte nicht direkter Hitze aus. Der Contrology Classical Reformer wurde entwickelt, um die beste Mittel – Der Stützblock Version des ursprünglichen Pilates Reformers zu sein, wie er liegt auf der Kerbe in der von Joseph Pilates entwickelt und verwendet wurde.
- Page 90 EINSTELLUNG DER FEDERSTANGE wenn der Wagen für Bein- und Fußarbeit ausgerichtet ist. SEITLICHE WAGENEINSTELLUNGEN Der Contrology Classical Reformer kann für größere Nutzer oder Nutzer mit Knieproblemen in drei verschiedenen Positionen Der Contrology Classical Reformer ist so voreingestellt, dass er ausgerichtet werden. Versuchen Sie nicht, die Federstange zu zentriert im Rahmen gleitet.
- Page 91 Elefant, lange Stretch-Serie). EINSTELLUNG DER FEDERLÄNGE EINSTELLUNG DER RIEMEN Der Contrology Classical Reformer wird mit den richtigen Abständen zwischen Wagen und Federstange sowie Federspannung geliefert. Der Montagewinkel kann an der Unterseite des Wagens eingestellt werden. Wenn Sie die Federspannung ändern möchten, lösen Sie, wie in Abbildung H...
- Page 92 Wenn der Haken große Abnutzung aufweist, stellen Sie die späteren Nachschlagen auf. Bitte rufen Sie uns an, wenn Sie Benutzung der Feder sofort ein und rufen Sie Balanced Body an, Das Nichtbeachten dieser Anweisungen kann zu um die Feder oder Schnappverbindung zu ersetzen. Siehe Abb. 2.
- Page 93 Schmierung. Niemals Silikon nahe den Rollen oder in die Die Federn aushaken und die Schienen der gesamten Länge nach mit einem weichen Tuch und Balanced Body Cleaner oder einem Rollen sprühen – dies könnte das Schmiermittel aus den milden handelsüblichen Reinigungsmittel wie Fantastik® oder 409®...
- Page 94 Stiften der Schieber feststellen, kontaktieren Sie bitte telefonisch Die Verwendung der 4. Seite Balanced Body, um Ersatz anzufordern. Die Verwendung der PTS der PTS zusammen mit dem in diesem Zustand kann zu Verletzungen führen. Sicherheitsgurt wird dringend empfohlen, um Verletzungen zu Wöchentliche Wartung der Push-Through-Stange mit Schiebern.
- Page 95 Bohrungen fallen. Wenn die Stifte nicht in den Rohrbohrungen bleiben, müssen die Zugknöpfe ausgetauscht Wenn Sie Ersatzteile bestellen möchten oder Fragen haben, werden. Wenden Sie sich für Ersatzteile an Balanced Body. erreichen Sie uns telefonisch wie folgt: USA und Kanada: 1-800-PILATES (1-800-745-2837) GERÄTEPRÜFUNG UND WARTUNGSPROTOKOLL...
- Page 96 Federn. Abbildung C Ledergriffe 707-305 1 Paar EINBAU DER FEDERSTANGE Contrology Reformer Federn SPR9600 Setzen Sie die Federstange mit den Hakenenden nach oben Contrology Federstange 623-518 in den Gangwinkel ein, wie in Abbildung D gezeigt. Verbinden Sie mindestens (1) Feder mit einer Augenschraube an der Federstange.
- Page 97 EINBAU DES OPTIONALEN SPRUNGBRETTS (nur für Der Gangblocker, der für alle Reformer-Längen verwendet wird, diese Modelle: 86" / 218 cm und 89" / 226 cm) befindet sich am Fußende auf der linken Seitenschiene der Getriebepositionen, wie in Abbildung F gezeigt. Der Gangblocker hat zwei Einstellungen, kurz und lang.
-
Page 98: Reinigung Und Instandhaltung
Eine milde Lösung aus Seife und Wasser kann ebenfalls verwendet werden. FRAGEN? » Achten Sie auf eine gründliche Trocknung. Bitte rufen Sie die technische Betreuung von Balanced Body unter 1-800-PILATES an » Bei stärkeren Verschmutzungen, wenden Sie sich bitte an die technische Unterstützung von Balanced Body. -
Page 99: Wartung
Unterseite des Schlittens. Dazu wird der Reformer auf ausreichend zu informieren. eine Seite gelegt (bitte legen Sie zu diesem Zweck eine » Bitte verwenden Sie den Contrology Reformer nur auf einer Pilatesmatte neben den Reformer, um die Oberfläche ebenen Stellfläche. - Page 100 (siehe Abbildung C am Ende dieses Dokuments). Standardeinstellung zurück und überprüfen bzw. reinigen Sie sie e. Fußbügel i. Überprüfen Sie die seitlichen Schrauben und ziehen Sie sie Contrology Reformer gegebenenfalls nach. 1. Reformer auf Standardeinstellung zurücksetzen f. Schlitten a. Der Fußbügel ist hochgeklappt.
- Page 101 Knickstelle Abbildung A NOTIZ: das ist keine Contrology Feder spring aber der Knick wird ähnlich aussehen. Abbildung B QuickLink es ist nicht befestigt. (das erste bild) QuickLink es ist befestigt. (das zweite bild) Abbildung C Beschädigte Schnappverbindung: übermäßige Abnutzung am Haken..
- Page 102 Übungen mit dem Contrology Reformer WARNHINWEIS: Die Verwendung dieses Geräts könnte gefährlich sein und sollte daher nur unter Aufsicht einer ausgebildeten Fachkraft erfolgen. Bitte konsultieren Sie Ihren Arzt, bevor Sie ein Trainingsprogramm mit diesem Gerät beginnen. FOOTWORK – ZEHEN FERTIGKEITSLEVEL 10 Wiederholungen Geräteaufbau::...
- Page 103 FERTIGKEITSLEVEL THE HUNDRED 10 Wiederholungen Geräteaufbau: Federn: 4, 3 oder 2 Fußbügel: unten Kopfstütze: oben Zusatzausrüstung: Riemen und Griffe Vorsicht bei: Nacken- und Schulterproblemen, schwacher unterer Rücken- muskulatur – bitte konsultieren Sie einen Arzt, bevor Sie diese Übung durchführen. Erforderliche Fertigkeiten, um die Grundübung durchzuführen: Fähigkeit, den Kopf zu heben und die Beine mühelos aus der Körpermitte heraus anzuheben.
- Page 104 THE FROGS FERTIGKEITSLEVEL – ANFÄNGER 5 to 6 Wiederholungen Geräteaufbau: Federn: 2 Fußbügel: unten Kopfstütze: oben Sonstiges Zubehör: Riemen, Griffe, Verlängerungsriemen Vorsicht bei: Abbildung A Schwacher unterer Rückenmuskulatur, empfindlichen Füßen – bitte konsultieren Sie einen Arzt, bevor Sie diese Übung durchführen. Erforderliche Fertigkeiten, um diese Übung durchzuführen: Ausreichende Flexibilität, um die Füße in den Riemen zu platzieren.
- Page 105 DIE SHORT BOX – RUND FERTIGKEITSLEVEL – ANFÄNGER 3 - 5 Wiederholungen Geräteaufbau: Federn: 2 Fußbügel: unten Kopfstütze: unten Abbildung A Sonstiges Zubehör: Box, schwarzes Polster – Fußriemen Vorsicht bei: schwacher unterer Rückenmuskulatur, Unfähigkeit, die Füße zu beugen – bitte konsultieren Sie einen Arzt, bevor Sie diese Übung durchführen.
- Page 106 THE ELEPHANT FERTIGKEITSLEVEL – ANFÄNGER 8 bis 10 Wiederholungen Geräteaufbau: Federn: 2 Fußbügel: oben Kopfstütze: oben Vorsicht bei: Hüft- und Inversionsproblemen, niedrigem Blutdruck – bitte konsultieren Sie einen Arzt, bevor Sie diese Übung durchführen. Erforderliche Fertigkeiten, um diese Übung durchzuführen: Abbildung A Keine.
- Page 107 DIE KNEE-STRETCH-SERIE – RUND - FERTIGKEITSLEVEL – ANFÄNGER 8 bis 10 Wiederholungen Geräteaufbau: Federn: 2 Fußbügel: oben Kopfstütze: oben Vorsicht bei: Knieproblemen, Unfähigkeit, den Fuß oder die Zehen zu beugen – konsultieren Sie bitte einen Arzt, bevor Sie diese Übung durchführen. Abbildung A Erforderliche Fertigkeiten, um diese Übung durchzuführen: Auf der Matte zurückrollen.
Need help?
Do you have a question about the Contrology and is the answer not in the manual?
Questions and answers