
Related Manuals for ETC QuickTouch+ Mk2


Summary of Contents for ETC QuickTouch+ Mk2
- Page 1 QuickTouch+ Mk2 Rigging Controller User Guide Version 2.0.0 Part Number: 8061M1210-2.0.0 Rev: A Released: 2023-07...
- Page 2 To view a list of ETC trademarks and patents, go to etcconnect.com/ip. All other trademarks, both marked and not marked, are the property of their respective owners. For a complete list of all third-party licenses that are fully incorporated herein to the extent required by each third-party license terms and conditions, please visit etcconnect.com/licenses.
-
Page 3: Table Of Contents
Resetting E-stop Select Motors Selected Motor Display Manual Motor Movement Motor Speed Set Motor Speed Before Movement Adjust Speed During Movement Stop Motor Movement Trims Manage Trims QuickTouch+ Mk2 6 Channel / 12 Channel QuickTouch+ Mk2 1 Channel Table of Contents... - Page 4 Select and Move to a Trim (QT+ MK2 6CH/12CH Only) Load Profiles and Monitoring Quick Learn Full Profile Enable Load Monitoring Status Messages Fixed Speed Remote Control Connecting the Remote Control Using the Remote Motor Speed Down Emergency Stop (E-Stop) QuickTouch+ Mk2 User Guide...
-
Page 5: Introduction
Please email comments about this manual to: TechComm@etcconnect.com. Help from ETC Technical Services If you have questions that are not answered by this document, try the ETC support website at support.etcconnect.com or the main ETC website at etcconnect.com. If none of these resources are sufficient, contact ETC Technical Services directly at one of the offices identified below. -
Page 6: Identify The Software Version
Identify the Software Version To identify the version of your QuickTouch+ Mk2 software, turn the POWER key switch from the OFF to the ON position. The software version is displayed in the LCD during the startup and system test. -
Page 7: Safety And Warnings
Do not exceed point load, Uniform Distributed Load (UDL), or Working Load Limit (WLL) or Hoist Capacity for any line set. ETC motors must only be used to move a maximum load equal to or less than the capacity of your specific motor. - Page 8 Do not open the controller or remove the outer casing if the system is connected to a power source, even if the QuickTouch+ Mk2 itself is not powered on. Doing so can result in damage to the product and is a health hazard.
-
Page 9: Working Load Limit (Wll)
Working Load Limit (WLL) The Working Load Limit (WLL) of any hoist is the maximum load capacity that a user may apply to a hoist or hoist system. All Prodigy hoists have a Working Load Limit that is identified on the product label. -
Page 10: Operation
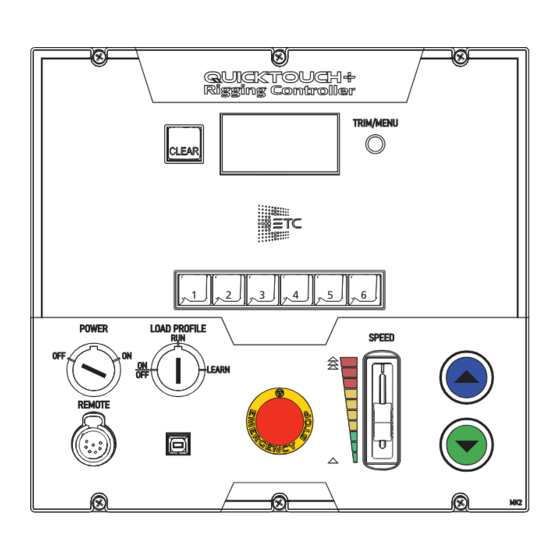
12 motors. Control Panel Interface Review the components of the control panel for your QuickTouch+ Mk2 controller as these are referenced throughout this document. The only difference between the six and 12 motor controller is the number of selection buttons. -
Page 11: Status Screen
Status Screen The status screen provides important information about your QuickTouch+ Mk2 system. When the system is running without motors selected or errors detected, the System OK screen is displayed. When you select a motor, the Motor Status screen is displayed. This screen provides static and dynamic information about the motor selected. -
Page 12: Activate The System
The contact information screen is shown as the system powers up. This screen displays contact information for the installer responsible for the system or the ETC website and phone number. Your installer may have chosen to display their contact information. The software version is also displayed during the start up. -
Page 13: Lcd E-Stop Messages
• You can have up to four external E-stop button stations • You can also have an ETC Rigging Remote Control, which also has an E-stop button E-stop buttons have an illuminated and dimmable ring around the button so they can easily be found in a dark stage environment. -
Page 14: Selected Motor Display
If both buttons are pressed and held at once, the motors do not move. If conflicting directions are pressed simultaneously from different controllers (i.e., Up on the QuickTouch+ Mk2 and Down on a remote control), the motors do not move. All selected motors stop when: •... -
Page 15: Motor Speed
Motor Speed Variable speed motors can have their speed set before or adjusted during movement. Set Motor Speed Before Movement Variable speed motors can be set to move at a specific speed prior to pressing the move buttons. This feature can be used to give a more predictable and constant speed of movement prior to performing a move. -
Page 16: Trims
Trims are user-programmable stopping points. If you do not record any trims, the motor will travel completely between the limits set when the system was commissioned. QuickTouch+ Mk2 6 Channel and QuickTouch+ Mk2 12 Channel controllers can have up to five recorded trims for each channel: •... -
Page 17: Quicktouch+ Mk2 1 Channel
4. Rotate the [Trim/Menu] button to highlight Delete Trim and press the [Trim/Menu] button to select it. 5. Press the [Trim/Menu] button again on the Yes confirmation to delete the trim. QuickTouch+ Mk2 1 Channel There is only one method each for recording and deleting the trim on the QT+1 Mk2 controller. -
Page 18: Move To Trims
Note: Manual motor movement is the only way to reach the trim set on QuickTouch+ Mk2 1 Channel controllers. When the High or Low Trim is reached, motor movement stops and can only resume in the opposite direction. -
Page 19: Load Profiles And Monitoring
Chapter 5 Load Profiles and Monitoring Load monitoring allows the system to verify that the correct load is being lifted. If the load is out of the allowable range, movement is stopped and an error message is displayed on the LCD. -
Page 20: Enable Load Monitoring
3. Press the select button for any motor to change the state of load monitoring (the following image shows 1–5 disabled and 6–12 enabled). 4. Release the key switch and it returns to the RUN position. 5. Remove the key from the key switch. QuickTouch+ Mk2 User Guide... -
Page 21: Status Messages
Chapter 6 Status Messages Below is a list of status messages that may appear on your QuickTouch+ Mk2 controller LCD. If any of these messages appear and you are not sure how to correct the situation, immediately cease use of your system and contact the ETC Rigging Installer who installed your... - Page 22 Verify that the area is safe. Release all E-stop buttons. E-Stop Make sure the respective motor is powered and connected to the control system. Responding If the problem persists, contact your system installer or ETC Technical Services. Overload Reduce the load on the batten. RC Bypass Disconnect the remote control.
-
Page 23: Fixed Speed Remote Control
This quick guide illustrates the integration and use of the fixed speed remote control with your ETC Rigging system. The remote control unit connects to any control station using a 7-pin XLR connector. It offers individual up and down control as well as an emergency stop button so that a motor can be run from a line-of-sight position. -
Page 24: Down
Once the button is released, you must return to the control station to cycle power by turning the POWER key switch to OFF and then back to ON. This will allow the motor and remote to operate normally again. QuickTouch+ Mk2 User Guide... - Page 25 New York, NY | Orlando, FL | Los Angeles, CA | Austin, TX | © 2023 Electronic Theatre Controls, Inc. etcconnect.com | Support support.etcconnect.com | Contact etcconnect.com/contactETC Trademark and patent info: etcconnect.com/ip | Third-party license agreement info: etcconnect.com/licenses Product information and specifications subject to change. ETC intends this document to be provided in its entirety. 8061M1210-2.0.0 Rev A Released 2023-07...
Need help?
Do you have a question about the QuickTouch+ Mk2 and is the answer not in the manual?
Questions and answers