Table of Contents
Advertisement
Quick Links
ETC Installation Manual
QuickTouch+ Mk2 Control Panel and Electronics
Overview
This guide provides information on installing the QuickTouch+ Mk2 control panel and electronics.
Back boxes must be installed prior to installing the control electronics and control wiring must be
run to the box. For information on installing back boxes, refer to the QuickTouch Back Box
Installation Manual that shipped with the back box.
Shipping Contents
• Control panel and electronics assembly with attached ground wire
• Two 8-position clamp-style connectors (one installed on the circuit board and one spare)
• One 8-position Emergency Stop terminator (installed on the circuit board)
• M4 x 8 mm screws (six for MK2 1CH and eight for MK2 6CH/12CH – each includes two spare
screws)
• Install Manual
Control Panel and Electronics
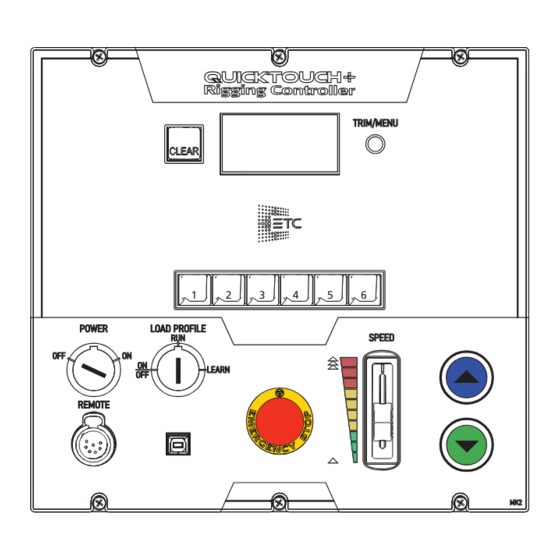
There are three QuickTouch+ Mk2 variants:
• QuickTouch+ Mk2 1 Channel controls a single channel and installs into a small back box
(8055A1100 or 8055A1102)
• QuickTouch+ Mk2 6 Channel and QuickTouch+ Mk2 12 Channel control six and 12 channels,
respectively, and install into a large back box (8055A1101 or 8055A1103)
QT+ MK2 1CH
Corporate Headquarters n Middleton, WI, USA | +1 608 831 4116
Global Offices n London, UK | Rome, IT | Holzkirchen, DE | Paris, FR | Hong Kong | Dubai, UAE | Singapore
New York, NY | Orlando, FL | Los Angeles, CA | Austin, TX | © 2023 Electronic Theatre Controls, Inc.
Web
Trademark and patent info:
Product information and specifications subject to change. ETC intends this document to be provided in its entirety.
8061M2110 Rev A Released 2023-07
SPEED
MENU
etcconnect.com
| Support
support.etcconnect.com
etcconnect.com/ip
1
2
3
4
5
6
QT+ MK2 6CH
| Contact
etcconnect.com/contactETC
| Third-party license agreement
1
2
3
4
5
6
7
8
9
10
QT+ MK2 12CH
info: etcconnect.com/licenses
11
12
Advertisement
Table of Contents

Related Manuals for ETC QuickTouch+ Mk2


Summary of Contents for ETC QuickTouch+ Mk2
- Page 1 Control Panel and Electronics There are three QuickTouch+ Mk2 variants: • QuickTouch+ Mk2 1 Channel controls a single channel and installs into a small back box (8055A1100 or 8055A1102) • QuickTouch+ Mk2 6 Channel and QuickTouch+ Mk2 12 Channel control six and 12 channels,...
- Page 2 ETC Installation Manual QuickTouch+ Mk2 Control Panel and Electronics System Configuration Before you install the control panel and electronics to the back box, you must terminate the control wiring for your system. There are two connectors that ship installed in the back of the electronics.
- Page 3 ETC Installation Manual QuickTouch+ Mk2 Control Panel and Electronics System Riser Legend Rigging System Power Injector Power and Control Distribution (PCD) boxes QuickTouch+ Mk2 Controller E-stop Rigging System Power Injector Up to 12 motors For variable-speed motors E-stop Buttons Up to 4 in a...
- Page 4 ETC Installation Manual QuickTouch+ Mk2 Control Panel and Electronics Terminate Cable to Connectors Terminate the wires of your control cables according to the control wiring diagram and labels on the connectors: 1. Label your cables (i.e. MCX, E-stop) and strip 40 mm (1.5 in) of the end of the outer cable jacket using a sheathing tool or cutter, making sure not to damage the shield or insulation of the inner conductors.
- Page 5 ETC Installation Manual QuickTouch+ Mk2 Control Panel and Electronics Install in Back Box Once you have terminated your control cables to the connectors provided, you can finish installing the control panel and electronics in the previously installed back box. Provide Strain Relief for Controls Cables Ensure that you run your cables through the strain relief points on your control electronics.
- Page 6 ETC Installation Manual QuickTouch+ Mk2 Control Panel and Electronics Terminate Ground Wire A green and yellow ground wire is attached to the back of the control panel and electrics, with an insulated quick connect flag on the loose end of the wire. Attach the flag to the ground tab that is located on the back box to ensure proper grounding of the electronics.
- Page 7 ETC Installation Manual QuickTouch+ Mk2 Control Panel and Electronics Secure in Back Box With all of the wiring terminations complete, secure the control panel in the back box. Surface-Mount Place the electronics inside the back box and line up the screw holes in the control panel with the screw troughs in the back box.
Need help?
Do you have a question about the QuickTouch+ Mk2 and is the answer not in the manual?
Questions and answers