Table of Contents
Advertisement
Advertisement
Table of Contents

Related Manuals for transnorm TS 1600-90 Helix


Summary of Contents for transnorm TS 1600-90 Helix
- Page 1 TS 1600-90 Helix Curve belt conveyor Operating instructions...
- Page 2 Contact: Documentation agent of EC Declaration of Incorporation Documentation Operating instructions, -Translation- Version 1.1 ENG, 06.05.2013 Subject to technical modifications. All rights reserved by TRANSNORM SYSTEM GmbH. Reprints and duplication only with written agreement. These operating instructions must be retained for future use. Edition V 1.0...
-
Page 3: Table Of Contents
Contents Contents Further applicable documents ....................7 EC Declaration of Incorporation ......................7 ............................ 9 Introduction Purpose of this document ........................9 Validity ............................9 Illustrations ............................. 9 Using these instructions ....................... 10 Copyright ............................11 Service ..............................11 Warranty ............................. 12 ............................... - Page 4 Replacing the base parts of the belt edge holder ................80 ..........................83 Fault clearance What to do if............................83 Motor and gear unit..........................84 Decommissioning and disposal ................... 85 Machine disposal ..........................85 Operating instructions: Curve belt conveyor TS 1600-90 Helix Version 1.1ENG, 06.05.2013...
- Page 5 Contents Main components of the machine ....................... 86 ..........................87 Contact details Head office ............................87 Subsidiaries, branch offices and sales partners worldwide ..............88 Service branches Germany ........................ 90 Suggestions and comments ....................... 90...
- Page 6 Contents Operating instructions: Curve belt conveyor TS 1600-90 Helix Version 1.1ENG, 06.05.2013...
-
Page 7: Further Applicable Documents
Further applicable documents EC Declaration of Incorporation Further applicable documents EC Declaration of Incorporation... - Page 8 Further applicable documents EC Declaration of Incorporation Operating instructions: Curve belt conveyor TS 1600-90 Helix Version 1.1ENG, 06.05.2013...
-
Page 9: Introduction
Introduction Purpose of this document Introduction Purpose of this document These operating instructions enable you to safely operate the delivered machine, defined as partly completed machinery by the EC Machinery Direc- tive, in accordance with its intended use. Read through these instructions carefully before commissioning the machine. -
Page 10: Using These Instructions
This is the first step in a sequence of actions. This is a visible result of a sequence of actions. You have achieved an objective. The action has been completed. You have completed an entire process. Operating instructions: Curve belt conveyor TS 1600-90 Helix Version 1.1ENG, 06.05.2013... -
Page 11: Copyright
This publication must be treated as strictly confidential. It may only be used by authorised persons and within the company. and must not be disclosed to third parties without the written approval of TRANSNORM SYSTEM GmbH. All documents are protected under copyright law. Dissemination or reproduc- tion of these documents, in their entirety or as excerpts, is prohibited. -
Page 12: Warranty
We accept no liability for defects or damage caused by improper handling, operation or maintenance. Note that only original spare parts and accesso- ries approved by TRANSNORM SYSTEM GmbH should be used. Unless otherwise stipulated in the contract, the warranty period begins on the day of delivery or with notification of supply readiness. -
Page 13: Safety
Safety Operating conditions Safety Operating conditions The conveyor, subsequently referred to as the machine, is an incomplete machine as defined by the EC Machinery Directive. The machine has been manufactured in keeping with current scientific and technological develop- ments. Nevertheless, there may be dangers arising from the machine under the following circumstances: Use other than for its intended purpose Improper use... -
Page 14: Impermissible Operating Conditions
Provide instructions on how to proceed and behave in the case of acci- dents and emergencies. Define issues relating to occupational health and safety as well as envi- ronmental protection. Operating instructions: Curve belt conveyor TS 1600-90 Helix Version 1.1ENG, 06.05.2013... - Page 15 Safety Operating conditions Trouble-free operation of the machine Implement the following measures to ensure trouble-free operation of the machine: Ensure that these instructions are complete, in legible condition and accessible to all personnel at all times. Only operate the machine when it is fully functional. Check the operability of the machine and the safety equipment regularly.
-
Page 16: Personnel Qualification
Are technically qualified and authorised by the operating company personnel to carry out specific tasks such as installation, maintenance and fault elimination. Corresponding training in theory and practice is a prerequisite. Operating instructions: Curve belt conveyor TS 1600-90 Helix Version 1.1ENG, 06.05.2013... -
Page 17: Remaining Risks
Safety Remaining risks The following work is to be carried out by specialised personnel only: Work requiring specialised knowledge Work on Specialised knowledge pneumatic Such work may only be carried out by personnel with specialised components knowledge of and experience in handling pneumatic systems. electrical Such work may be carried out under the guidance and supervision components... - Page 18 Damage to Leaking operating During disposal: the environ- fluids Collect operating fluids in suitable ment containers. Dispose of waste oil, lubricating grease, cleaning agents containing solvents and similar products correctly Operating instructions: Curve belt conveyor TS 1600-90 Helix Version 1.1ENG, 06.05.2013...
-
Page 19: Protective Devices
Protective devices Protective devices Various protective devices are installed on the machine to prevent limbs being drawn in and crushed. These devices are listed below. It is expressly prohibited to render unserviceable, bypass or remove protec- tive devices. These devices may only be taken off temporarily during mainte- nance or repair work. -
Page 20: Protective Devices On The Machine
Bearing cover, inside left Guide profile, outside Cover profile, outside Bearing cover, outside right Cover, right Bearing cover, outside right Finger guard, outside right Lower conveyor track cover Finger guard, outside left Operating instructions: Curve belt conveyor TS 1600-90 Helix Version 1.1ENG, 06.05.2013... -
Page 21: Description
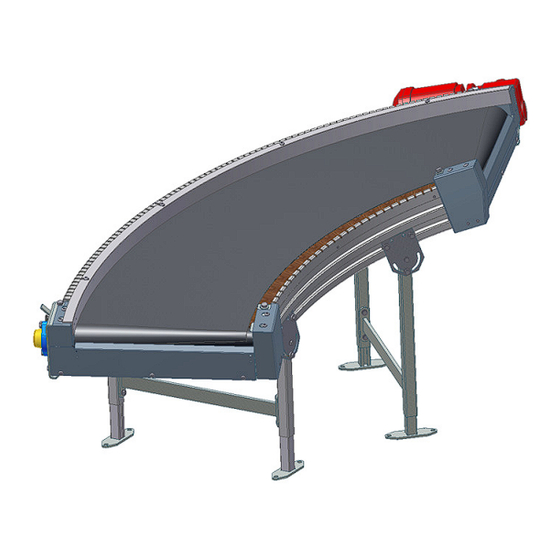
Description General description The TS 1600-90 Helix curve belt conveyor extends the range of applications for the TS 1600 series and has been optimised for the intralogistic flow of materials and goods. Packaged and unpackaged unit loads up to a weight of 50 kg and loads with complex collation structures are transported smoothly and gently. -
Page 22: Technical Description
Technical Description Technical Description The operating principle of the TS 1600-90 Helix curve belt conveyor is based on a tapered belt which is brought onto one level and driven by means of conical pulleys with a wrap angle of approx 180°. The geometry of this arrangement produces forces which pull the belt towards the centre of the circle. -
Page 23: Main Dimensions
Description Main dimensions Main dimensions The dimensions of your machine can be found in the performance specifica- tions included with the order confirmation. Use-specific dimensions are shown as variables. Hauptmaße TS 1600-90 Helix, example illustration Key to illustration Variable Description Nominal angle Nominal radius Nominal width... -
Page 24: Specifications
External pulley diameter 90 mm (DTAU) Drive / tail pulley conical Basic frame Aluminium bolted construction with lower conveyor cover Distance to up- / downstream ca. 50 mm machines Operating instructions: Curve belt conveyor TS 1600-90 Helix Version 1.1ENG, 06.05.2013... - Page 25 Description Specifications Electrical data Description Data Motor voltage supply Standard: 230 V / 400 V AC 50 Hz, see motor type identification plate for variations Motor brake voltage Standard: 230 V AC / 400 V AC, see motor type identification plate for variations Protection class Standard: IP55, not explosion-protected Location requirements...
-
Page 26: Machine Areas
Description Machine areas Machine areas The machine consists of the following areas: Areas TS 1600-90 Helix, example illustration Key to figure Description Gear motor Conveyor track Support Operating instructions: Curve belt conveyor TS 1600-90 Helix Version 1.1ENG, 06.05.2013... -
Page 27: Parts Of The Machine
Description Parts of the machine Parts of the machine Parts TS 1600-90 Helix, example illustration Key to figure Description Description Guide profile Flange bearing (drive pulley) Bearing cover, inside left Support Bed support bracket basic frame Conveyor belt Cover Belt edge holder beading Cover profile Flange bearing (tail pulley) -
Page 28: Motor Types
Detailed information on the gear motors can be found in the motor manufac- turer's operating instructions. You will find these documents in the annex to these operating instructions. Operating instructions: Curve belt conveyor TS 1600-90 Helix Version 1.1ENG, 06.05.2013... -
Page 29: Optional Machine Equipment
Description Optional machine equipment Optional machine equipment The following optional machine equipment is available: TS 1600-90 Helix with C-profile side guide TS 1600-90 Helix with transfer roller... - Page 30 Description Optional machine equipment TS 1600-90 Helix with transfer plate TS 1600-90 Helix with vibration damper Operating instructions: Curve belt conveyor TS 1600-90 Helix Version 1.1ENG, 06.05.2013...
-
Page 31: Transport And Installation
"Repairs." If the machine is transported by sea, seaworthy packaging will be additionally required. Observe the permissible operating conditions described in the following also during the storage period. If you have any queries concerning storage and transport, please contact TRANSNORM SYSTEM GmbH. -
Page 32: Disposing Of Packaging Materials
Sort the packaging components into types and dispose of them in compli- ance with the local waste disposal regulations. Observe the national regula- tions and requirements for disposal in the country of use. Operating instructions: Curve belt conveyor TS 1600-90 Helix Version 1.1ENG, 06.05.2013... -
Page 33: Installing The Machine
Transport and Installation Installing the machine Installing the machine Ground requirements The machine may only be mounted to a stable concrete surface (concrete class at least B25 or the corresponding standard in the country) or to an equal steel construction. The nominal strength must be at least 25 N/mm². The installation location must not be subject to vibration and must be capable of taking up the static and dynamic loads. -
Page 34: In-Company Transport
If there are supporting points on the basic frame, only these spots are suitable for lifting. This ensures torsion-free transport. Please refer to the delivery note for the actual gross weight. Operating instructions: Curve belt conveyor TS 1600-90 Helix Version 1.1ENG, 06.05.2013... -
Page 35: Auxiliary Equipment
Transport and Installation In-company transport Auxiliary equipment Required auxiliary equipment Indoor / gantry crane: safe working load = 2,000 kg Industrial truck: safe working load = 2,000 kg lifting height = 4,000 mm Lift truck cross beam: safe working load = 2,000 kg Lift truck hook: safe working load = 2,000 kg Round slings:... - Page 36 TRANSNORM machines. Transport bracket (E2009698) with attachment set comprising: 4x slot nut M8 (N1001434) 4x bolt M8x18 (K1009663) Is designed exclusively for in- company transport of TRANSNORM machines. Operating instructions: Curve belt conveyor TS 1600-90 Helix Version 1.1ENG, 06.05.2013...
-
Page 37: Transport With Industrial Truck Or Crane
Transport and Installation Transport with industrial truck or crane Transport with industrial truck or crane TS 1600-090 Helix (up to 45° ) Required auxiliary equipment: 1x lift truck cross beam 3x round slings / hoisting chain 3x chain shackles 3x transport brackets with attachment set... -
Page 38: Ts 1600090Fh Helix (From 45° To 90° )
TS 1600090FH Helix (from 45° to 90° ) Required auxiliary equipment: 1x adjustable cross beam, single / 4x lift truck hooks 4x round slings / hoisting chain 4x chain shackles 4x transport brackets with attachment set Operating instructions: Curve belt conveyor TS 1600-90 Helix Version 1.1ENG, 06.05.2013... -
Page 39: Ts 1600-090 Helix (Up To 90° )
Transport and Installation Transport with industrial truck or crane TS 1600-090 Helix (up to 90° ) Required auxiliary equipment: 1x adjustable cross beam, double / 4x lift truck hooks 4x round slings / hoisting chain 4x chain shackles 4x transport brackets with attachment set... -
Page 40: Final Installation On-Site
Transport and Installation Final installation on-site Final installation on-site We recommend that you have installation carried out by TRANSNORM SYSTEM GmbH. Alternatively, final installation could be carried out under the supervision of or after instruction by TRANSNORM SYSTEM GmbH. In any case, only technical personnel authorised by the operating company are permitted to carry out the installation. -
Page 41: To Carry Out Installation
Curve belt conveyors are usually delivered in one piece. Curve conveyors delivered in multipart require assembly works carried out by TRANSNORM SYSTEM GmbH. Do not install them yourself. Is the machine on optimum setting? The machine is delivered with a fitted endless conveyor belt as standard. - Page 42 Manually check the transfer accuracy at the front and back of the machine. Use loads according to specifications to carry out this check. The machine has been aligned and anchored. The machine has been installed. Operating instructions: Curve belt conveyor TS 1600-90 Helix Version 1.1ENG, 06.05.2013...
-
Page 43: Electrical Installation And Electrical Connection Of The Machine
Transport and Installation Final installation on-site Electrical installation and electrical connection of the machine Danger of fatal injury due to electric current! The machine is powered by 3-phase alternating current. The electrical installation must be carried out by qualified and authorised DANGER electricians. - Page 44 Transport and Installation Final installation on-site Operating instructions: Curve belt conveyor TS 1600-90 Helix Version 1.1ENG, 06.05.2013...
-
Page 45: Operation
Operation Commissioning Operation Commissioning Commissioning for the first time and after repairs are generally carried out in the same way. Daily commissioning using the control system for the entire conveyor system is described in the system/control documentation. The machine is designed for the following electrical connection data: 3 phases, neutral conductor and earthing conductor alternating voltage 400 V mains frequency 50 Hz. - Page 46 Tighten / align the belt, see section "Repair." Switch off the machine. Test run has been carried out. Machine has been put into operation and is ready for normal application. Operating instructions: Curve belt conveyor TS 1600-90 Helix Version 1.1ENG, 06.05.2013...
-
Page 47: Normal Operation
Operation Normal operation Normal operation Normal application includes the daily switching on and off and operation by the operating personnel. The operation of the machine using the control system for the overall plant in normal application is described in the system/control documentation. After a downtime of the machine of more than 4 weeks, all points of the maintenance schedule must be carried out. - Page 48 Operation Decommissioning Operating instructions: Curve belt conveyor TS 1600-90 Helix Version 1.1ENG, 06.05.2013...
-
Page 49: Maintenance And Care
Upon your request we will provide an optimised maintenance contract based on your individual requirements. To guarantee safe operation of the machine, we recommend that you to make use of our TRANSNORM SYSTEM Service at least once a year. -
Page 50: Maintenance Schedule
If so, replace bearings. Compare bearing temperatures. If one bearing is much hotter than the others, replace it. Semi- Joining elements Check that bolts subject to dynamic load are annual tight. Operating instructions: Curve belt conveyor TS 1600-90 Helix Version 1.1ENG, 06.05.2013... -
Page 51: Lubricating Intervals And Lubricants
Maintenance and care Lubricating intervals and lubricants Lubricating intervals and lubricants Lubricating intervals Interval Components and lubricants see annex: motor manufacturer's operating instructions Gear motor: gear oil (see annex: motor manufacturer's operating instructions) Lubricants Type of lubricant Description Gear oil See motor manufacturer's operating instructions (annex) Lubricating grease ARAL HLP 2, BP Energrease LS-EP 2, ESSO Beacon EP... -
Page 52: Cleaning And Care
Clean the machine regularly and adequately depending on the degree of dirtiness. It may only be cleaned dry (brush, cloth, compressed air, etc.). Make sure the machine and especially the electrical components are protected from wetness. Operating instructions: Curve belt conveyor TS 1600-90 Helix Version 1.1ENG, 06.05.2013... -
Page 53: Repairs
The spare parts list shows the order information to ensure the correct allocation of spare parts. Only original TRANSNORM SYSTEM GmbH spare parts should be used. DIN parts can be ordered from specialist retailers. In the event of inquiries or orders, we recommend that you send a copy of the spare parts list with details of the spare parts required to our service department. -
Page 54: Tightening Torques
Values for screw connections on aluminium parts Electro-galvanised Black, untreated screws Electro-galva- screws nised screws Tightening torque [Nm] Tightening torque [Nm] Tightening torque [Nm] 10.9 10.9 8.8 / 10.9 Operating instructions: Curve belt conveyor TS 1600-90 Helix Version 1.1ENG, 06.05.2013... -
Page 55: Guards
TRANSNORM provides captive fasteners for protective devices if the oper- ating company needs to detach a safety device from a machine. This is necessary for maintenance and cleaning. -
Page 56: Replacing Gear Motor
Use lifting equipment to raise and lower the gear motor. Carry out the following procedures: Remove all electrical supply connections from the gear motor. Remove cap (1). Remove joining elements (2). Operating instructions: Curve belt conveyor TS 1600-90 Helix Version 1.1ENG, 06.05.2013... - Page 57 Repairs Replacing gear motor Remove joining elements (3). Unscrew the gear motor (5) from the torque arm (6) and pull it off the pulley journal. Place the gear motor on a suitable support surface. Remove feather key (4) where applicable. Gear motor has been removed.
-
Page 58: Tensioning / Adjusting Belt
Loosen the belt on both sides. Undo the tensioning bolt (2). Pull out detent pin (3) and fold down the tensioning units (4). Belt has been loosened on the outside. Operating instructions: Curve belt conveyor TS 1600-90 Helix Version 1.1ENG, 06.05.2013... - Page 59 Repairs Tensioning / adjusting belt Carry out the following procedures: Loosening the belt on the inside Undo the joining elements (2) on both sides. Where applicable, remove the bearing covers (1) on both sides. Undo the grub screws (4) on both sides. Turn the tensioning bolts on both sides.
- Page 60 Wait until the belt completes several rotation before adjusting again. Switch on the machine. Check for smooth running. Switch-off the machine. Repeat steps 2 to 5, until the belt shows an accurate running cycle. Tighten grub screw (3). Operating instructions: Curve belt conveyor TS 1600-90 Helix Version 1.1ENG, 06.05.2013...
- Page 61 Repairs Tensioning / adjusting belt Where applicable, fit the bearing covers. The belt has been tensioned / adjusted. The belt has been tensioned / adjusted.
-
Page 62: Demounting/Installing The Side Guide
Mark position of the supports (1) on both sides of the frame (2). Undo screws (3). Remove side guide and place on a suitable support surface. Side guide is demounted. Operating instructions: Curve belt conveyor TS 1600-90 Helix Version 1.1ENG, 06.05.2013... - Page 63 Repairs Demounting/installing the side guide Carry out the following procedures: Fitting the side guide Position the side guide on the frame (2) (dimension "x“ = Hf+15 mm). Tighten joining elements (3) by hand. Position holder (1) on marking. Tighten joining elements (3). Side guide is fitted.
-
Page 64: Demounting / Fitting The Bed
Secure the load according to regulations. Carry out the following procedures: Undo joining elements (1 and 6). Remove guide (2) and cover profile (3), bearing covers (5) and finger guard plates (4). Operating instructions: Curve belt conveyor TS 1600-90 Helix Version 1.1ENG, 06.05.2013... - Page 65 Repairs Demounting / fitting the bed Open belt edge holder (7) and bed support bracket (8).
- Page 66 Bed has been demounted. Carry out the following procedures: Fitting the bed Align the bed in the conveyor track. Assembly to be carried out in reverse order. Operating instructions: Curve belt conveyor TS 1600-90 Helix Version 1.1ENG, 06.05.2013...
- Page 67 Repairs Demounting / fitting the bed Check that the belt edge lug (3) is correctly positioned between the ball bearings (2) in the belt edge holders (1). Check that the cover profile (5) is correctly positioned between the bed support brackets (4) and the retaining plates (6). Bed has been fitted.
-
Page 68: Replacing Flange Bearings
Demount flange Carry out the following procedures: bearing, outside Undo joining elements (1 and 6). Remove guide (2) and cover profile (3), bearing covers (5) and finger guard plates (4). Operating instructions: Curve belt conveyor TS 1600-90 Helix Version 1.1ENG, 06.05.2013... - Page 69 Repairs Replacing flange bearings Remove joining elements (9). Undo grub screws (7) and pull the flange bearing (8) off the pulley journal. Flange bearings have been removed on the outside. Mount flange Carry out the following procedures: bearing, outside Align flange bearings. Assembly to be carried out in reverse order.
- Page 70 Where applicable, remove bearing covers (1). Undo screws (5). Undo grub screws (3) and pull the flange bearing (4) off the pulley journal. Flange bearings have been demounted on the inside. Operating instructions: Curve belt conveyor TS 1600-90 Helix Version 1.1ENG, 06.05.2013...
- Page 71 Repairs Replacing flange bearings Carry out the following procedures: Installing flange bearings on the inside Align flange bearings. Assembly to be carried out in reverse order. Screw the grub screws of the flange bearing tight and secure with thread lock fluid. Flange bearings have been installed on the inside.
-
Page 72: Changing Belt
Pull bearing support (2) off the pulley journal on both sides. Lift the drive (4) and tail pulley (3). Remove the conveyor belt (5) in the direction of the inner radius. Belt has been removed. Operating instructions: Curve belt conveyor TS 1600-90 Helix Version 1.1ENG, 06.05.2013... - Page 73 Repairs Changing belt Carry out the following procedures: Mount belt Align conveyor belt. Installation is carried out in the reverse order. Belt is mounted. Fitting the bed Carry out the following procedures: Carry out work steps as described under "Fitting the bed.“ Bed has been fitted.
-
Page 74: Replacing Drive Pulley
Removing drive pulley Increased risk of accident! Pulley can tilt and crush body parts. Secure the pulley to prevent it falling. WARNING Use hoists to raise and lower the pulley. Operating instructions: Curve belt conveyor TS 1600-90 Helix Version 1.1ENG, 06.05.2013... - Page 75 Repairs Replacing drive pulley Carry out the following procedures: Remove joining elements (1 and 3). Pull bearing support (2) off the pulley journal. Raise drive pulley (4) and pull it out of the belt loop in the direction of the inner radius.
- Page 76 The belt has been tensioned / adjusted. Carry out the following procedures: Mount gear motor Carry out procedures as described under "Installing gear motor". Gear motor has been installed. Drive pulley has been replaced Operating instructions: Curve belt conveyor TS 1600-90 Helix Version 1.1ENG, 06.05.2013...
-
Page 77: Replacing Tail Pulley
Repairs Replacing tail pulley Replacing tail pulley The tail pulley must be demounted for certain maintenance and repair work, but not replaced. In the case of replacement, lay out the new tail pulley ready for use according to the spare parts list. Precondition: Machine has been taken out of operation. - Page 78 Tail pulley has been removed. Installing tail pulley Carry out the following procedures: Align tail pulley. Installation is carried out in the reverse order. Tail pulley has been installed. Operating instructions: Curve belt conveyor TS 1600-90 Helix Version 1.1ENG, 06.05.2013...
- Page 79 Repairs Replacing tail pulley Carry out the following procedures: Fitting the bed Carry out work steps as described under "Fitting the bed.“ Bed has been fitted. Fit the side guide Carry out the following procedures: where applicable Proceed as described under "Installing the Side Guide". Side guide is fitted.
-
Page 80: Replacing The Base Parts Of The Belt Edge Holder
Check that base parts are fitted securely. Base parts have been installed. Carry out the following procedures: Fitting the bed Carry out work steps as described under "Fitting the bed.“ Bed has been fitted. Operating instructions: Curve belt conveyor TS 1600-90 Helix Version 1.1ENG, 06.05.2013... - Page 81 Repairs Replacing the base parts of the belt edge holder Carry out the following procedures: Fit the side guide where applicable Proceed as described under "Installing the Side Guide". Side guide is fitted. Tension belt / adjust Carry out the following procedures: Carry out work steps as described under "Belt tensioning / adjustment“.
- Page 82 Repairs Replacing the base parts of the belt edge holder Operating instructions: Curve belt conveyor TS 1600-90 Helix Version 1.1ENG, 06.05.2013...
-
Page 83: Fault Clearance
Fault clearance What to do if... Fault clearance This section informs you what to to if a malfunction occurs. A disturbance can have various different causes. What to do if... Mechanical malfunctions Diagnosed disturbance Possible cause Remedial action Machine shuts down Power supply disrupted, Have technical personnel error message... -
Page 84: Motor And Gear Unit
Should a fault occur in the drive motor, please refer to the operating instruc- tions provided by the motor manufacturer for information on how to remedy the fault. The motor operating instructions are an integral part of the installation. Operating instructions: Curve belt conveyor TS 1600-90 Helix Version 1.1ENG, 06.05.2013... -
Page 85: Decommissioning And Disposal
Decommissioning and disposal Machine disposal Decommissioning and disposal Machine disposal When disposing of the complete machine or parts of it, please observe your local rules and regulations for waste disposal. The regulations will tell you if the machine has to be dismantled for disposal and how the individual components may be recycled. -
Page 86: Main Components Of The Machine
Drive belt, conveyor belt Polyurethane (PU) Polyvinyl chloride (PVC) Conveyor roller Plastic Steel Gear motor Cast iron Copper Steel Basic frame, support Aluminium Steel Pulley Steel Polyurethane- (PUR) coated steel Operating instructions: Curve belt conveyor TS 1600-90 Helix Version 1.1ENG, 06.05.2013... -
Page 87: Contact Details
In the event of uncertainty or problems during installation, maintenance, repair or operation of the machine, please first consult the corresponding section of the operating instructions. If you cannot find the information you require there, please contact TRANSNORM SYSTEM GmbH. Head office Germany TRANSNORM SYSTEM GmbH Förster Str. -
Page 88: Subsidiaries, Branch Offices And Sales Partners Worldwide
Tel.: +31 (0) 1 11 41 00 90 Tel.: +33 (0) 1 48 63 70 61 Fax: +31 (0) 1 11 45 12 88 Fax: +33 (0) 1 48 63 05 62 e-mail: sales.nl@transnorm.de e-mail: eric.cornec@transnorm.de Operating instructions: Curve belt conveyor TS 1600-90 Helix Version 1.1ENG, 06.05.2013... - Page 89 Contact details Subsidiaries, branch offices and sales partners worldwide Sales partners Denmark Switzerland Nerak A/S. Frei Fördertechnik AG Viborgvej 22-24 Schwarzbachstraße 26 8600 Silkeborg 3113 Rubigen Tel.: +45 (0) 70 26 50 04 Tel.: +41 (0) 3 17 20 56 56 Fax: +45 (0) 70 23 50 04 Fax: +41 (0) 3 17 20 56 55 e-mail: nerak@email.dk...
-
Page 90: Service Branches Germany
Fax: 0 21 73 / 93 82 76 Fax: 0 71 43 / 96 58 51 Suggestions and comments ...on this documentation or the machine should be sent to the first address listed above. Operating instructions: Curve belt conveyor TS 1600-90 Helix Version 1.1ENG, 06.05.2013...
Need help?
Do you have a question about the TS 1600-90 Helix and is the answer not in the manual?
Questions and answers
how to determine what parts to use
Only original TRANSNORM SYSTEM GmbH spare parts should be used for the Transnorm TS 1600-90 Helix. DIN parts can be ordered from specialist retailers.
This answer is automatically generated