Table of Contents
Advertisement
Quick Links
Advertisement
Table of Contents

Related Manuals for Craftex CX617


Summary of Contents for Craftex CX617
- Page 1 MODEL CX617 MODEL CX617 12" DRILL PRESS USER MANUAL Version 1.0...
-
Page 2: Table Of Contents
TABLE OF CONTENTS General Safety Instructions for Machines ............... 3 Specific Safety Instructions ..................4 CX617 Features ...................... 5 Physical Features ....................6 Proper Grounding ....................7 Unpacking ....................... 8 Setup ........................8 Operating Controls ....................8 Test Run ......................... 9 Operation ........................ -
Page 3: General Safety Instructions For Machines
GENERAL SAFETY INSTRUCTIONS FOR MACHINES Extreme caution should be used when operating all power tools. Know your power tool, be familiar with its operation, read through the user manual, and practice safe usage procedures at all times. ALWAYS read and understand the NEVER leave a tool unattended while it user manual before operating the is in operation. -
Page 4: Specific Safety Instructions
SPECIFIC SAFETY INSTRUCTIONS CX617 – 12" DRILL PRESS READ AND UNDERSTAND the user SELECT PROPER SPINDLE manual before operating the CX617. SPEED for the type of work and material you are cutting. Let the spindle reach to ALWAYS WEAR safety glasses for its full speed before beginning a cut. - Page 5 As part of the growing line of Craftex CX-Series metalworking equipment, we are proud to offer the CX617, a 12" Drill Press. By following the instructions and procedures laid out in this user manual, you will receive years of excellent service and satisfaction. The CX617 is a professional tool and like all power tools, proper care and safety procedures should be adhered to.
-
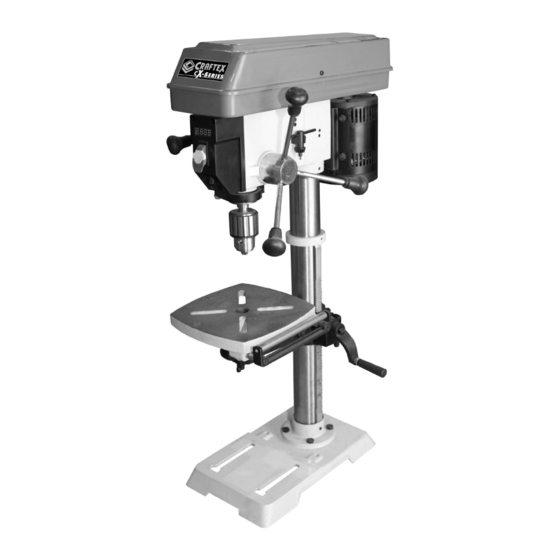
Page 6: Physical Features
PHYSICAL FEATURES CX617 - 12" DRILL PRESS Variable Speed Handle Depth Stop Return Spring LED Light LED Light ON/OFF Switch Pulley Cover RPM Digital Readout Display Chuck Key and Holder ON/OFF Switch 1 HP Motor with Safety Key Feed Handles... -
Page 7: Proper Grounding
Check with a qualified CX617 is for use on a normal 110 volt electrician if you are in doubt as to circuit. Make sure that the machine is whether the outlet is properly grounded. -
Page 8: Unpacking
WARNING! a guide and drill into the table. CX617 is a heavy machine, do not over- exert yourself. Use a fork truck or get the Secure the drill press to the table by using help of an assistant for safe moving. - Page 9 Figure-5 Installing feed handle Figure-3 Installing table height lock handle EXTENSION TABLE Slide the table to desired height and lock it ROLLER in position. Insert the two rods of the extension table into the two channels at the side of the FEED HANDLES table.
- Page 10 INSTALLING ON/OFF SWITCH THE CHUCK The CX617 features ON/OF switch with a removable which prevents from Remove grease and particles from the unauthorized use when removed. chuck and spindle surface with a clean cloth. Slide the chuck onto the arbor and then...
-
Page 11: Operation
TEST RUN VARIABLE SPEED Once you have assembled your drill press The CX617 is provided with a variable completely, it is then time for a test run to speed to increase or decrease the spindle make sure that it works properly and is speed using a speed handle. - Page 12 ADJUSTING TABLE CHANGING DRILL BIT The table height and angle can be adjusted To insert the bit: on the CX617. Make sure the cord is disconnected from To adjust the table height: the power source. Make sure the cord is disconnected from Open the chuck wide enough to accept a the power source.
- Page 13 While firmly holding the spring housing, DEPTH STOP carefully pull the spring housing out until it clears the raised notch. A drilling depth stop is provided on the left side of the drill head. The depth stop is Turn the housing so that the next notch is consists of a threaded rod with depth engaged with the raised notch.
-
Page 14: Drive Belt Replacement
DRIVE BELT REPLACEMENT Belt tension and drill press speed is controlled by the variable speed handle located on the side of the machine. To replace the drive belt: Make sure the machine is on and loosen the tension on the belt by using the variable speed handle. -
Page 15: Lubrication
MAINTENANCE LUBRICATION During the life of your machine, you will Following are lubrication recommendations need to practice some regular maintenance for drill press components. to keep your machine in peak performance condition. SPINDLE PULLEY DRIVE Lubricate spindle occasionally with light grease. -
Page 16: Troubleshooting
TROUBLESHOOTING PROBLEM POSSIBLE CAUSE REMEDY 1. Circuit breaker tripped. 1. Reset circuit breaker. 2. Branch circuit breaker tripped or 2. Reset branch circuit breaker/replace Spindle does fuse blown. fuse. not turn. 3. Open wire in switch circuit. 3. Repair open circuit. 4. - Page 17 PARTS DIAGRAM...
-
Page 18: Parts List
PARTS LIST... -
Page 21: Warranty
This warranty shall not apply to consumable products such as blades, bits, belts, cutters, chisels, punches etceteras. Craftex shall in no event be liable for injuries, accidental or otherwise, death to persons or damage to property or for incidental contingent, special, or consequential damages arising from the use of our products.
Need help?
Do you have a question about the CX617 and is the answer not in the manual?
Questions and answers