Craftex CX Series Manual
16" variable speed scroll saw
Hide thumbs
Also See for CX Series:
- User manual (49 pages) ,
- Manual (42 pages) ,
- Owner's manual (35 pages)
Table of Contents
Advertisement
Quick Links
Advertisement
Table of Contents

Related Manuals for Craftex CX Series


Summary of Contents for Craftex CX Series
- Page 1 MODEL CX126 16” Variable Speed Scroll Saw 05/18/21...
-
Page 2: Table Of Contents
TABLE OF CONTENTS General Safety Rules ..................... 3 Specific Rules for Scroll Saws ................4 Plug and Grounding Requirements ................ 6 Unpacking of the CX126 ..................7 CX126 Variable Speed Scroll Saw Anatomy ............8 Assembly and Adjustments ..................9 Adjusting the Blower .................... -
Page 3: General Safety Rules
General Safety Rules Warning! To avoid serious injury or any mistakes do not plug in your scroll saw until the steps below have been read and understood. 1) Read the manual and familiarize yourself with the intended applications as well as limitations and possible hazards. -
Page 4: Specific Rules For Scroll Saws
13) DO NOT leave the scroll saw running and unattended. Turn the power off and wait until the scroll saw comes to a complete stop before leaving the work area. 14) Never use the scroll saw for applications or purpose it is not intended for as this could lead to property damage or serious personal injury. - Page 5 7) Avoid injury and fire hazards operate the scroll saw away from any flammable liquids or gasses. 8) To avoid any back injuries: a) Get helping when lifting the scroll or raising it more than 10”. Remember to always bend your knees when lifting the scroll saw.
-
Page 6: Plug And Grounding Requirements
Plug and Grounding Requirements NOTE: If ever you notice damage or wear to either the cord or plug disconnect it immediately This machine must be grounded so that in from the power supply and have it replaced the event of certain malfunctions it will by a licensed electrician or service tech reduce the chances of electrical shock by before any further use of the machine. -
Page 7: Unpacking Of The Cx126
UNPACKING OF THE CX126 surfaces. Be certain to buff out the wax before assembling the scroll saw. Specifications This machine has been carefully packed to protect it during transport. While unpacking Model………………………………………………….CX126 thoroughly go through the box and separate Motor………………………….………120V,60Hz, 1.2A all items from the materials used for Variable Speed………………………...50-1600 SPM packaging. -
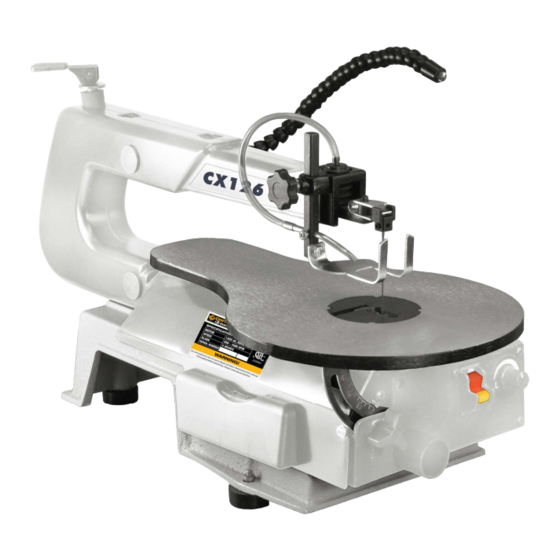
Page 8: Cx126 Variable Speed Scroll Saw Anatomy
CX126 Variable Speed Scroll Saw Anatomy A. Blade Tensioning Adjustment Knob K. Blade Guard Foot B. Arm Housing Right & Left L. Blade Guard Foot Lock Knob C. Rubber Bearing Covers M. LED Light D. Table N. Upper Blade Holder E. -
Page 9: Assembly And Adjustments
Assembly and Adjustments Caution! Do not pick up by the arm that holds the blade as this will damage your machine. Warning! In order to avoid personal injury or damage to the machine from accidental start-ups turn the power switch off and unplug the scroll saw before making any adjustments or performing any maintenance. - Page 10 2. Loosen the table bevel locking knob (3) and adjust the table so that it is approximately at a right angle in relation to the blade. Figure 6 5. Now secure the table in place with the bevel locking knob located under Figure 4 the table (3) to prevent any further movement...
-
Page 11: Adjusting The Blower
Adjusting the Blower For optimum results, the saw dust blower tube (1) Should be adjusted so that air is directed at both the blade and the workpiece. See figure 9 below. Figure 11 Blade Selection The CX126 Variable Speed Scroll Saw supports blades that are both pinned and Figure 9 pinless and are 5”... -
Page 12: Blade Installation/Removal
Thicker Materials- Use wider blades for thicker materials, however this will 2. Correctly set the proper blade tension. reduce your ability to cut tight curves. A smaller blade width would be required to 3. Use the correct blade for the cut circles with a smaller diameter. - Page 13 Figure 13 Figure 14 2. Carefully pull up the table insert and remove it from the table. See figure 13A. Figure 13A 3. To release and remove the blade from Figure 15 the blade holder push down on the upper blade holder (2) then remove the Caution! blade from the lower blade holder (3).
-
Page 14: Adjusting The Blade Direction
6. Slowly move the blade tensioning leaver Installing/Removing Pinless Blades down while making sure that the pins are properly positioned in the blade holders. 1. Remove the existing blade in the See figure 13-15. scroll saw. (see Blade Installation/Removal section). 7. -
Page 15: Operations
7. Carefully move the blade tensioning lever down while making sure that the blade attachments are properly secured and tension correctly in the scroll saw. Operations When Operating the Scroll Saw 1. Preventative measures to help avoid injury from unexpected scroll saw movement. -
Page 16: Recommendations For Cutting
Make sure blade is installed in the the teeth a rather small and only remove small amounts of material at correct orientation with the teeth of a time. the blade pointed down toward the table. 4. Remember that there is a learning curve when using a scroll saw for the ... -
Page 17: Freehand Cutting
10. When choosing a blade for your scroll saw make sure it is suitable for the desired application. 11. When cutting tougher material like plywood or cutting hardwood on an angle blades will become dull or worn out faster. When cutting becomes difficult or material is not cutting cleanly it is time to replace Figure 20... -
Page 18: Cutting Bevels
5. Remove the workpiece away from 5. Remove the workpiece away from the blade before turning the scroll the blade before turning the scroll saw on. saw on. 6. Slowly begin to feed the workpiece 6. Slowly begin to feed the workpiece into the scroll saw blade while into the scroll saw blade while carefully guiding it and keeping... -
Page 19: Rip/Straight Cutting
2. Remove the blade from the scroll downward pressure saw. blade removal workpiece keep it securely against installation section of the manual. the table. 9. Once the cut has been completed 3. Place the workpiece on to the scroll move the workpiece away from the saw table with the ¼”... - Page 20 the straight edge is secured firmly in 1. Turn the scroll saw onto its side and place. remove the cover. 5. Now position the workpiece against 2. Apply a generous amount of SAE 20 the blade and adjust the foot of the oil around the shaft and bearing.
-
Page 22: Cx126 Variable Speed Scroll Saw Parts List
CX126 Variable Speed Scroll Saw Parts List PART # DESC PCX12601 BASE PCX12602 BOLT - HEX M6-1.0 X 20 PCX12603 FIXING PLATE PCX12604 UPPER ARM PCX12605 WASHER - SPRING M6 PCX12606 NUT M6-1.0 PCX12607 ARM BEARING PCX12608 OIL CAP PCX12609 LOWER ARM PCX12610 THREADED ROD... - Page 23 PCX12628 WORK TABLE BRACKET PCX12629 SCREW - M5-0.8 X 8 PCX12630 TABLE LOCK KNOB PCX12631 BLADE 15TPI PCX12632 SCREW - M4-0.7 10 PCX12633 TRANSFORMER BOX PCX12634 SCREW - M4-0.7 X 8 PCX12635 POINTER PCX12636 SCREW - M6-1.0 X 10 PCX12637 WORK TABLE PCX12638 BOLT-HEX M6-1.0 X 40...
- Page 24 PCX12661 TOOL BOX PCX12662 SCREW - M4 X 8 PCX12663 NUT - HEX M4-0.7 PCX12664 SCREW - M5-1.0 X 8 PCX12665 FOOT PCX12666 PVC PIPE PCX12667 UPPER BLADE SUPPORT PCX12668 LOWER BLADE SUPPORT PCX12669 SUPPORT CUSHION PCX12670 SCREW - M4-0.7 X 20 PCX12671 PRESSURE PLATE PCX12672...
- Page 25 PCX12695 CORD CLAMP PCX12696 POWER CORD PCX12697 CORD BUSHING PCX12698 BIG FLAT WASHER - M6 PCX12699 CORD BUSHING 2 PCX12700 SWITCH PCX12701 BLAST PIPE PCX12702 LED ASSEMBLY TRANSFORMER BOX PCX12703 PCX12704 TENSION BOLT ASSEBMLY...
-
Page 26: Warranty
Craftex Machinery Warranty Busy Bee Tools warrants every Craftex machine to be free from defects in materials and agrees to correct such defects where applicable. This warranty covers two years for Craftex CT-Series machines and three years for Craftex CX-Series Machines and 90 days for labour (unless specified otherwise), to the original purchaser from the date of purchase but does not apply to malfunctions arising directly or indirectly from misuse, abuse, improper installation or assembly, negligence, accidents, repairs or alterations or lack of maintenance.
Need help?
Do you have a question about the CX Series and is the answer not in the manual?
Questions and answers