Table of Contents
Advertisement
Quick Links
PORTABLE AIR CONDITIONER(Local Air Conditioner)
Download the app
& activate product
Warning notices: Before using this product, please read this manual carefully and keep it for future reference.
The design and specifications are subject to change without prior notice for product improvement.
Consult with your dealer or manufacturer for details.
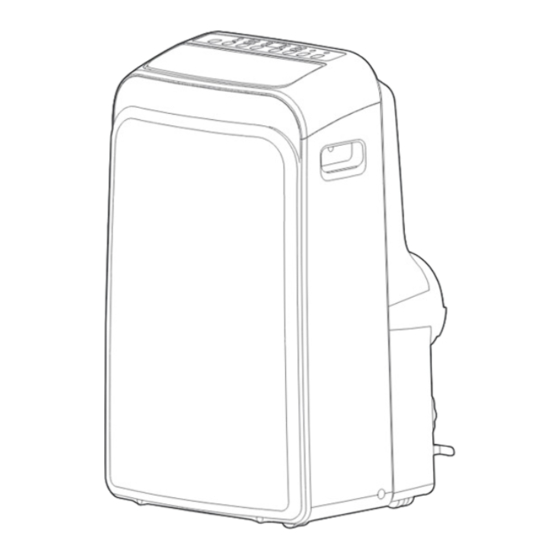
The diagram above is just for reference. Please take the appearance of the actual product as the standard.
MSmartHome
USER MANUAL
MODEL:
MPPD40C
Advertisement
Table of Contents

Related Manuals for Midea MPPD40C


Summary of Contents for Midea MPPD40C
- Page 1 PORTABLE AIR CONDITIONER(Local Air Conditioner) USER MANUAL MODEL: MSmartHome MPPD40C Download the app & activate product Warning notices: Before using this product, please read this manual carefully and keep it for future reference. The design and specifications are subject to change without prior notice for product improvement.
-
Page 2: Table Of Contents
THANK YOU LETTER Thank you for choosing Midea! Before using your new Midea product, please read this manual thoroughly to ensure that you know how to operate the CONTENTS THANK YOU LETTER SAFETY PRECAUTIONS SPECIFICATIONS PRODUCT OVERVIEW CONFIRM IT BEFORE YOU GET START... -
Page 3: Safety Precautions
SAFETY PRECAUTIONS It’s really important you read Safety Precautions Before Operation and Installation Incorrect installation due to ignoring instructions can cause serious damage or injury. The seriousness of potential damage or injuries is classified as either a WARNING or CAUTION. Explanation of Symbols WARNING The signal word indicates a hazard with a medium level of risk... - Page 4 WARNING Do not modify the length of the power cord or use an extension cord to power • the unit. Do not share a single outlet with other electrical appliances. Improper power • supply can cause fire or electrical shock. Do not install your air conditioner in a wet room such as a bathroom or laundry •...
- Page 5 CAUTION Prior to cleaning or other maintenance, the appliance must be disconnected from • the supply mains. Do not remove any fixed covers. Never use this appliance if it is not working • properly, or if it has been dropped or damaged. Do not run cord under carpeting.
-
Page 6: Remote Control Operation 2
WARNING for Using R32/R290 Refrigerant Do not use means to accelerate the defrosting process or to clean, other than those • recommended by the manufacturer. The appliance shall be stored in a room without continuously operating ignition • sources (for example: open flames, an operating gas appliance or an operating electric heater). - Page 7 Compliance with national gas regulations shall be observed. • Keep ventilation openings clear of obstruction. The appliance shall be stored so as to prevent mechanical damage from occurring. • A warning that the appliance shall be stored in a well-ventilated area where the •...
- Page 8 6.Information on servicing 1)Checks to the area Prior to beginning work on systems containing flammable refrigerants, safety checks are necessary to ensure that the risk of ignition is minimised. For repair to the refrigerating system, the following precautions shall be complied with prior to conducting work on the system.
- Page 9 9)Checks to electrical devices Repair and maintenance to electrical components shall include initial safety checks and component inspection procedures. If a fault exists that could compromise safety, then no electrical supply shall be connected to the circuit until it is satisfactorily dealt with.
- Page 10 Leak detection fluids are suitable for use with most refrigerants but the use of detergents containing chlorine shall be avoided as the chlorine may react with the refrigerant and corrode the copper pipe-work. If a leak is suspected, all naked flames shall be removed/extinguished.
- Page 11 g) Start the recovery machine and operate in accordance with manufacturer's instructions. h)Do not overfill cylinders. (No more than 80 % volume liquid charge). i)Do not exceed the maximum working pressure of thecylinder, even temporarily. j)When the cylinders have been filled correctly and the process completed, make sure that the cylinders and the equipment are removed from site promptly and all isolation valves on the equipment are closed o .
-
Page 12: Specifications
SPECIFICATIONS Product Model MPPD40C 220-240V~ 50Hz, 1Ph Power source 4.0kW Cooling capacity Heating capacity Rated current 2000W Rated power input Outdoor unit IPX0 resistance class... -
Page 13: Product Overview
PRODUCT OVERVIEW NOTE ON ILLUSTRATIONS: All the illustrations in the manual are for explanation purpose only. Your machine may be slightly di erent. The actual shape shall prevail. The unit can be controlled by the unit control panel alone or with the remote controller. -
Page 14: Confirm It Before You Get Start
CONFIRM IT BEFORE YOU GET START Ambient Temperature Range For Unit Operating MODE Temperature Range MODE Temperature Range Cool 17-35°C (62-95°F) Heat(pump heat mode) 5-30°C (41-86°F) 13-35°C (55-95°F) Heat(electrical heat mode) 30°C (86°F) ≥ Choose the right position Your installation location should meet the following requirements: -Make sure that you install your unit on an even surface to minimize... - Page 15 What should I look for first when purchasing a portable air conditioner? The right air conditioner helps you cool a room e ciently. An undersized unit won't cool adequately while one that's too large will not remove enough humidity, leaving the air feeling damp. To find the proper air conditioner, determine the square footage of the room you want to cool by multiplying the room length by its width.
-
Page 16: Product Installation
PRODUCTION INSTALLATION ACCESSORIES NOTE Use the accessories packed with the unit to install the machine. The following accessories are for explantory purposes only. The item are not included with your unit must be purchased separately. North America Qty. Shape Name of Accessories Shape Name of Accessories Qty. - Page 17 Window Installation Kit Step 1: Preparing the Exhaust Hose assembly. Press the exhaust hose(or extended exhaust hose) into the window slider adaptor(or wall exhaust adaptor) and unit adaptor, clamp automatically by elastic buckles of the adaptors. Type window installation: Model A Model B Air exhaust Exhaust hose...
- Page 18 Step 3: Preparing the Adjustable Window Slider. 1. Choose the window sliders according the size of your window. Sometimes, it needs to be cut short to meet the window size, please take extra care to cut it properly. 2. Use bolts to fasten the window sliders once they are adjusted to the Proper length. Type 1 : Bolt Bolt...
- Page 19 Hung window installation or wall installation NOTE: Once the Exhaust Hose assembly and Adjustable Window Slider are prepared, choose from one of the following two installation methods. Type 1: Hung Window or Sliding Window Installation(For some models) Foam seal B Foam seal B (Adhesive type-shorter) (Adhesive type-shorter)
- Page 20 Type 2: Wall Installation(For some models) NOTE Cover the hole using the adaptor cap when not in use. Step 1: Step 2: Cut a 125mm (4.9inches) hole into the wall Secure the Wall Exhaust Adaptor B to the wall using for the Wall Exhaust Adaptor B.
-
Page 21: Operation Instructions 2
OPERATION INSTRUCTIONS Control Panel Press 3s CONSTANT FAN(Press 3s) CONSTANT FAN(Press 3s) CONSTANT FAN(Press 3s) CONSTANT FAN(Press 3s) FRESH(Press 3s) NOTE: On some models is instead of °F. On some models (power light) is instead of (WIRELESS light). Indicator Function Indicator Function Indicator... - Page 22 OPERATION INSTRUCTIONS Description Used to initiate the Auto swing feature. When the operation is ON, press the SWING button can stop the louver at the desired angle. Used to initiate the Wireless function. For the first time to use Wireless function, press and hold the swing button for 3 seconds to initiate the Wireless connection mode.
- Page 23 Description Used to adjust (increasing/decreasing) temperature settings in 1°C/1°F (or 2 °F) increments in a range of 17°C/62°F to 30°C/86°F (or 88°F) or the TIMER setting in a range of 0~24hrs. Up and Down buttons NOTE: The control is capable of displaying temperature in degrees Fahrenheit or degrees Celsius.
- Page 24 More features FOLLOW ME/TEMP SENSING feature AIR FLOW DIRECTION ADJUSTMENT (On some models) The louver can be adjusted automatically. Adjust the NOTE: This feature can be activated from the air flow direction automatically: remote control ONLY. The remote control serves ·...
-
Page 25: Water Drainage
Water drainage · During dehumidifying modes, remove the upper · (For model A1)During heating pump mode, drain plug from the back of the unit, install the drain remove the lower drain plug from the back of connector(5/8" universal female mender) with 3/4" the unit, install the drain connector(5/8"... - Page 26 Remote Controller Specifications Model RG10F(B)/BGEF、RG10F1(B)/BGEF、RG10F2(B1)/BGEFU1、RG10F3(B1)/BGEFU1 Rated Voltage 3.0V( Dry batteries R03/LR03×2) Signal Receiving Range Environment -5°C~60°C(23°F~140°F) Quick Start Guide SELECT MODE FIT BATTERIES SELECT TEMPERATURE AUTO AUTO COOL COOL HEAT HEAT PRESS POWER BUTTON POINT REMOTE TOWARD UNIT SELECT FAN SPEED AUTO HIGH NOT SURE WHAT A FUNCTION DOES?
- Page 27 Handling the Remote Controller NOTES FOR USING REMOTE CONTROL Inserting and Replacing Batteries The device could comply with the local Your air conditioning unit may come with two national regulations. batteries(some units). Put the batteries in the remote control before use. In Canada, it should comply with •...
- Page 28 Buttons and Funcitons Before you begin using your new air conditioner, make sure to familiarize yourself with its remote control. The following is a brief introduction to the remote control itself. For instructions on how to operate your air conditioner, refer to the How to Use Basic Functions section of this manual. Description ON/OFF No.1...
- Page 29 Buttons and Functions Description ON/OFF No.1 Turns the unit on or off. TEMP Increases temperate in 1°C (1°F) increments. No.2 Max. temperature is 30°C (86°F ). Scrolls through operation functions as follows: Fresh( ) I Sense( ) AP mode( ) Fresh...
- Page 30 Remote Screen Indicators Information are displayed when the remote controller is power up. Fresh feature display(some units) (No displays when Fresh feature is activated) Sleep mode display No.1 Follow me feature display Wireless control feature display Low battery detection display(If flashes) Transmission Indicator No.2 Lights up when remote sends signal to indoor unit...
- Page 31 How to Use Basic Functions Basic operation COOL Mode ATTENTION! Before operation, please ensure the unit is plugged in and power is available. SETTING TEMPERATURE The operating temperature range for units is 17°C-30°C (62°F-86°F). You can increase or decrease the set temperature in 1°C (1°F) increments.
- Page 32 How to Use Basic Functions How to Use Basic Functions 1. Press the MODE button to select FAN mode. DRY Mode (dehumidifying) 2. Press FAN button to select the fan speed: AUTO, LOW, MED or HIGH. 3. Press the ON/OFF button to start the unit. NOTE: You can’t set temperature in FAN mode.
- Page 33 How to Use Basic Functions Setting the TIMER TIMER ON/OFF - Set the amount of time after which the unit will automatically turn on/off. TIMER ON setting Press up or down button for Press TIMER ON button to Point remote to unit and wait multiple times to set the desired initiate the ON time sequence.
- Page 34 How to Use Advanced Functions SHORTCUT function Swing function Press Swing button Press SHORTCUT button The horizontal louver will swing up and downautomatically when pressing Swing Push this button when remote controller is on, button. Press again to make it stop. the system will automatically revert back to the previous settings including operating mode, setting temperature, fan speed level...
- Page 35 How to Use Advanced Functions SLEEP Function LOCK function Press SLEEP button The SLEEP function is used to decrease energy while you sleep(and don’t need the same temperature settings to stay comfortable). This function can only by activated via remote control. For the details, please see “sleep operation ”...
- Page 36 How to Use Advanced Functions SET function • Press the SET button to enter the function setting, then press SET button or TEMP or TEMP button to select the desired function. The selected symbol will flash on the display area, press the OK button to confirm.
-
Page 37: App Setup And Operation
APP SETUP AND OPERATION - For wireless control models only SPECIFICATION Unit model: MPPD40C APP control module model: EU-SK105, US-SK105 Antenna Type: Printed PCB Antenna Frequency Band: 2400-2483.5MHz Operation Temperature:0 C~45 C/32 F~113 F Operation Humidity: 10%~85% Power Input: DC 5V/300mA Maximum TX Power: <20dBm... - Page 38 Network configuration CAUTIONS: It is necessary to forget any other around network and make sure the Android or ● iOS device just connect to the wireless network you want to configure. Make sure the Android or iOS device wireless function works well and can be ●...
- Page 39 5. If no message appears, select "+" on the page and select your device in the list of nearby devices available. If your device is not listed, please add your device manually by the device category [Air Conditioner] and device model [Portable AC]. 6.
- Page 40 3. Thus, user can control air conditioners on/o status, operation mode, temperature, fan speed and so on. Special functions Including: Schedule, Sleep curve, Energy Monitor, Check. NOTE: No all the unit can use these special function on the APP. Thus, if the air conditioner do not support theabove function,the function will be hided from the function list.
- Page 41 Energy Monitor Check User can simply monitor the electricity consumptionof User can simply check the AC running AC unit by checking the chart and history record. status with this function.When finishing this procedure,it can display the normal items,abnormal items, and detail information.
- Page 42 Declaration of conformity CONTAINS FCC ID: 2ADQOMDNA21 CONTAINS IC : 12575A-MDNA21 This device complies with Part 15 of the FCC Rules and Industry Canada’s licence-exempt RSSs. Operation is subject to the following two conditions: (1) This device may not cause interference;and (2) This device must acceptany interference,including interference that may cause undesired operation of the device.
-
Page 43: Cleaning And Maintenance 4
CLEANING AND MAINTENANCE CAUTION · Always unplug the unit before cleaning or servicing. · DO NOT use flammable liquids or chemicals to clean the unit. · DO NOT wash the unit under running water. Doing so causes electrical danger. · DO NOT operate the machine if the power supply was damaged during cleaning. A damaged power cord must be replaced with a new cord from the manufacturer. - Page 44 Store the unit when not in use Step 2 Step 3 Step 1 hours *Please refer to the actual plug, and the legend is for reference only. Step6 Step4 Step 5 · Drain the unit’s water collection tray according to the instructions in the following section. ·...
-
Page 45: Troubleshooting
TROUBLESHOOTING Problem Possible Causes Solution The Water Collection Tray is full. Turn o the unit, drain the water from the Water Collection P1 Protection Code Unit does not turn Tray and restart the unit. on when pressing ON/OFF button In COOL mode: room temperature is lower than Reset the temperature the set temperature... -
Page 46: Trademarks, Copyrights And Legal Statement 4
Midea Group and/or its a liates (“Midea”), to which Midea owns trade- marks, copyrights and other intellectual property rights, and all goodwill derived from using any part of an Midea trademark. -
Page 47: Data Protection Notice
European Economic Area. Further information are provided on request. You can contact our Data Protection O cer via MideaDPO@midea.com. To exercise your rights such as right to object your personal date being processed for direct marketing purposes, please contact us via MideaDPO@midea.com. - Page 48 2023 CP001UI-PDTY 16120600A26218...
Need help?
Do you have a question about the MPPD40C and is the answer not in the manual?
Questions and answers