
Related Manuals for Bartscher 195 Plus


Summary of Contents for Bartscher 195 Plus
- Page 1 195 Plus - 220 Plus - 250 Plus - 275 Plus - 300 Plus 174196-174221-174251-174276-174301...
- Page 2 Bartscher GmbH Phone: +49 5258 971-0 Franz-Kleine-Str. 28 Fax: +49 5258 971-120 Technical Support Hotline: +49 5258 971-197 D-33154 Salzkotten Germany www.bartscher.com Version: 4.0 Date of preparation: 2023-10-25...
-
Page 3: Table Of Contents
Original instruction manual Safety ......................2 Explanation of Signal Words ..............2 Safety instructions..................3 Intended Use ................... 5 Unintended Use ..................5 General information ..................6 Liability and Warranty ................6 Copyright Protection ................6 Declaration of Conformity ................ 6 Transport, Packaging and Storage .............. -
Page 4: Safety
Safety Diese Bedi enungsanlei tung besc hrei bt di e Installation, Bedi enung und Wartung des Geräts und gilt als wic htige Infor mationsquelle und N achschl agewer k. Di e Kenntnis aller enthaltenen Sic herheits hinweis e und H andlungs anweisungen schafft die Vorauss etz ung für das sichere und s ac hger echte Ar beiten mit dem Gerät. D arüber hi naus müs sen die für den Ei ns atz ber eic h des Geräts geltenden ör tlichen Unfall verhütungs vorsc hriften und allgemeinen Sicherheits besti mmungen eing ehalten wer den. Dies e Bedi enungs anleitung is t Bes tandteil des Produkts und muss i n unmi ttelbarer N ähe des Ger äts für das In¬s tall ations-, Bedi enungs-, Wartungs- und R einigungspers onal jederzeit z ugänglich auf¬bewahrt werden. Wenn das Ger ät an eine dritte Pers on weiterg egeben wird, muss die Bedi enungsanlei tung mit ausgehändigt wer den. -
Page 5: Safety Instructions
Safety CAUTION! The signal word CAUTION warns against hazards that may lead to light or moderate injuries if the hazards are not avoided. , di e IMPORTANT! The signal word IMPORTANT indicates possible property damages, which may occur if safety instructions are not observed. NOTE! The symbol NOTE indicates subsequent information and guidelines for the user on usage of the appliance. - Page 6 Safety • Check the power cord regularly for damage. Do not use the appliance if the power cord is damaged. If this cable is damaged, it must be replaced by customer service or a qualified electrician in order to avoid dangers. Safety During Operation of the Slicer •...
-
Page 7: Intended Use
Safety Improper Use • Unintended or prohibited use may cause damage to the appliance. • The appliance may only be used when its technical condition is flawless and allows for safe operation. • The appliance may only be used when all connections are executed according to rules of law in force. -
Page 8: General Information
General information General information Liability and Warranty All information and instructions in this instruction manual account for legal regulations in force, current level of technical engineering knowledge as well as our expertise and experience, developed over the years. If special models or additional options are ordered, or state-of-the-art technical solutions were implemented, the actual scope of delivery of the appliance may, in some circumstances, differ from descriptions and numerous drawings in this instruction manual. -
Page 9: Transport, Packaging And Storage
Transport, Packaging and Storage Transport, Packaging and Storage Delivery Check Immediately upon reception, check the delivery for completeness and possible shipping damage. In the case of visible transport damage refuse to accept the appliance or accept it conditionally. Mark and note the scope of damage in shipping documents/consignment list of the shipping company and lodge a complaint. -
Page 10: Technical Data
Magnetic switch • Control: button • ON/OFF switch • Indicator light: ready for operation Technical Specifications Slicing machine 195 Plus Name: 174196 Art. No.: Material: aluminium, plexiglas, plastic Blade diameter, in mm: Maximum rotational speed, in RPMs: Slicing thickness range, in mm:... - Page 11 Technical Data Slicing machine 220 Plus Name: 174221 Art. No.: Material: aluminium, plexiglas, plastic Blade diameter, in mm: Maximum rotational speed, in RPMs: Slicing thickness range, in mm: 1 - 12 Slicing length, in mm: Slicing height, in mm: Degree of protection: IPX3 Connected load: 0,13 kW | 230 V | 50 Hz...
- Page 12 Technical Data Slicing machine 275 Plus Name: 174276 Art. No.: Material: aluminium, plexiglas, plastic Blade diameter, in mm: Maximum rotational speed, in RPMs: Slicing thickness range, in mm: 1 - 12 Slicing length, in mm: Slicing height, in mm: Degree of protection: IPX3 Connected load: 0,13 kW | 230 V | 50 Hz...
-
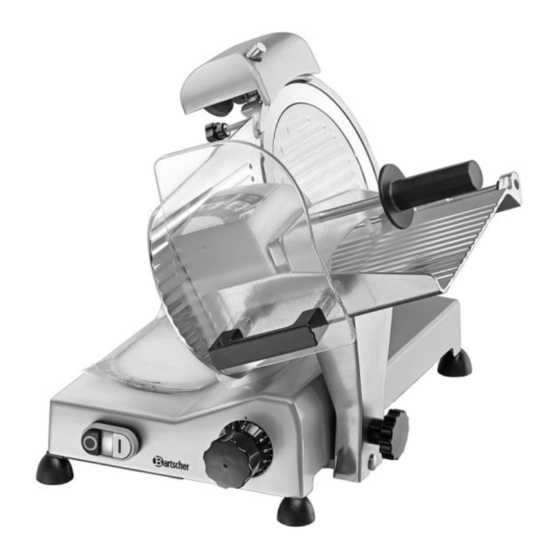
Page 13: List Of Components Of The Appliance
Technical Data List of Components of the Appliance Fig. 1 174196 11 / 28... - Page 14 4. Pusher handle with pusher 5. Food tray 6. Carriage 7. Carriage lock knob (except for 8. Slice thickness adjustment knob model No. 195 Plus, art. No. 174196) 9. ON/OFF switch with indicator light 10. Feet (4 pcs) 11. Handle with hand protection 12.
-
Page 15: Functions Of The Appliance
Technical Data Accessories (not included in the delivery!) Blade with corrugated cutting edge Material: steel, hard chrome-plated 195 Plus 220 Plus 250 Plus 275 Plus 300 Plus Compatible model: Diameter (mm): W 195 W 220 W 250 W 275 W 300... -
Page 16: Protective Elements Of The Appliance
Technical Data Protective Elements of the Appliance Blade guard Pusher handle with pusher ON/OFF switch (after a power failure, the appliance can only be switched on again by pressing the white START button in the appliance ON/OFF switch) Pusher handle with grip and hand protection (11) Carriage locking device (Fig. - Page 17 Technical Data Sharpener serving as the upper blade guard There is a magnetic connector (a) on the sharpening tool: the appliance operates only when the sharpener is properly positioned. When the sharpener is removed during operation the appliance stops. Once the Fig.
-
Page 18: Installation And Operation
Installation and operation Installation and operation Installation Unpacking / Positioning • Unpack the appliance, remove all external and internal packaging elements and shipment safeguards. CAUTION! Choking hazard! Prevent children from accessing package materials, for instance: plastic bags and EPS. • If the appliance is covered with a protective film, remove it. -
Page 19: Operation
Installation and operation To securely use the slicing machine, keep at least 20 cm clearance from the slicing machine and walls, objects, cupboards, etc. • The clearance from the floor should be approx. 80 cm. • Place the appliance in a room, in which temperature ranges from +5°C do +32 °C, and the maximum moisture level should be 70%. - Page 20 Installation and operation Check before starting the appliance: – whether the appliance is connected to a grounded single socket. – whether the carriage (6) is firmly connected to the carriage lock knob (7). – the movement of the carriage (6) and that no obstacle is blocking and no object is on the carriage tray (5).
- Page 21 Installation and operation Appliance Operation (Fig. 6, 7) 1. Plug the appliance into a suitable single socket. 2. To switch the appliance on, press the white START button (B) in the appliance ON/OFF switch (9). The indicator lamp (C) lights up and remains lit during operation. 3.
- Page 22 Installation and operation 10. Move the carriage (6) slowly and steadily towards the blade (1) using the pusher handle (4). 11. The best slicing results are obtained when the pusher handle (4) is slightly pushed towards the movable slice thickness partition (13). The product to be sliced encounters the blade (1), the sliced product is separated and falls onto the tray (12), which is located on the back of the movable slice thickness adjustment partition (13).
- Page 23 Installation and operation Blade Sharpening If the surface of a sliced product becomes frayed or coarse and the cutting operations become cumbersome, the blade must be sharpened. 1. Pull the plug out from the socket and clean the blade edges before sharpening using alcohol in order to degrease them.
-
Page 24: Cleaning And Maintenance
Cleaning and Maintenance 10. Check if the blade is sharp enough. 11. Continue until the desired sharpening level is reached. WARNING! Cut wounds hazard! The blade is very sharp! Be very careful when checking the sharpness of the blade! During operation wear class 5 cut resistant protective gloves of DIN EN 388 standard! 12. -
Page 25: Cleaning
Cleaning and Maintenance Cleaning CAUTION! During maintenance works and cleaning (when the protective elements are removed) check for any possible hazards. Unplug the appliance from a socket. Ensure that the slice thickness adjustment knob is in '0' position. Move the carriage towards the slice thickness adjustment knob. ATTENTION! Never wash removable elements in a dish-washer. - Page 26 ATTENTION! The 195 Plus model / art. No. 174196 does not have a carriage lock knob. The carriage of the appliance is not removable. 4. Clean the carriage (6) with guard (14), carriage tray (5) and pusher handle with pusher (4) in warm water with a soft cloth and neutral cleaning agent.
- Page 27 Cleaning and Maintenance 7. Clean the blade protection ring (2) in warm water and a neutral cleaning agent. Rinse in fresh water. Leave the cleaned parts for drying or wipe them with a dry cloth. 8. After cleaning install the blade (1) with the use of three adjustment screws (e) — maintaining correct stance —...
-
Page 28: Maintenance
Cleaning and Maintenance Slice Tray and Housing (Fig. 14) 1. Clean the slice tray (11) and housing with the use of a moist, soft cloth and neutral cleaning agent. 2. Wipe it with a clean, soft cloth. 3. Dry completely after cleaning. 4. -
Page 29: Possible Malfunctions
Possible Malfunctions Possible Malfunctions Mögliche The table below contains descriptions of possible causes and solutions to malfunctions or errors during operation of the appliance. When malfunction cannot be removed, contact the technical service. In such a case, provide article number, model name and serial number. These data may be found in the rating plate. -
Page 30: Disposal
Disposal Disposal Electrical Appliance Electric appliances are marked with this symbol. Electrical appliances must be disposed of and recycled in a correct and environmentally friendly manner. You must not dispose of electric appliances with household waste. Disconnect the appliance from the power supply and remove power cord from the appliance.
Need help?
Do you have a question about the 195 Plus and is the answer not in the manual?
Questions and answers