
Related Manuals for Primera SignatureEVO


Summary of Contents for Primera SignatureEVO
- Page 1 User’s Manual 031023 © 2023 All rights reserved. For the most recent version of this manual please visit http://www.primera.com/slideprinterdownloads...
-
Page 2: Table Of Contents
Table of Contents Section 1: Getting Started ........................4 1A. Choosing a Good Location ......................4 1B. Unpacking and Inspection ......................5 1C. Identifying the Parts ........................6 1D. Slide Specifications ........................8 1E. Connect Power ..........................9 1F. Load a Ribbon ..........................10 1G. - Page 3 Notices: The information in this document is subject to change without notice. NO WARRANTY OF ANY KIND IS MADE WITH REGARD TO THIS MATERIAL, INCLUDING, BUT NOT LIMITED TO, THE IMPLIED WARRANTIES OF MERCHANTABILITY AND FITNESS FOR A PARTICULAR PURPOSE. No liability is assumed for errors contained herein or for incidental or consequential damages in connection with the furnishing, performance, or use of this material.
-
Page 4: Section 1: Getting Started
Section 1: Getting Started THANK YOU… ...for purchasing a Signature EVO Slide Printer. The Signature EVO Slide Printer can significantly increase the efficiency of your lab while helping to reduce the risk of misidentification of specimens. It prints directly onto slides, eliminating handwriting or expensive, difficult to apply xylene-resistant labels. -
Page 5: Unpacking And Inspection
1B. Unpacking and Inspection While unpacking your Printer, inspect the carton to ensure that no damage has occurred during shipping. Make sure that all supplied accessories are included with your unit. The following items should be included: Signature EVO Slide Printer Power cord Power converter USB cable... -
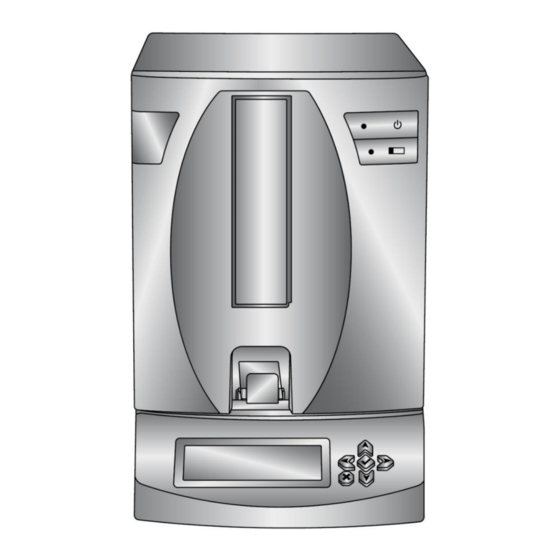
Page 6: Identifying The Parts
1C. Identifying the Parts The following illustrations show the various parts of the printer. These parts will be referred to throughout this manual so return here if you ever encounter a term that is unfamiliar to you. Cover Release Button Power Button Slide Button Slide Cartridge... - Page 7 Rear View Rear Panel Ethernet Power Page | 7...
-
Page 8: Slide Specifications
1D. Slide Specifications Slides should be 1.00" x 3.00" x .040" and have ground edges. Primera recommends using clipped corners (1mm x 1mm), but 90° corner slides can also be used. The slides must have a coated frosting, and it should cover 20mm of the length of the slide. The coating must be of uniform thickness across the entire width of the slide. -
Page 9: Connect Power
1E. Connect Power Attach the power cord to the Power brick. Plug the power cord into a grounded outlet and the 5mm barrel connector to the back of the printer. The power converter is a universal 100v-240v input and a 12v output. Page | 9... -
Page 10: Load A Ribbon
The Signature Slide Printer uses either a Black ribbon (5000 prints) or a CMYK Color ribbons (1000 prints). You must use Primera ribbons to print with the Signature Slide Printer. 1. Remove a Color or Black Ribbon from its packaging. Detach the take up ribbon from the supply ribbon by gently pulling them apart. - Page 11 3. Remove the ribbon from its shrink-wrapped packaging. Hold the take up (back) ribbon core with your left hand. Hold the supply (front) ribbon with your right hand. Install the take up ribbon by depressing the spring-loaded hub inside the printer. Snap the take up ribbon core into place. 4.
- Page 12 5. Rotate the hubs until the tabs on the right side hubs match the notches on the ribbon. Manually turn the take up core until the ribbon is taut. Page | 12...
-
Page 13: Load A Slide Cartridge
1G. Load a Slide Cartridge 1. Remove the empty blue slide cartridge by pulling up and out. 2. Open the blue slide cartridge. Note: The EVO requires a new slide cartridge with a cut out section for proper air puffer operation. The old slide cartridges from the original slide printer will NOT work. - Page 14 3. Locate the 100 pack slide box. Place the slides next to the blue side cartridge so that the printable surface is on the TOP of the slide with the orientation shown below. Note: To achieve the proper orientation, it may be necessary to replace the box top, flip the box over and remove the other side of the box.
- Page 15 6. Once the slides are in place, straighten any that did not properly fall in the cartridge and ensure the printable surface is facing up and near the front of the cartridge as it is placed in the printer. Important Note! To prevent feeding problems, a).
- Page 16 Click! Important Note! The blue LED light will turn on when both the slide cartridge and ribbon are correctly installed. Page | 16...
-
Page 17: Section 2: Printing Slides
Section 2: Printing Slides The included PTLab SE software can be used to print to the Signature EVO Slide Printer. The PTLab software has its own manual. Please refer to it for detailed capabilities. 2A. Printing from other Programs Printing to the Slide Printer from other software (besides PTLab SE) can be accomplished by using the standard Windows driver. - Page 18 Page | 18...
-
Page 19: Section 3: Maintenance And Troubleshooting
Section 3: Maintenance and Troubleshooting 3A. Control Panel Status Messages, Indicator Lights and Error Codes The Control Panel will display the number of prints and slides remaining. When there is an error, it will display the error instead of the slide/ribbon count. Occasionally you may need to press the arrows to scroll through error messages or press the check button to dismiss an error. - Page 20 Error Codes (Found in Printer Driver Details) Page | 20...
-
Page 21: Cleaning The Print Head
3B. Cleaning the Print Head A print head cleaning pen is included with the printer. Clean the print head after every ribbon change or if you notice quality problems such as vertical line through the entire print. 1. Unplug Power. 2. - Page 22 5. If the cleaning pen does not resolve the issue, the pink Polishing Paper (895703) should be used. Rub the paper over the print head burn line a few times to help remove any built-up debris. Polishing Paper If these steps do not resolve the issue, it may be time to replace the print head. Page | 22...
-
Page 23: Replacing The Print Head
3C. Replacing the Print Head If cleaning the print head (Section 3B) does not resolve a quality problem such as a vertical line through the entire print, it may be time to replace the print head. Print heads are designed to last tens of thousands of prints. However, it is possible a premature failure could occur if high heat settings were continuously used, it is used in a particularly hot environment or if slides not recommended for the printer are used. - Page 24 5. Disconnect the cable from the connector. Pull on the cables to remove the connector. 6. Connect the new print head. 7. Rotate the printhead 180 degrees and push it back into the metal housing. 8. IMPORTANT! Find the Resistance value printed on the printhead. Resistance Value Printed Here Before printing, enter this value in the advanced settings area of the PTLab software.
- Page 25 Page | 25...
-
Page 26: Troubleshooting Print Quality
3D. Troubleshooting Print Quality Print Quality problems are usually caused by debris or flaws on the printable surface of the slide. Use the chart below to diagnose quality problems. Vertical Line. A line vertically through the entire print is cause by dust or debris on the print head burn line or blown pixel on the print head. -
Page 27: Changing The Spring Force (Printing Pressure)
3E Changing the Spring Force (Printing Pressure) For rougher surface slides such as those manufactured for handwriting or inkjet printing, the higher print head pressure may be necessary to achieve optimal print quality. If you have smooth sides, the higher force might cause ribbon breaks or poor quality. -
Page 28: Repairing/Preventing Ribbon Breaks
3F. Repairing/Preventing Ribbon Breaks Ribbon breaks can occur if the head setting is too high. To repair a ribbon break follow this procedure: 1. Open the cover. 2. Locate the supply roll ribbon. Place it on the top of the print as shown below. Attach a piece of tape. Tape Sticky Side Down 3. -
Page 29: Retrieving A Broken Slide
3G. Retrieving a Broken Slide If a slide is broken or stuck in the system there are two access panels that can be used to retrieve the slide. If a slide is found inside the printer, use the Power and Slide buttons to move the internal slide rollers forward and back to advance the slide to a point where it can be removed. -
Page 30: Cartridge Or Ribbon Recognition Problems
7. Finally, if the slide is broken you can remove it using the bottom catch bin. Pick up the slide printer and rotate it in multiple directions until all of the pieces are in the bin. Now pull out the bin and empty it into the trash. -
Page 31: Adjusting The Slide Separating System
3I. Adjusting the Slide Separating System The slide separating system supplies an air burst between the bottom two slides in order to separate the slides as they feed out of the slide cartridge. The slide separating system uses a pump and compressed air. You may occasionally hear sounds of the compressor and the air being released. -
Page 32: Technical Support
3J. Technical Support. If you have difficulties operating your Printer, contact technical support using one of the methods listed below. Source Location Primera Knowledge Base www.primera.com/kb Email Support www.primera.com/customer-support Phone Support 763-475-6979 (Mon - Fri 8 a.m. - 5 p.m. CST) www.primera.com... -
Page 33: Section 4. Technical Specifications
Section 4. Technical Specifications Printing technology: Thermal transfer Print speed: Up to 10 slides/minute (monochrome) Up to 7 slides/minute (solid colors) Print resolution: 300 dpi Ink type: Resin thermal transfer Ribbon types: CMYK: 1000 prints Black: 5000 prints Printable colors: 8 solid colors Slide types: 3"... -
Page 34: Section 5 Compliance
Section 5 Compliance EMC: Class B FCC: NOTE: This equipment has been tested and found to comply with the limits for a Class B digital device, pursuant to part 15 of the FCC Rules. These limits are designed to provide reasonable protection against harmful interference when the equipment is operated in a commercial environment. - Page 35 When a product reached its end of life, contact us at environment@primera.com or +1-763-475-6676 to arrange its recycling. Primera will work with you to arrange for the recycling of the product.
Need help?
Do you have a question about the SignatureEVO and is the answer not in the manual?
Questions and answers