Advertisement
Quick Links
Advertisement

Related Manuals for Luxier SP24-SS


Summary of Contents for Luxier SP24-SS
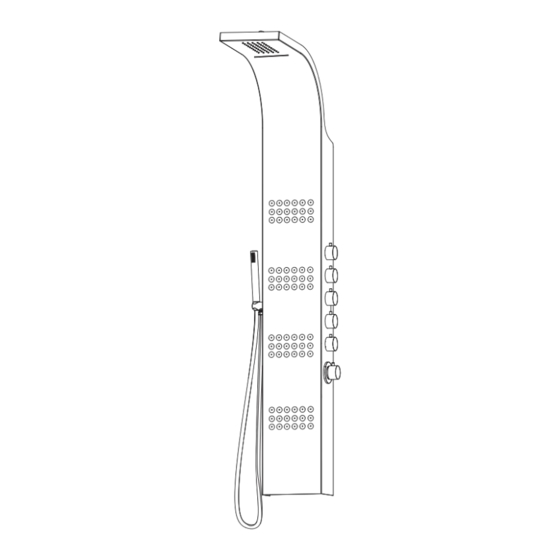
- Page 1 Luxier SP24-SS Features - Stunning stylish European inspired design - Durable stainless steel frame construction - 72 body massage jets - 4 stage shower functions (Rainfall, Waterfall, Massage Spray, Hand Shower) - Contemporary brass hand shower Luxier SP24-SS Rev. A1 012016...
- Page 2 Should a malfunction occur within the warranty period, Luxier USA will, as its option, (1) repair or replace the defective part(s) or product(s) at no charge; (2) issue a refund of the original purchase price of the product(s) (Valid within 30 days from the date of purchase);...
- Page 3 • A laundry outlet box such as the Sioux Chief Ox Box can be used to speed up the installation process of the shut off valves. Luxier SP24-SS Rev. A1 012016...
- Page 4 NOTE: This distance vary by models, always take the actual measurement from the shower panel) (This is the distance from the oor to the bottom edge of the shower panel) Reference Model Height is 5’ 8” Luxier SP24-SS Rev. A1 012016...
- Page 5 Recommended Operating Pressure: 50 - 80 psi Approx. flow rate: 3.3 gpm at 80 psi 200mm 495mm 7.87” 19.49” 1500mm 59.06” 770mm 30.31” 570mm 22.44” 390mm 260mm 15.35” 10.24” 72.5mm *All Measurements are Approximate 2.85” Luxier SP24-SS Rev. A1 012016...
-
Page 6: Parts List
02. Hand Shower 03. Hand Shower Cradle 04. O rings 05. Hand Shower Hose 06. Gasket 07. Hand Shower Water Connector 08. Screws X 4 09. Mounting Brackets X 2 10. Wall Anchors X 4 Luxier SP24-SS Rev. A1 012016... -
Page 7: Installation
Insert the anchors into the wall. (NOTE: Before installing the wall anchors, use a small piece of painters tape or masking tape over the drill area. This will prevent damages to the tile) 1” Luxier SP24-SS Rev. A1 012016... - Page 8 Make sure the unit is seated properly. Apply silicon sealant on left and right sides of the shower panel. (NOTE: do not seal the bottom of the panel, this will allow any possible future leaks to drain out the panel) Luxier SP24-SS Rev. A1 012016...
- Page 9 Installation (cont.) 7. Connect hand shower hose to the main panel body. Attach the hand shower to the hose. (NOTE: Install the rubber washer to prevent leak.) Luxier SP24-SS Rev. A1 012016...
-
Page 10: Operation
5. After cleaning, rinse thoroughly with clean water to remove any cleaner residue. 6. Wipe dry with soft cloth to keep shower panel surface spot free. Luxier SP24-SS Rev. A1 012016...
Need help?
Do you have a question about the SP24-SS and is the answer not in the manual?
Questions and answers