Table of Contents
Advertisement
Quick Links
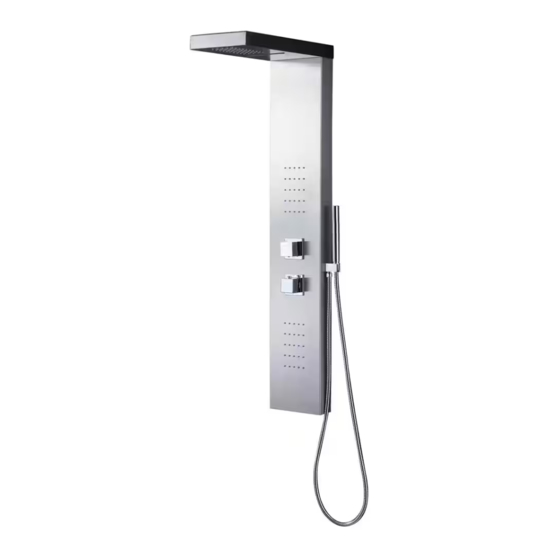
Features
- Stunning stylish European inspired design
- Fingerprint resistance finish
- Durable stainless steel frame construction
- Contemporary brass hand shower
- 4 stage shower functions (Rainfall, Waterfall, Massage Spray, Hand Shower)
* Proper water pressure is required for simultaneous operations
Luxier
1
SP20-CEC
SP20-CEC Rev. A 102019
Advertisement
Table of Contents

Related Manuals for Luxier SP20-CEC


Summary of Contents for Luxier SP20-CEC
- Page 1 - Fingerprint resistance finish - Durable stainless steel frame construction - Contemporary brass hand shower - 4 stage shower functions (Rainfall, Waterfall, Massage Spray, Hand Shower) * Proper water pressure is required for simultaneous operations Luxier SP20-CEC Rev. A 102019...
- Page 2 Should a malfunction occur within the warranty period, Luxier USA will, as its option, (1) repair or replace the defective part(s) or product(s) at no charge; (2) issue a refund of the original purchase price of the product(s) (Valid within 30 days from the date of purchase);...
- Page 3 (NOTE: additional parts such as 1/2” angle valves, 5/8” rubber grommets, and other parts are required but not included with this product.) Refer to Appendix A for detail diagram for the outlet box. Luxier SP20-CEC Rev. A 102019...
- Page 4 NOTE: This distance vary by models, always take the actual measurement from the shower panel) (This is the distance from the oor to the bottom edge of the shower panel) Luxier SP20-CEC Rev. A 102019...
-
Page 5: Technical Data
200 mm 508 mm 7.87” 20” 1.625” 1,210 mm 47.64” 700 mm 27.56” 485 mm 425 mm 19.09 ” 16.73” 225 mm 8.86” 70 mm 2.76” * Drawings not to scale. All measurements are approximate * Luxier SP20-CEC Rev. A 102019... -
Page 6: Parts List
09. Hand Shower Cradle 10. Hand Shower Hose 11. Water Supply Hoses 12. Check Valves 13. Thermostatic Valve 14. Diverter 15. Screws x 4 16. Mounting Brackets x 2 17. Wall Anchors x 4 18. Main Shower Body Luxier SP20-CEC Rev. A 102019... -
Page 7: Installation
Mark the positions of the 2 brackets on the wall and set a side the panel. (NOTE: The distance between the two brackets should be 700 mm or 27.56”) 700mm 27.56” Luxier SP20-CEC Rev. A 102019... - Page 8 The range of the control knob is limited in both clockwise and counter-clockwise directions. DO NOT force to turn the knob pass its limit. Overturning the control will damage the thermostatic valve making it fail to regulate temperature. Luxier SP20-CEC Rev. A 102019...
- Page 9 9. Connect hand shower hose to the main panel body and connect the hand shower wand to the hose. Make sure the silicon gaskets are seated properly to prevent water leak. The installation process is now complete. Luxier SP20-CEC Rev. A 102019...
-
Page 10: Operation
7. When using spray cleaners, spray fi rst onto a soft cloth or sponge. Never spray directly onto the faucet as droplets can enter openings and gaps and cause damage. 8. After cleaning, rinse thoroughly with clean water to remove any cleaner residue. Luxier SP20-CEC Rev. A 102019... -
Page 11: Troubleshooting
The shower panel is also equipped with removable fl ow restriction devices in accordance with the water conservation regulations. The devices can be removed to test the functionality of the shower panel if needed. Luxier SP20-CEC Rev. A 102019... - Page 12 (NOTE: When inserting the thermostatic valve, make sure the marking on the tip of the valve is pointing up at 12 o’clock position as seen in Figure E) 10. Turn on water supply to the unit and test the system for leak. Luxier SP20-CEC Rev. A 102019...
- Page 13 6. Once the temperature is set, install the Temperature Control Knob #3. (NOTE: The Safety Pin should be pointing at 12 o’clock) and tighten setscrew #2 Fig. F Fig. H Safety Pin Chrome Trim with Temperature Scale (4) Temperature Limit Stop (5) Termostatic Valve (7) Fig. G Luxier SP20-CEC Rev. A 102019...
- Page 14 NOTE: Luxier is not affi liated with the owner of the video. The purpose of this video is meant to provide a visual concept of the shower outlet box to speed up the installation process. All images are copyright to their respective owners.
Need help?
Do you have a question about the SP20-CEC and is the answer not in the manual?
Questions and answers