Table of Contents
Advertisement
Quick Links
Advertisement
Table of Contents

Subscribe to Our Youtube Channel
Related Manuals for GRAPHTEC GL980


Summary of Contents for GRAPHTEC GL980
- Page 1 LOGGER GL980 Quick Start Guide 604929020 GL980-UM-851...
-
Page 2: Table Of Contents
The explanation on how to use the ferrite core, tilt stand, and M3.5 screw can be found in the manual above. Please refer to them. Checking the Outer Casing After unpacking, check the GL980's Exterior to make sure that there are crack or other damage before use. Checking the Accessories •... -
Page 3: Nomenclature
Nomenclature Top Panel Top Panel Top Panel Power jack for humidity sensor Analog signal input terminals Input terminals AC adapter jack USB memory terminal GND terminal Front Panel Front Panel Front Panel USB interface terminal Operation status LED FAN air exit FAN air exit LAN interface terminal Monitor... -
Page 4: Connection Procedures
Pink with red dotted line : Trigger input/External sampling input Pink with black dotted line Shielded * The B-513 input/output cable for GL980 (sold separately) is required for connecting input/output signals. (For logic/pulse input, alarm output, trigger input, external sampling pulse input) - Page 5 Internal / External memory This device is equipped with internal RAM and internal memory. The internal memory is not removable. An SD card and USB memory are available. * Make sure that the SD card is not locked. SD card USB memory...
-
Page 6: Precautions To Observe When Taking Measurementt
Precautions to Observe When Taking Measurement To avoid break-downs or short-circuiting accidents, please make sure to follow warnings written below. • Use only the AC adapter provided as a standard accessory. The rated power supply range for the adapter is 100 to 240 VAC, and the rated frequency is 50/60 Hz. -
Page 7: Descriptions Of The Control Panel Keys
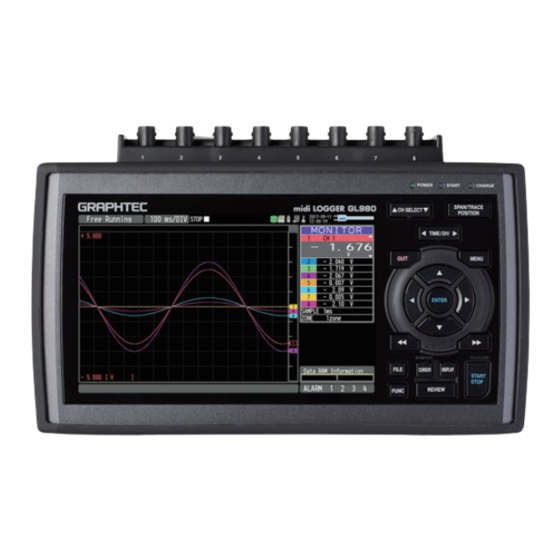
Descriptions of the Control Panel Keys This section describes key operation. (2) SPAN/TRACE/POSITION (1) CH SELECT (3) TIME/DIV (5) QUIT (4) MENU (6) DIRECTION KEYS (7) ENTER (8) FAST FORWARD (KEY LOCK) (13) FILE (9) START/STOP (USB DRIVE MODE) (14) FUNC (11) DISPLAY (10) REVIEW (12) CURSOR... - Page 8 . QUIT This key is primarily used for the following operations. To cancel a setting when setting MENU. To return to the MONITOR screen while the SPAN/TRACE/POSITION key is operated. To cancel the interface restriction (When the keys are disabled). To exit the replay display.
- Page 9 . REVIEW This key is used to replay captured data. During Free Running, captured data is replayed. During capturing, captured data is replayed. (Data replay Source is displayed on the status display. Press again to return to the capturing data screen.) To exit the replay display, press the [Quit] key.
- Page 10 . Key lock release with password A password can be set to device to cancel the key lock. (No password is set at factory default.) <Operation Flow> 1. Set the password. Press the , and ENTER keys at the same time to display the password setting screen shown below.
-
Page 11: Descriptions Of The Menu Screens
Descriptions of the Menu Screens 5. Device access display 6. Device access display (SD card) (USB memory) 4. Device access display 7. Remote lamp (Internal memory) 2. Time/DIV display area 8. Key lock display 3. Status mark 1. Status message display area 9. - Page 12 Device access display (SD card) : SD card is not attached. : SD card is attached but not being accessed. : SD card is accessed. Do not remove SD card. The POWER LED light also flashes while the SD card is being accessed.
- Page 13 Clock display Displays the current date and time. For details on date and time settings, refer to “3.5 Setting Menus” - “(6) OTHER settings”. AC/Battery status indicator : Running on AC or DC power supply. : Running on battery. The remaining battery power is 100 to 91%. : Running on battery.
- Page 14 Alarm display area Displays the alarm output status. The number with which an alarm went off is displayed in red. The channel with the alarm threshold has a red input value in the digital display area. Level bar Displays the each channel signal position, trigger position and alarm range. Trigger position Alarm range Rising...
-
Page 15: Measurement Procedure
For example, when you are using a 4GB SD card with 100MB already used, the total capacity of the SD card is 4GB with 100MB used space, and the available space of the SD card would be approximately 3.9GB. As the captured time elapses, the usage of the SD card increases and the remaining capacity of the SD card decreases. -
Page 16: Amp Setting
2. AMP setting 1. Press the [MENU] key The AMP setting screen will appear. 2. Press the direction keys to match the CH1 input setting. Set to TEMP. 3. Press the direction keys to match the CH1 range setting. Set to TC-T. 4. - Page 17 5. For 2CH, set Input to DC, Range to 10V, and Filter to Off. 6. Set Input to Off for 3CH to 8CH. 7. When the setting is complete, press the [QUIT] key to finish the AMP setting.
-
Page 18: Data Setting
3. DATA setting 1. Or press the [MENU] key twice. Press the MENU key and the direction key to display the DATA setting screen. 2. Set the sampling interval to 1 s. 3. Set the capture destination to the SD CARD, and the file name to CSV. For the file name setting (arbitrary, serial number) refer to the operation manual of the main unit. -
Page 19: Recording And Stopping
4. Recording and stopping 1. When the setting is completed, press the [START] key to start recording. When "Do you want to start recording?" is displayed, recording is started by pressing the [ENTER] key. During recording, the status at the top left of the screen will be displayed. -
Page 20: Playback Method
5. 再生方法 5. Playback method 1. When recording stops, it automatically switches to recorded data playback. To check the recorded data value press the direction keys to change the CH and the cursor. Pressing the fast forward key will move the cursor at high speed. 2. -
Page 21: Specifications
Specifications Standard Specifications Item Description Number of analog CHs 8CH fixed Trigger input (1ch) or external sampling (1ch) External output terminal Logic input (4ch) or pulse input (4ch) Alarm output (4ch) or trigger output (1ch) + alarm output (3ch) PC I/F Ethernet (10BASE-T/100BASE-TX) USB (compatible with high-speed) standard-included Internal memory device Internal RAM : 4MW/CH... -
Page 22: Specification Of Input Section
Specification of input section Item Description Number of input channels 8CH fixed Input terminal Insulated BNC connector or M3.5 screw terminal unit Voltage type (However, it cannot input to the BNC connector of same CH and the screw terminal at the same time.) Temperature M3.5 screw type terminals (Rectangular flat washer) Input method... -
Page 23: Specification Of Input/Output Section
Maximum number of count : 15 MC (24-bit counter) External sampling input Maximum input frequency: 100 kHz Temporal error: 1 μs or less. Installation Guide For the install procedure of the GL980 application software refer to the “Application Software Manual” included in the attached CD-ROM. - Page 24 Specifications are subject to change without notice. November 1, 2017 GL980 Quick Start Guide 1st edition-01 (GL980-UM-851) Publisher GRAPHTEC CORPORATION...
Need help?
Do you have a question about the GL980 and is the answer not in the manual?
Questions and answers