Table of Contents
Advertisement
Quick Links
Advertisement
Table of Contents

Subscribe to Our Youtube Channel
Related Manuals for Aputure MC Pro 8-Light Kit


Summary of Contents for Aputure MC Pro 8-Light Kit
- Page 1 MC Pro 8-Light Kit Product Manual English...
-
Page 2: Important Safety Instructions
As part of your essential lighting package, the MC Pro 8-Light Kit contains all the tools needed to unlock new light possibilities, so you and your equipment will be ready whenever creativity strikes. - Page 3 Any malfunctions caused by unauthorized disassembly are not covered by the warranty. The user may pay for maintenance. We recommend only using the original Aputure® cable accessories. Please note that any malfunctions caused by using unauthorized accessories are not covered by the warranty.
-
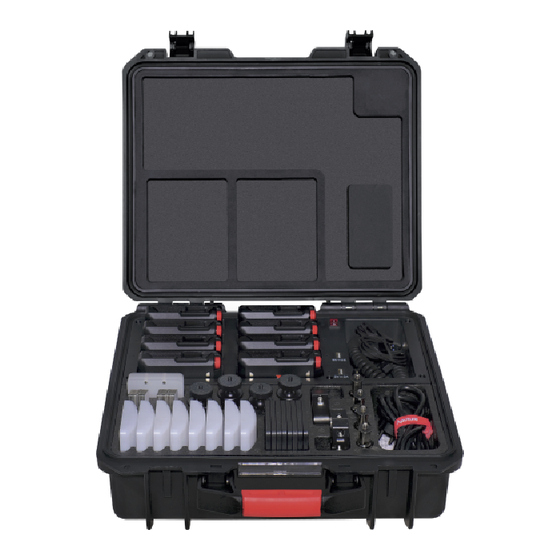
Page 4: Components List
This device has been evaluated to meet general RF exposure requirements. Components List Please make sure all accessories listed below are completed before using. If not, please contact with your sellers immediately. MC Pro 8-Light Kit: D-tap to D-tap Power Cable ×2 USB Type-C Charging Cables... -
Page 5: Product Details
Product Details 1.MC Pro Screw Mount 1/4" Display Pogo Pin Power Button Magnets USB-C Charging /DMX Port MENU/Return Function Control Knob 2.MC Pro 8-Light Charging Case Power Switch MC Pro D-tap to D-tap Power cable Charging slot USB Type-C Charging cables Flat Diffusers USB-A Output Metal Adhesive... -
Page 6: Installations
Installations 1. Powered by the charging case—— AC Power 100V-240V 2. DC Power Use a D-tap to D-tap cable to connect the battery to power the charging case. 12V - 16.8V - 5 -... - Page 7 Operations 1. Power ON/OFF 1.1 Charging case switch mode Access the AC power cable and press the switch. When the switch is turned on, the light of the switch turns red. Power Switch AC Power cable 1.2 MC Pro switch mode Press and hold the power button for 1 seconds to turn the MC Pro on or off.
- Page 8 *Supports 5V/2A charging via charger or power banks. 2.2 Pogo Pin Charging The Aputure® MC Pro is compatible with the Pogo Pin charging. First put the MCs Pro in the charging slot of the charging case, then ensure that the charging case is plugged into a com- patible power source, then flip the power switch to the ON position.
- Page 9 Do not close the lid when the charging case on or in an active charging state, to prevent overheating. Failure to do so will result in the internal temperature of the case and the MC Pros being charged to become extremely hot. 3.
- Page 10 3.3.2 HSI Rotate and press the knob to select HSI in Light Mode. INT (Intensity): 0.0%- 100.0% HUE (Hue): 0.1° - 360.0° SAT (Saturation): 0.0%- 100.0% CCT (Correlated Color Temp.): 2000 K - 10000 K 3.3.3 RGB Rotate and press the knob to select RGB in Light Mode. INT (Intensity): 0.0%- 100.0% R (Red): 0.0%- 100.0% G (Green): 0.0%- 100.0%...
- Page 11 3.3.6 XY Rotate and press the knob to select XY in Light Mode. INT (Intensity): 0.0%- 100.0% X (x coordinate): 0.0000 – 0.8000 Y (y coordinate): 0.0000 – 0.8000 3.3.7 FX Rotate and press the knob to select FX in Light Mode. Rotate and press the knob to select Club Lights/Paparazzi/Lightning/TV/Candle/Fire/Strobe/Explosion/Faulty Bulb/Pulsing/Welding/Cop Car/Colors Chase/Party Lights/ Fireworks.
- Page 12 5. Candle 6. Fire 7. Strobe 8. Explosion 9. Faulty Bulb 10.Pulsing 11.Welding 12.Cop Car 13.Colors Chase 14.Party Lights 15.Fireworks - 11 -...
- Page 13 3.3.8 Custom FX Rotate and press the knob to select FX in Light Mode. You can choose to enter Music FX or Picker FX. Each type can be uploaded and renamed in Sidus Link with 10 custom effects. "NO CFX" means unsaved FX. Picker FX Music FX 3.4 BT Settings...
- Page 14 * The fade-out time decreases as the percentage of brightness decreases. When the brightness output is 100%, the fade-out time is 60 seconds, which decreases in sequence. * If the signal is reconnected, the DMX console will continue to maintain the signal output as same as before.
- Page 15 Product Info: Rotate and press the knob to select Product Info to see Firmware Version / Hardware Version. Factory Reset: Rotate and press the knob to select Factory Reset. Factory Setting: Light Mode: Intensity 50%, CCT 5600K, GM 0 BT Status: ON DMX: Address 001, Profile CCT&RGB, Hold Last Setting, CRMX OFF.
- Page 16 4.4 Controlling Device Via DMX The MC Pro offers a variety of DMX modes. Please find a detailed overview of all DMX modes in the document, DMX Chart is available for free download on the Aputure official website https://www.aputure.com. 5. Using the Sidus Link APP You can download the Sidus Link app from the iOS App Store or Google Play Store for enhancing the functionality of the light.
-
Page 17: Specifications
(L x W x H) 4.25*2.76*0.98 in Cooling Method Passive IP Rating IP65 * USB-C to 5-Pin XLR In & Out adapter sold separately. MC Pro 8-Light Kit 100 – 240V AC Power Input Input Current 1.8A 50/60Hz Input Power (Max) - Page 18 Photometrics MC Pro Dome Flat Light Con- Distance Bare Bulb Bubble Diffusers Diffusers trol Grids Diffuser 2000K 0.5m 1027 lux 194 lux 253 lux 463 lux 838 lux 2500K 0.5m 1244 lux 226 lux 297 lux 543 lux 1014 lux 3200K 0.5m 1459 lux...
Need help?
Do you have a question about the MC Pro 8-Light Kit and is the answer not in the manual?
Questions and answers