Table of Contents
Advertisement
Quick Links
Advertisement
Table of Contents

Related Manuals for Aputure Light torm LS 600c Pro


Summary of Contents for Aputure Light torm LS 600c Pro
- Page 1 LS 600c Pro Product Manual English...
-
Page 2: Important Safety Instructions
Introduction Thank you for purchasing the Aputure® "Light Storm" series RGBWW COB light - LS 600c Pro. LS 600c Pro is a high power full color light source with Fully Tunable CCT from 2,300K to 10,000K, supporting CCT, HSI, XY, RGB, GEL, SOURCE light mode, and professional control with Sidus Link, DMX512/RDM, Lumenradio CRMX, Ethernet. -
Page 3: Fcc Compliance Statement
Any malfunctions caused by unauthorized disassembly are not covered by the warranty. The user may pay for maintenance. 20. We recommend only using the original Aputure cable accessories. Please note that any malfunctions casued by using unauthorized accessories are not covered by the warranty. - Page 4 Increase the separation between the equipment and receiver. Connect the equipment to an outlet on a different circuit than the receiver is connected Consult the dealer or an experienced radio/TV technician for help. RF Warning Statement: This device has been evaluated to meet general RF exposure requirements.
-
Page 5: Components List
Components List Please make sure all accessories listed below are found before using. If not, contact your seller immediately. Protection Paracord Cover (1 pc) Strap(1 pc) Lightning Clamp LS 600c Pro (1 pc) Control Box (1 pc) LS 600c Pro Lamp Head (1pc) 600 Series Hyper Reflector (1 pc) -
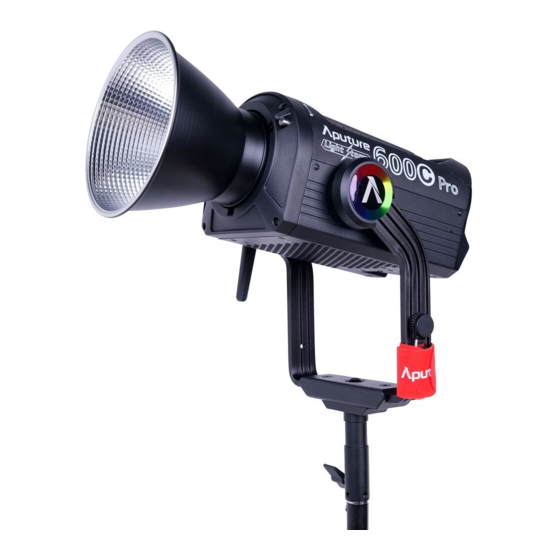
Page 6: Product Details
Product Details 1. Lamp Head Bowens Mount Bowens Mount Release button 600W RGBWW COB chipset 600 Series Hyper Reflector 7-Pin Male Weatherproof Head Cable Connector Cable Relief Hook T-Handle / Baby Pin Mounting Screw Junior/Baby Pin Mount Ratcheting Disk (1.125in/28mm | 5/8in./16mm) Brake Handle 2. - Page 7 Bottom 7-Pin Female Head Cable Connector DMX OUT DMX IN 48V DC Input Neutrik® Port Port (3-Pin XLR) powerCON AC Input Setting Up the Light 1. Attaching/detaching the Protection Cover Press the release button following the arrow and rotate the cover clockwise to detach the cover.
- Page 8 3. Setting Up the Lamp Head If using a 5/8in / 16mm stand (Baby Pin), then mount the Lamp Head onto the stand, and fix it in place using the T-Handle/Mounting Screw on the Baby Pin Receiver. If using a 1.125in / 28mm stand (Junior Pin), then mount the Lamp Head into the Junior Pin receiver, and fix it in place using the T-Handle on the stand.
- Page 9 5. Connecting the Lamp Head to the Control Box Connect the Lamp Head to the control box using the 7-pin Weatherproof Connecting Cable. * Hang the cable using the rope to manage and reduce tension on the cable. * Disconnect the Head Cable by pulling up the collar on the connector. This will disengage its locking mechanism.
- Page 10 2) Powering by DC V-Mount Battery Anton Bauer Battery * You can choose V-Mount or Anton Bauer Battery as required. 3) Powering by DC Supply DC Supply 48V-15A 3pin XLR 7. Charging Batteries Using the Control Box You can charge batteries via built-in Battery Plates, the maximum intensity that the light can operate at while charging batteries are as follows: Exponential(Exp) or Linear: ≤70% Logarithmic(Log): ≤30%...
- Page 11 Operations 1. Turning the Light On and Off S i l ent : 100% Intensity : CCT 6200K Correlated Color temperature 2000K 10000K : G/M-1 G/M+1 -0.05 Green/Magenta adjustment Default Control Screen (CCT Mode) 2. Manual Control There are three buttons on the control box for manual control of the light: MENU, LIGHT MODE, and PRESET.
-
Page 12: Output Mode
Max Output: perform at the maximum possible output throughout the CCT range. Output Mode Constant Output Maximum Output 2.1.2) DMX Mode Press the MENU button to enter the menu interface, rotate the select wheel and short press to enter the DMX mode. DMX address: LS 600c Pro will set to in DMX Address interface. -
Page 13: Dimming Curve
You can choose to enter Picker FX or Music FX. Each type can save up to 10 custom FXs. "NO FX" refers to unsaved FX, and "Untitled" refers to saved FX. Custom FX Picker FX Music FX 2.1.4) Dimming Curves Press the MENU button to enter the menu interface, rotate the select wheel and short press to enter the Dimming Curves. - Page 14 2.1.6) Studio Mode Press the MENU button to enter the menu interface, rotate the select wheel and short press to enter the Studio Mode. When the studio mode is turned on (ON), the lamp can be turned on directly, when the studio mode is turned off (OFF), you need to press the power button to turn on the lamp.
- Page 15 CRMX CRMX Status Unpair 2.1.7.3) Ethernet Rotate the select wheel and short press to enter the Ethernet mode. You can set the IP manually in Manual Set IP interface or obtain IP aromatically in Automatic Obtain IP interface. Ethernet Manual Set IP 2.1.8) Language Press the MENU button to enter the menu interface, rotate the select wheel and short press to enter the Language settings.
- Page 16 Frequency Selection + 2000 2.1.10) Product Information Press the MENU button to enter the menu interface, rotate the select wheel and short press to enter Product Information, you can view the Hardware Version and UID of the product. Product Information Hardware Version UID: 6LY00X1000X 2.1.11) Update...
- Page 17 The factory settings list : Light mode: Intensity 50%, CCT 5600K; Language: English Fan Mode: Smart Dimming Curve: Linear Studio Mode: OFF Control System: Bluetooth DMX: Address 001, Hold Last Settings, DMX Termination OFF Factory Reset 2.1.13) Battery Power Option Press the MENU button to enter the menu interface, rotate the select wheel and short press to Battery Power Option.
- Page 18 2.2.1} CCT Press the LIGHT MODE button to enter the light mode interface, rotate the select wheel and short press to CCT. You can adjust Intensity (0-100%), Correlated Color Temperature (2300K - 10000K), and Green/ Magenta adjustment (-1.0 to +1.0). S i l ent :...
- Page 19 2.2.4) RGB Press the LIGHT MODE button to enter the light mode interface, rotate the select wheel and short press to RGB. You can adjust Intensity (0-100%) and Red/Green/Blue values (0-100%). S i l ent : 100% : 100% : :...
- Page 20 2.2.7) GEL Press the LIGHT MODE button to enter the light mode interface, rotate the select wheel and short press to GEl. You can set 3200K or 5600K as the light color temperature , and select the Rosco or LEE Gel Lighting Filter paper. S i l ent 100% :...
- Page 21 You can download the Sidus Link app from the iOS App Store or Google Play Store for enhancing the functionality of the light. Please visit sidus.link/app/help for more details regarding how to use the app to control your Aputure lights. Sidus.link/app/help...
-
Page 22: Specifications
Specifications Powe Consumption ≤720W Output Power ≤600W Voltage Input Range 100V~240V Operating Current ≥95 TLCI ≥98 SSI(D56) SSI(D32) Ambient Temperature 2300 K - 10000 K -20°C - 45°C Operation 14.4 V - 15A DC Voltage Range Operating Voltage (Battery) 48 V - 15 A 26 V - 8 A (3-Pin XLR) 28.8 V –... - Page 23 Photometrics LS 600 Distance Bare Bulb F10 Fresnel Flood F10 Fresnel Spot Hyper Reflector 39500 lux 12460 lux 19930 lux 44300 lux 3669 fc 1157 fc 1851 fc 4115 fc 2517 lux 5710lux 3770ux 1481 lux 2300 K 233 fc 530 fc 350fc 177 fc...
- Page 24 Bowens is a trademark registered by Bowens in China and other countries. Anton Bauer is a trademark registered by Anton Bauer in the US and other countries. Neutrik® is a trademark registered by Neutrik® in the US and other countries. Detailed product manual can be found on www.aputure.com. -23-...
Need help?
Do you have a question about the Light torm LS 600c Pro and is the answer not in the manual?
Questions and answers