
Related Manuals for Proline VH 23 T


Summary of Contents for Proline VH 23 T
- Page 1 VH 23 T CERAMIC COOKER HOB TABLE DE CUISSON VITROCÉRAMIQUE VITROKERAMICH KOOKPLAAT GEBRUIKSAANWIJZING...
-
Page 2: Table Of Contents
Table of Contents WARNINGS ......................... 2 IMPORTANT SAFETY INSTRUCTIONS ................ 5 INSTALLATION INSTRUCTIONS.................. 6 ....................... 6 Built‐in s cheme Clearances ...................... 7 Fastening the hob to the bench ................ 8 OVERVIEW ........................ 9 Top view ......................... 9 Control panel ...................... COOKING GUIDELINES .................... 10 Cookware ...................... 10 Cooking tips ...................... 11 ... -
Page 3: Warnings
WARNINGS This appliance is intended to be used in household and similar applications such as: − staff kitchen areas in shops, offices and other working environments; − farm houses; − by clients in hotels, motels and other residential type environments; −... - Page 4 supervision or instruction concerning use of the appliance in a safe way and understand the hazards involved. Children shall not play with the appliance. Cleaning and user maintenance shall not be made by children without supervision. WARNING: Unattended cooking on a hob with fat or oil can be dangerous and may result in fire. NEVER try to extinguish a fire with water, but switch off the appliance and then cover flame e.g. with a lid or a fire ...
- Page 5 These surfaces can get hot. The surfaces are liable to get hot during use. Do not touch hot surface. Use the handle while moving the product. Do not place the appliance in or near hot gas or electric burner, or permit to touch a heated v en or mini oven. The temperature of accessible surfaces may be high when the appliance is operating. The plug must be remained easily accessible after installation of the appliance. CAUTION: The cooking process has to be supervised. A short term cooking process has to be supervised continuously. After use, switch off the hob element by its control and do not rely on the pan detector.
-
Page 6: Important Safety Instructions
IMPORTANT SAFETY INSTRUCTIONS • Read these instructions carefully before installing or using this hob. • Do not place combustible material or products on the hob at any time. • In order to avoid a hazard, this hob must be installed according to these instructions for installation. • This hob is to be properly installed only by a qualified person. • Never use this hob for warming or heating the room. • Never leave metal objects on the hob as they can become hot very quickly. • Turn the power off and remove the plug when the hob is not in use, left unattended and before cleaning. Allow to cool down before cleaning or storing the hob. • Do not touch hot surfaces. • Never use the hob as a work or storage surface. • Never leave any objects or utensils other than suitable cookware on the appliance. • Do not stand on the hob. • Do not use pans with jagged edges or drag pans across the ceramic ... -
Page 7: Installation Instructions
INSTALLATION INSTRUCTIONS Built‐in scheme In the bench top A B C D E F 268 490 50 mm 50 mm 50 mm 50 mm mm mm mini mini mini mini C/D/E/F: minimum distance between the cutout of the hob and the nearest surface On the bench top A B 50 mm 50 mm mini ... -
Page 8: Clearances
Clearances A B C D E 760 mm 50 mm 30 mm mini Air intake Air exit 10 mm CAUTION: • The bench top is square and level, and no structural members interfere with space requirements. • The bench top is made of a heat‐resistant material. • The installation will comply with all clearance requirements and applicable standards and regulations. • There is adequate flow of fresh air from outside the cabinetry to the base of the hob. • The hob must be installed by a qualified authorised person. Never try to install the appliance by yourself. • Incorrect installation may cause harm and damage to people or property, for which the manufacturer accepts no responsibility. • The hob must not be installed above refrigerators, freezers, dishwashers or tumble dryers. -
Page 9: Fastening The Hob To The Bench
• Install the hob away from heat sources such as ovens or direct sunlight. • To avoid any damage, the sandwich layer and adhesive must be resistant to heat. • A steam cleaner must not be used. Fastening the hob to the bench 1. Turn the hob upside down and place it on a soft surface. 2. Mount the supplied clamps and screws onto the hob as shown, without tightening the screws. 3. Place the hob into the cutout, and then tighten the screws to clamp the hob securely to the bench. ... -
Page 10: Overview
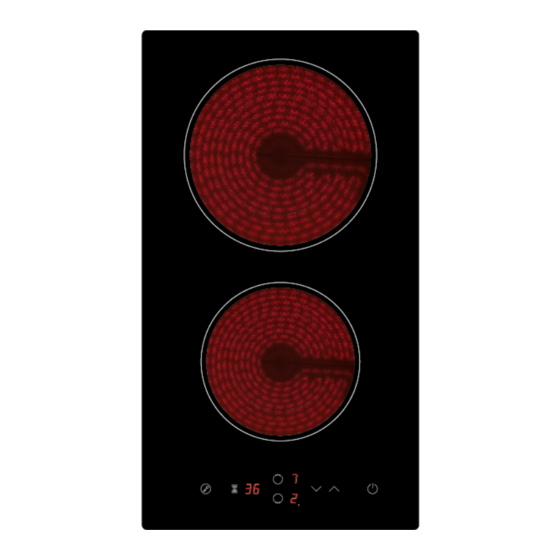
OVERVIEW Top view 1. Max. 1800 W cooking zone 2. Max. 1200 W cooking zone 3. Control panel Control panel 1. ON/OFF control 2. Heat or timer setting control 3. Cooking zone selection control 4. Timer setting control 5. Key lock control ... -
Page 11: Cooking Guidelines
COOKING GUIDELINES Cookware •Use heavy‐gauge, flat, smooth‐based cookware that matches the diameter of the cooking zone. •Saucepans or heavy frying pans with jagged edges or a rough base will scratch the glass. •Always lift pans off the hob. Do not slide them, or they may scratch the glass. •Cookware with a stainless steel sandwich base or enamelled cast iron will give you the best results. ... -
Page 12: Cooking Tips
Cooking tips Take care when deep‐frying: oil or fat can overheat very quickly, particularly on a high setting. •When food comes to the boil, reduce the temperature setting. •Using a lid will reduce cooking times through retaining the heat. •Minimise the amount of liquid or fat to reduce cooking times. •Start cooking on a high setting and reduce the setting when the food has heated through. Simmering, cooking rice •Simmering occurs below boiling point, at around 85°C, when bubbles are just rising occasionally to the surface of the cooking liquid. It is the key to delicious soups and tender stews because the flavours develop without overcooking the food. You should also cook egg‐based and flour‐thickened sauces below boiling point. •Some tasks, including cooking rice by the absorption method, may require a setting higher than the lowest setting to ensure the food is cooked properly in the time recommended. Searing steak To cook juicy flavoursome steaks: 1. Stand the meat at room temperature for about 20 minutes before cooking. 2. Heat up heavy‐based frying pan. 3. Brush both sides of the steak with oil. Drizzle a small amount of oil into the hot pan and then lower the meat onto the hot pan. ... - Page 13 4. Turn the steak only once during cooking. The exact cooking time will depend on the thickness of the steak and how cooked you want it. Times may vary from about 2 – 8 minutes per side. Press the steak to gauge how cooked it is – the firmer it feels the more ‘well done’ it will be. 5. Leave the steak to rest on a warm plate for a few minutes to allow it to relax and become tender before serving. For stir‐frying 1. Choose a flat‐based wok or a large frying pan. ...
-
Page 14: Operation
OPERATION Using the touch controls • The controls respond to touch, so you don’t need to apply any pressure. • Make sure the controls are always clean, dry, and there is no object (e.g. a utensil or a cloth) covering them. To start cooking 1. Touch . • A beep will sound and all the indicator lights will show “―” or “― ―”, indicating that the hob has entered the standby mode. • If there is no operation within 1 minute, the hob will automatically switch off. 2. Touch the desired cooking zone control key. •... - Page 15 3. Set the power level by repeatedly touching or . • To change the power level during cooking, touch the cooking zone and then touch o r until the desired power level is set. Power level guideline Heat setting Suitable for •Delicate warming for small amounts of food 1 – 2 •Foods that burn quickly •Gentle simmering •Slow warming •Reheating 3 – 4 •Rapid simmering •Cooking rice 5 – 6 Pancakes •Sautéing 7 – 8 •Cooking pasta •Stir‐frying 9 •Searing •Boiling ...
- Page 16 To switch off one cooking zone 1. Touch the corresponding key. 2. Repeatedly touch or touch and at the same time. Make sure the display will show “0”. To switch off all cooking zones Touch . NOTE: After the hob is switched off, “H” will illuminate to indicate the cooking zone is hot. It will disappear when the cooking zone has cooled down. ...
-
Page 17: Locking The Controls
Locking the controls • You can lock the controls to prevent unintended use (for example children accidentally turning cooking zones on). • When the controls are locked, all controls except the ON/OFF control are disabled. To lock the controls Touch the key lock control. “Lo” will flash on the timer display, indicating that the controls are locked. NOTE: You can always turn the hob off in an emergency, but the controls will still be locked when you turn the hob on again. Unlock the controls first before operating the hob. To unlock the controls 1. Make sure the hob is turned on. 2. Touch and hold the key lock control for 2 seconds. “Lo” will disappear. 3. You can now start using the hob. Overheat sensor The hob is equipped with a sensor that monitors the temperature inside the hob. The hob will automatically turn off if this temperature becomes excessive. Residual heat indicator After intensive use, the cooking zone may remain hot. “H” will flash on the display after switching off a cooking zone or the complete stop of the hob. “H” will disappear when the cooking zones may be touched without danger. As far as “H” is flashing, do not touch the cooking zones and put any heat‐sensitive object on them. There are risks of burn and fire! ... -
Page 18: Automatic Stop Function
Automatic stop function The function activates automatically if you forget to turn off the hob after cooking. Power used The cooking zone turns off automatically after approximately Between 1….3 8 hours Between 4….6 4 hours Between 7….9 2 hours Using the timer You can set the timer to automatically turn a cooking zone off when the set time is up. Never leave the hob unattended when in use, even if you have set the timer to automatically turn a cooking zone off. 1. Select cooking zone already in use. 2.Select the timer. • "10" will flash on the timer display. •... - Page 19 3. While “10” is flashing, set the digits using . / • Touch∨ or∧once to decrease or increase the time by 1 minute. • The maximum time is 99 minutes. • Touch and hold / will increase or decrease time by 10 minutes. 4. Press the timer setting control to confirm. The timer is now set and begins counting down. ...
-
Page 20: Cleaning And Care
CLEANING AND CARE What? How? Important! • When the hob is Everyday soiling 1. Switch the hob off. on glass 2. Apply a hob cleaner switched off, there will (fingerprints, while the glass is still be no ‘hot surface’ marks, stains warm (but not hot!). warning but the cooking left by non‐ 3. Rinse and wipe dry zone may still be hot! sugary spillages with a clean cloth Take extreme care. • Heavy‐duty scourers, on the glass) or paper towel. 4. Switch the hob back some nylon scourers on. and harsh/abrasive cleaning agents may scratch the glass. Always read the label to check if your cleaner or scourer is suitable. •... - Page 21 cooktop. always store safely and 3. Clean the soiling or out of reach of children. spill up with a dish cloth or paper towel. 4. As soon as the hob has cooled enough to safely touch, clean with cooktop cleaner following the instructions for ‘Everyday soiling on glass’ above. 5. Switch the hob back on. Spillage on the 1. Switch the hob off. Beware of hot spills. touch controls 2. Soak up the spill. 3. Wipe the touch control area with a clean damp sponge or cloth. 4. Wipe the area completely dry with a paper towel. 5. Switch the hob back on. ...
-
Page 22: Troubleshooting
TROUBLESHOOTING Problem Possible causes Possible solution The hob No power. Make sure the hob is cannot be connected to the power turned on. supply and that it is switched on at the wall. Check whether there is a power outage in your home or area. If you have checked everything and the problem persists, consult a qualified technician. The touch The controls are Unlock the controls. See controls are locked. section ‘Locking the controls’ unresponsive. for instructions. The touch You may be using the Use the ball of your finger controls are tip of your finger when touching the controls. difficult to when touching the operate. controls. The glass is Rough‐edged Use cookware with flat and being ... -
Page 23: Technical Data
20 Feb. 2017 <200 20 Feb. 2019 <195 Product information requirements (since 20 Feb. 2015) EN60350-2:2013+A11:2014 The testing method is in compliance with the requirements of Brand Proline Reference VH 2 Category 2 zones ceramic hob Voltage/frequency V / Hz ... - Page 24 DISPOSAL As a responsible retailer we care about the environment. As such we urge you to follow the correct disposal procedure for the appliance and packaging materials. This will help conserve natural resources and ensure that it is recycled in a manner that protects health and the environment. You must dispose of this appliance and its packaging according to local laws and regulations.
- Page 25 Table des matières ATTENTION .................... 24 MISES EN GARDE IMPORTANTES .............. 28 INSTRUCTIONS D’INSTALLATION .............. 29 ................ 29 Schémas d’encastrement Espacements .................... 30 Fixation de la table de cuisson sur le plan de travail ........ 31 DESCRIPTION .................... 32 Vue de dessus ................... 32 ................Bandeau de commande ...
-
Page 26: Attention
ATTENTION Cet appareil est destiné à être utilisé dans des applications domestiques et analogues telles que: − les coins cuisines réservés au personnel des magasins, bureaux et autres environnements professionnels; − les fermes; − l’utilisation par les clients des hôtels, motels et autres environnements à... - Page 27 Cet appareil peut être utilisé par des enfants à partir de 8 ans et plus et par des personnes ayant des capacités physiques, sensorielles ou mentales réduites ou un manque d’expérience et de connaissances à condition qu’elles aient reçu une supervision ou des instructions concernant l’utilisation de l’appareil en toute sécurité et qu’elles comprennent les dangers encourus. Les enfants ne doivent pas jouer avec l’appareil. Le nettoyage et l’entretien par l’usager ne doivent pas être effectués par des enfants, sauf s’ils ont plus de 8 ans et qu’ils sont surveillés. Maintenir l’appareil et son cordon hors de portée des enfants de moins de 8 ans. MISE EN GARDE: Une cuisson, sans surveillance, utilisant de l’huile ou autre matière grasse, sur une plaque de cuisson peut être dangereuse et déclencher un incendie. NE JAMAIS essayer d’éteindre un feu avec de l’eau mais déconnecter l'appareil de l'alimentation et couvrez les flammes, par exemple, à l’aide d’un couvercle ou d’une couverture ignifugée. ...
- Page 28 MISE EN GARDE: Danger de feu: Ne jamais placer d’objets sur la plaque de cuisson. MISE EN GARDE: Si la surface est fêlée, déconnecter l'appareil de l'alimentation pour éviter un risque de choc électrique. Ne pas utiliser d’appareil de nettoyage à la vapeur. L'usager ne doit pas fixer des yeux les foyers de cuisson. Cet appareil n’est pas destiné à être mis en fonctionnement au moyen d'une minuterie extérieure ou par un système de commande à distance séparé. Ces surfaces sont susceptibles de devenir chaudes. Les surfaces sont susceptibles de devenir chaudes au cours de l'utilisation. ...
- Page 29 Ne pas toucher les surfaces chaudes Ne pas placer l’appareil près de ou sur une gazinière ou une plaque chauffante, ne le posez pas sur un four ou un mini‐four. La température des surfaces accessibles peut être élevée lorsque l'appareil est en fonctionnement. L a fiche de prise de courant doit demeurer facilement accessible après l'installation de l'appareil. AVERTISSEMENT: Le processus de cuisson est à surveiller. Un processus de cuisson court est à surveiller sans interruption. Après utilisation, éteindre l'élément de la table de cuisson par sa commande.
-
Page 30: Mises En Garde Importantes
MISES EN GARDE IMPORTANTES • Lisez attentivement le mode d’emploi avant d’installer et d’utiliser cette table de cuisson. • Aucun produit ou matériau combustible ne doit être posé sur la table sous quelque prétexte que ce soit. • Pour des raisons de sécurité, la table doit être installée d’une manière conforme aux instructions du mode d’emploi. • L’installation de la table doit impérativement s’effectuer de manière correcte, par le biais d’une personne qualifiée. • N’utilisez en aucun cas cette table pour chauffer ou réchauffer la pièce. • Ne laissez jamais d’objets métalliques sur la table : ils pourraient rapidement devenir brûlants. • Éteignez et débranchez la table après usage, avant de la nettoyer et avant de la laisser sans surveillance. Laissez la table de cuisson refroidir avant de la nettoyer ou de la ranger. • Ne touchez pas les surfaces chaudes. • N’utilisez pas la table de cuisson comme plan de travail ou comme espace de rangement. • Aucun objet ou ustensile autre que les ustensiles de cuisine adéquats ne doit être laissé sur l’appareil. • Ne montez pas sur la table de cuisson. • N'utilisez pas des ustensiles dont les bords sont irréguliers, et ne traînez pas les ustensiles sur la surface en vitrocéramique: vous risqueriez de la rayer. • Ne nettoyez pas la table avec un produit abrasif. ... -
Page 31: Instructions D'installation
INSTRUCTIONS D’INSTALLATION Schémas d’encastrement Dans le plan de travail JOINT A B C D E F 268 490 50 mm 50 mm 50 mm 50 mm mm mm minimum minimum minimum minimum C/D/E/F : distance minimale entre la découpe de la plaque et le mur Sur le plan de travail A B ... -
Page 32: Espacements
Espacements A B C D E 760 mm 50 mm 30 mm mini Arrivée Sortie d'air 10 d'air mm ATTENTION : • Le plan de travail est rectangulaire et horizontal, et aucun élément de structure ne vient compromettre les espacements. • Le matériau du plan de travail est résistant à la chaleur. •L'installation est conforme aux normes et régulations en vigueur, et tous les espacements sont respectés. •L'air frais peut circuler librement de l'extérieur du meuble jusqu'à la base de la table de cuisson. • Cette table de cuisson doit être installée par un professionnel qualifié. N'essayez en aucun cas d'installer cet appareil par vous‐même. • Le fabricant décline toute responsabilité pour les dommages corporels et matériels résultant d'une installation incorrecte. ... -
Page 33: Fixation De La Table De Cuisson Sur Le Plan De Travail
• Cette table de cuisson ne doit pas être installée au‐dessus d'un réfrigérateur, d'un congélateur, d'un lave‐vaisselle ou d'un sèche‐linge. • Installez la table à distance de toute source de chaleur (four, lumière du soleil etc.). • Pour des raisons de sécurité, l'adhésif et la couche intermédiaire doivent être résistants à la chaleur. • Ne pas nettoyer à la vapeur. Fixation de la table de cuisson sur le plan de travail 1. Retournez la table et posez‐la sur une surface molle. 2. Montez les vis et les pièces de fixation fournies sur la table, sans serrer les vis (voir illustration). 3. Placez la table dans la découpe, puis fixez‐la au plan de travail en serrant les vis. ... -
Page 34: Description
DESCRIPTION Vue de dessus 1. Foyer max. 1800 W 2. Foyer max. 1200 W 3. Bandeau de commande Panneau de commande 1.Touche marche/arrêt 2.Touche de réglage de minuterie/température 3.Touche de sélection du foyer 4.Touche de contrôle de la minuterie 5.Touche de verrouillage des touches ... -
Page 35: Recommandations
RECOMMANDATIONS Compatibilité récipients •Utilisez des ustensiles de gros calibre à fond plat et lisse, de diamètre égal à celui de la plaque de cuisson. •Les casseroles et les grandes poêles à bords irréguliers ou à base rugueuse sont de nature à rayer la surface de verre. •Soulevez toujours les ustensiles verticalement. Ne les faites pas glisser sur la table: ils risqueraient de rayer le verre. •Vous obtiendrez de meilleurs résultats avec des ustensiles à fond multicouche en inox ou en fonte émaillée. ... -
Page 36: Conseils De Cuisson
Conseils de cuisson Faites attention lors des fritures: l'huile (ou le gras) peut surchauffer très rapidement, notamment si le réglage est élevé. •Lorsque les aliments arrivent à ébullition, baissez la température. •La cuisson avec couvercle permet de retenir la chaleur et donc de réduire le temps de cuisson. •Minimisez les quantités de graisse et de liquide afin de réduire les temps de cuisson. •Commencez la cuisson à une température élevée, puis baissez‐la une fois les aliments chauffés uniformément. Mijoter, cuire du riz •Mijoter consiste à faire cuire en dessous du point d’ébullition, aux alentours de 85˚C, lorsque les bulles ne montent qu’occasionnellement à la surface du liquide de cuisson. Cette méthode permet de réaliser des soupes délicieuses et des ragoûts très tendres, car les saveurs peuvent se développer sans que l’aliment ne soit trop cuit. Les sauces à base d’œuf et épaissies à la farine doivent également cuire en dessous du point d’ébullition. •Certaines tâches, comme par exemple la cuisson du riz par absorption, peuvent nécessiter une température plus élevée que la plus basse, afin d’assurer une cuisson uniforme dans le temps de cuisson recommandé. Saisir un steak Pour des steaks juteux et savoureux: 1. Laissez la viande à température ambiante pendant environ 20 minutes avant la cuisson. 2. Faites chauffer une poêle à fond épais. ... - Page 37 3. Badigeonnez les steaks des deux côtés avec de l’huile. Mettez quelques gouttes d’huile dans la poêle chaude, puis mettez délicatement la viande dessus. 4. Ne tournez le steak qu’une seule fois au cours de la cuisson. Le temps de cuisson exact dépend de l’épaisseur des steaks et du degré de cuisson souhaité. Le temps peut donc varier de 2 à 8 minutes par côté. Pressez le steak pour voir s’il est cuit ; puis il est ferme, plus il est cuit. 5. Mettez le steak sur une assiette chaude et laissez‐le reposer pendant quelques minutes de manière à ce qu’il soit bien tendre au moment du service. Faire sauter 1. Choisissez une grande poêle ou un wok plat. 2. Préparez tous les ingrédients et ustensiles dont vous aurez besoin. Ce mode de cuisson est rapide. Si vous voulez faire cuire de grandes quantités d’aliments de cette manière, procédez par petites fournées. 3. Préchauffez la poêle brièvement et ajoutez deux cuillères à soupe d’huile. 4. Cuisez d’abord la viande, puis mettez‐la de côté et gardez‐la au chaud. 5. Faites sauter les légumes. Lorsqu’ils sont chauds et encore croustillants, baissez la température de la plaque puis remettez la viande et ajoutez votre sauce. ...
-
Page 38: Utilisation
UTILISATION Commandes tactiles • Les boutons du bandeau de commande sont tactiles. Il est inutile d’exercer une quelconque pression sur les boutons • Les boutons doivent toujours rester propres et secs; aucun objet (ex: chiffon, ustensile) ne doit les recouvrir. L ancer la cuisson 1. Appuyez sur . • Un signal sonore retentit et tous les témoins affichent "―" ou "― ―", indiquant que la table est passée en mode veille. •... - Page 39 3. Réglez la puissance de cuisson à l'aide des touches ∨et∧. • Pour changer la puissance en cours de cuisson, touchez le bouton de la plaque puis réglez la puissance à l'aide des touches∨et ∨ Guide de réglage Réglage de Convient pour température •Chauffer doucement de petites quantités de 1 – 2 nourriture •Chauffer des aliments susceptibles de brûler rapidement •Faire mijoter •Chauffer lentement •Réchauffer 3 – 4 •Faire mijoter rapidement •Cuire du riz 5 – 6 Crêpes •Faire revenir 7 – 8 •Cuire des pâtes ...
- Page 40 Pour éteindre une plaque de cuisson 1. Appuyez sur la touche correspondante. ∨ 2. Appuyez de manière répétée sur ou appuyez en même temps sur ∨et ∧. L'écran doit normalement afficher "0". Pour éteindre toutes les plaques, appuyez sur . REMARQUE : Une fois la table éteinte, "H" s'affiche pour indiquer que la plaque est encore brûlante. Il disparaît lorsque la plaque a refroidi. ...
-
Page 41: Verrouillage Des Commandes
Verrouillage des commandes • Vous avez la possibilité de verrouiller les boutons afin d’empêcher tout risque de démarrage inopiné (ex : enfant allumant accidentellement l’une des plaques). • Lorsque le verrouillage est activé, tous les boutons sont inopérants à l’exception du bouton marche/arrêt. Pour verrouiller les boutons Appuyez sur la touche de verrouillage. "Lo" clignote sur l'écran de la minuterie, indiquant que les boutons sont maintenant verrouillés. REMARQUE : Vous pouvez toujours éteindre la table en cas d'urgence, mais les boutons seront verrouillés lorsque vous rallumerez la table. Vous devrez d'abord déverrouiller les boutons avant d'utiliser la table. Pour déverrouiller les boutons 1. Allumez la table. 2. Gardez la touche de verrouillage appuyée pendant 2 secondes. "Lo" disparaît de l'écran. 3. Vous pouvez maintenant utiliser la table. ... -
Page 42: Fonction Arrêt Automatique
Fonction arrêt automatique Cette fonction s'active automatiquement lorsque vous oubliez d'éteindre la table après la cuisson. Puissance Durée approximative au bout de laquelle la plaque de cuisson s'éteint automatiquement Entre 1 et 3 8 heures Entre 4 et 6 4 heures Entre 7 et 9 2 heures Minuterie La minuterie permet de programmer une plaque de manière à ce qu'elle s'éteigne automatiquement au bout d'une durée déterminée. Ne laissez jamais la table sans surveillance lorsqu'elle fonctionne, même si la plaque utilisée est programmée de manière à s'éteindre automatiquement. 1. Choisissez une plaque déjà en cours d'utilisation. ... - Page 43 2. Appuyez sur la minuterie. • "10" clignote à l’écran de la minuterie. • L'indicateur sur l'écran de la plaque de cuisson signifie que la minuterie peut maintenant être réglée pour cette plaque. 3. Pendant que "10" clignote, réglez la durée / avec les touches . • Chaque pression sur ∨ou sur∧ augmente ou diminue le temps de cuisson d'1 minute. • La durée maximale est de 99 minutes. • La durée se règle par paliers de 10 minutes lorsque les touches / sont maintenues enfoncées. ...
- Page 44 Pour modifier le réglage de la minuterie, suivez les étapes 1 à 3 (voir ci‐dessus). Pour annuler le réglage de la minuterie, suivez les étapes 1 et 2 (voir ci‐dessus) puis appuyez sur et en même temps; l'écran de la minuterie indique "‐‐". ...
-
Page 45: Nettoyage Et Entretien
NETTOYAGE ET ENTRETIEN Quoi? Comment? Important! • Lorsque la table est Souillure 1. Éteignez la table de quotidienne du cuisson. éteinte, le témoin verre 2. Appliquez un produit ‘surface chaude’ (empreintes pour table de cuisson disparaît mais la plaque digitales, pendant que le verre peut être encore marques, taches est encore chaud (mais brûlante ! Soyez très laissées par des pas brûlant !). vigilant. • Les produits de nettoyage aliments non 3. Rincez et essuyez avec sucrés) un chiffon propre ou durs/abrasifs et les avec du Sopalin. tampons à récurer ... - Page 46 1. Éteignez la table de abîmer le verre de cuisson. manière définitive. • Risque de coupure : 2. Tenez la lame à un angle de 30° et lorsque le protège‐lame poussez la tache ou est rétracté, la lame est les résidus vers une aussi coupante qu’un partie froide de la rasoir. Manipulez‐la avec table de cuisson. la plus extrême 3. Nettoyez la tache ou prudence et rangez‐la les résidus avec un toujours hors de portée chiffon ou du Sopalin. des enfants. 4. Dès que la table a suffisamment refroidi pour pouvoir être touchée sans danger, nettoyez‐la avec du produit pour table de cuisson (voir section "Souillure quotidienne du verre"). 5. Rallumez la table. Résidus sur les ...
-
Page 47: Dépannage
DÉPANNAGE Problème Causes possibles Solution possible La table ne Pas d’alimentation. Vérifiez que la table est s'allume pas. branchée et que la prise est bien sous tension. Il peut y avoir eu une coupure de courant chez vous ou dans votre quartier. Si le problème persiste une fois toutes les vérifications effectuées, consultez un technicien qualifié. Les touches de Les touches sont Déverrouillez les touches. Voir commande verrouillées. section "Verrouillage des sont boutons" pour plus de détails. inopérantes. Les touches Cela peut être dû au Touchez les boutons avec la sont difficiles à fait que vous touchez pulpe des doigts. utiliser. les boutons avec le bout des doigts. Le verre est Des ustensiles de Utilisez des ustensiles à fond rayé. ... -
Page 48: Données Techniques
<210 2015 20 février <200 2017 20 février <195 2019 Exigences d'information sur le produit (depuis le 20 février 2015) EN60350-2:2013+A11:2014 La méthode de test est en conformité avec les exigences de la norme Marque Proline Référence VH 2 Catégorie Plaque chauffante en céramique 2 zones Tension / fréquence V / Hz 220‐240V~ 50Hz ou 60Hz 2700-3300W Puissance totale nominale (W) Dimensions du produit (mm) 288 x 520 x 55 (Longueur x Largeur x Hauteur) Dimensions produit intégré (mm) 268 x 490... - Page 49 MISE AU REBUT En tant que distributeur responsable, nous accordons une grande importance à la protection de l’environnement. Nous vous encourageons à respecter les procédures correctes de mise au rebut de votre appareil, des piles et des éléments d’emballage. Cela aidera à préserver les ressources naturelles et à...
- Page 50 Inhoudsopgave WAARSCHUWINGEN ....................... 4 8 BELANGRIJKE VEILIGHEIDSVOORZORGEN ................ 5 2 INSTRUCTIES VOOR DE INSTALLATIE .................. 5 3 Ingebouwde regeling ...................... 5 3 Speling .......................... 5 4 De kookplaat op het aanrecht bevestigen ................ 5 5 OVERZICHT VAN HET APPARAAT ..................... 5 6 Bovenaanzicht ........................ 5 6 Bedieningspaneel ....................... 5 6 RICHTLIJNEN VOOR HET KOKEN ...
-
Page 51: Waarschuwingen
WAARSCHUWINGEN Dit apparaat is geschikt voor huishoudelijk gebruik en gelijksoortige toepassingen zoals: − kantines voor personeel in winkels, kantoren en andere werkomgevingen; − boerderijen; − door gasten in hotels, motels en andere woonomgevingen; − bed & breakfasts en soortgelijke omgevingen. - Page 52 Dit apparaat mag worden gebruikt door kinderen vanaf 8 jaar en personen met een beperkt lichamelijk, zintuiglijk of verstandelijk vermogen of een gebrek aan ervaring of kennis, op voorwaarde dat zij onder toezicht staan of instructies betreffende het veilige gebruik van dit apparaat hebben ontvangen en de risico’s kunnen inschatten die verbonden zijn aan het gebruik van dit apparaat. Kinderen mogen niet met dit apparaat spelen. Reinigen en onderhoud mogen niet door kinderen worden gedaan tenzij zij ouder zijn dan 8 jaar en onder toezicht staan. H oud dit apparaat en het netsnoer ervan buiten het bereik van kinderen die jonger zijn dan 8 jaar. WAARSCHUWING: pannen met vet of olie onbeheerd op een kookplaat achterlaten kan gevaarlijk zijn en tot brand leiden. ...
- Page 53 Probeer een brand NOOIT te blussen met water. Schakel het apparaat uit en verstik de vlammen met bijvoorbeeld een deksel of branddeken. WAARSCHUWING: brandgevaar: bewaar geen voorwerpen op de kookplaat. WAARSCHUWING: wanneer het apparaat is gebarsten dient men het meteen uit te schakelen om een gevaar van elektrische schokken te voorkomen. Gebruik geen stoomreiniger. Staar niet in de kookplaten. Dit apparaat is niet geschikt om te worden bediend door middel van een externe timer of een afzonderlijk afstandsbedieningssysteem. Deze oppervlakken kunnen zeer warm worden. ...
- Page 54 Het buitenoppervlak van dit apparaat wordt zeer warm tijdens het gebruik. R aak de warme oppervlakken niet aan. Raak het apparaat alleen bij de knoppen en handgrepen aan. Z et dit apparaat niet in of vlakbij een warm gas‐ of elektrisch fornuis en zorg ervoor dat het niet in contact komt met een warme oven o f mini‐oven. De temperatuur van toegankelijke onderdelen kan zeer hoog zijn terwijl het apparaat werkt. D e stekker moet na het installeren van het apparaat eenvoudig bereikbaar zijn. VOORZICHTIG: Het kookproces moet worden gecontroleerd. Een kookproces op korte termijn moet continu worden gecontroleerd. Schakel het kookelement na gebruik uit met zijn bediening en vertrouw niet op de pannendetector.
-
Page 55: Belangrijke Veiligheidsvoorzorgen
BELANGRIJKE VEILIGHEIDSVOORZORGEN • Lees deze handleiding aandachtig voordat u deze kookplaat in gebruik neemt. • Zet in geen geval brandbare materialen of producten op de kookplaat. • Deze kookplaat moet worden geïnstalleerd volgens deze handleiding om gevaar te voorkomen. • Deze kookplaat moet correct worden geïnstalleerd door een gekwalificeerd elektricien. • Gebruik deze kookplaat in geen geval voor het verwarmen of opwarmen van een ruimte. • Leg nooit metalen voorwerpen op de kookplaat omdat deze zeer snel kunnen verhitten. • Schakel de stroom uit en haal de stekker uit het stopcontact wanneer de kookplaat niet wordt gebruikt, onbeheerd wordt achtergelaten en voor het schoonmaken. Laat het apparaat afkoelen voordat u het gaat reinigen of wegbergen. • Raak de warme onderdelen van het apparaat niet aan. • Gebruik de kookplaat nooit als werkblad of als aanrecht. • Laat nooit voorwerpen of pannen die niet voor het apparaat geschikt zijn op het apparaat achter. • Ga niet op de kookplaat staan. • Gebruik geen pannen met scherpe randen en versleep geen pannen over het keramisch glas omdat dit krassen kan maken. ... -
Page 56: Instructies Voor De Installatie
INSTRUCTIES VOOR DE INSTALLATIE Ingebouwde regeling In het aanrecht VERZEGELING A B C D E F 268 490 50 mm 50 mm 50 mm 50 mm mm mm mini mini mini mini C/D/E/F: minimale afstand tussen de uitsparing van de kookplaat en het dichtstbijzijnde oppervlak In het aanrecht A ... -
Page 57: Speling
Speling A B C D E 760 mm 50 mm 30 mm mini Luchtinlaat Luchtuitlaat 10 mm LET OP: • Het aanrecht moet recht en vlak zijn en er mogen geen structurele zaken zijn die de vereiste speling belemmeren. • Het aanrecht moet uit hittebestendig materiaal zijn vervaardigd. • De installatie moet voldoen aan alle vereisten qua speling en de geldende normen en voorschriften. • Er moet voldoende toevoer van verse lucht van buiten de kasten naar de onderkant van de kookplaat zijn. • De kookplaat moet door een gekwalificeerde, bevoegde persoon worden geïnstalleerd. Probeer dit als gebruiker in geen geval zelf te doen. • Onjuiste installatie kan materiële schade en verwonding veroorzaken waarvoor de fabrikant niet aansprakelijk kan worden gesteld. ... -
Page 58: De Kookplaat Op Het Aanrecht Bevestigen
• De kookplaat mag niet bovenop een koelkast, vriezer, vaatwasser of wasdroger worden geïnstalleerd. • Installeer de kookplaat uit de buurt van warmtebronnen als rechtstreeks zonlicht. • Om schade te voorkomen moeten de tussenlaag en de lijm in het aanrecht hittebestendig zijn. • Gebruik geen stoomreiniger op dit apparaat. De kookplaat op het aanrecht bevestigen 1. Draai de kookplaat ondersteboven en leg neer op een zachte ondergrond. 2. Monteer de meegeleverde klemmen en schroeven op de kookplaat als aangegeven, voorlopig zonder de schroeven aan te draaien. 3. Zet de kookplaat in de uitsnede en draai dan de schroeven stevig aan om de kookplaat veilig op het aanrecht te bevestigen. ... -
Page 59: Overzicht Van Het Apparaat
OVERZICHT VAN HET APPARAAT Bovenaanzicht 1. Max. 1800 W kookzone 2. Max. 1200 W kookzone 3. Bedieningspaneel Bedieningspaneel 1. KNOP AAN/UIT 2. Toets temperatuur‐ of timerinstelling 3. Keuzetoetsen kookzones 4.Toets timerinstelling 5.Toetsenvergrendeling... -
Page 60: Richtlijnen Voor Het Koken
RICHTLIJNEN VOOR HET KOKEN Kookgerei • Gebruik zwaar kookgerei met een vlakke, gladde bodem en een diameter die overeenstemt met de kookzone. • Potten of zware braadpannen met scherpe randen of een ruwe onderkant zullen krassen in het glas maken. • Til pannen altijd op van de kookplaat. Verschuif ze niet, omdat dit krassen in het glas kan maken. • Pannen met een roestvrij stalen sandwich‐bodem of geëmailleerd gietijzer leveren de beste resultaten op. ... -
Page 61: Tips Voor Het Koken
Tips voor het koken Wees voorzichtig bij het frituren: olie of vetstof kan zeer snel oververhitten, in het bijzonder op de hogere instellingen. • Schakel naar een lagere temperatuurinstelling zodra het gerecht het kookpunt heeft bereikt. • Het gebruik van een deksel kan de bereidingstijd verkorten omdat de warmte wordt vastgehouden. • Gebruik zo weinig mogelijk vetstof of vloeistof om de bereidingstijd zo kort mogelijk te houden. • Start een bereiding op een hoge instelling en verminder de temperatuur nadat het gerecht volledig is opgewarmd. Sudderen, rijst koken • Sudderen gebeurt onder het kookpunt bij ongeveer 85°C, waarbij slechts nu en dan bellen naar het oppervlak van de kokende vloeistof komen. Dit is de sleutel tot heerlijke soepen en stoofschotels omdat smaken zich ontwikkelen zonder dat het voedsel overgaar wordt. Ook gerechten op basis van eieren en gebonden sauzen moeten onder het kookpunt worden bereid. • Bepaalde taken, zoals het koken van rijst met behulp van de absorptiemethode, vereisen een wat hogere instelling dan de allerlaagste, om te verzekeren dat het gerecht binnen de aanbevolen tijd voldoende gaarkookt. ... - Page 62 Steak schroeien Voor het bereiden van sappige, smaakvolle steaks: 1. Laat het vlees ongeveer 20 minuten voor de bereiding in kamertemperatuur staan. 2. Verwarm een braadpan met een zware bodem. 3. Borstel beide kanten van de steak met olie. Sprenkel een kleine hoeveelheid olie in de hete pan en leg het vlees in de pan. 4. Draai de steak tijdens het bakken slechts één keer om. De exacte bereidingstijd is afhankelijk van de dikte van de steak en de gewenste gaarheid. De tijd kan variëren van ongeveer 2 – 8 minuten per zijde. Druk op de steak om de gaarheid te voelen: hoe steviger hij aanvoelt, hoe meer doorbakken hij is. 5. Laat de steak enkele minuten op een warme plaat rusten, zodat het vlees kan ontspannen en zacht worden voordat u het serveert. Voor het roerbakken 1. Kies een wok met platte bodem of een grote braadplan. 2. Zet alle ingrediënten en kookgerei klaar. Roerbakken gaat zeer snel. Wanneer u grotere hoeveelheden gaat bereiden verdeelt u deze in kleinere porties. 3. Verhit de pan kort en voeg twee eetlepels olie toe. 4. Bak eerst het vlees, leg opzij en houd warm. 5. Roerbak de groenten. Schakel de kookzone op een lager vermogen zodra de groenten warm maar nog knapperig zijn, voeg dan het vlees en de saus toe. 6. Roer de ingrediënten voorzichtig om, om alles gelijkmatig te verwarmen. ...
-
Page 63: Bediening
BEDIENING De tiptoetsen gebruiken • reageren op aanraking, zodat u geen druk hoeft uit te toetsen oefenen. • Zorg ervoor dat de toetsen altijd schoon en droog zijn en deze niet door voorwerpen (bijv. kookgerei of handdoek) worden afgedekt. Aan de slag met koken 1. Raak aan. • U hoort een pieptoon en alle controlelampjes geven “―” of “― ―” aan, erop wijzend dat de kookplaat in de modus stand‐by is geschakeld. • De kookplaat schakelt automatisch uit als binnen de minuut geen enkele bewerking gebeurt. 2. Raak de toets van de gewenste kookzone aan. • Het controlelampje naast de toets gaat ... - Page 64 3. Selecteer het vermogen door herhaaldelijk ∨ of ∧ aan te raken. • Om tijdens een bereiding een ander vermogen te kiezen, raakt u de toets van de kookzone aan en dan ∨of ∧ tot het gewenste vermogen is ingesteld. Richtlijnen voor het vermogen Temperatuurinstelling Geschikt voor • Delicaat opwarmen van kleine 1 – 2 hoeveelheden voedsel • Voedingsmiddelen die snel aanbranden • Zacht sudderen • Langzaam opwarmen • Heropwarmen 3 – 4 • Snel sudderen •...
- Page 65 Om één kookzone uit te schakelen 1. Raak de overeenkomstige toets aan. 2. Raak herhaaldelijk ∨of tegelijkertijd∨ en ∧aan. Controleer of “0” op de display verschijnt. Om alle kookzones uit te schakelen: raak aan. OPMERKING: “H” verschijnt nadat de kookplaat is uitgeschakeld op de display, aangevend dat de kookzone nog warm is. Dit verdwijnt zodra de kookzone is afgekoeld. ...
-
Page 66: De Toetsen Vergrendelen
De toetsen vergrendelen • U kunt de toetsen vergrendelen om onbedoeld gebruik te voorkomen (bijvoorbeeld dat kinderen de kookzones per ongeluk aanzetten). • Alle toetsen behalve de AAN/UITKNOP zijn uitgeschakeld wanneer de toetsen vergrendeld zijn. De toetsen vergrendelen Raak de toets voor de toetsenvergrendeling aan. “Lo” verschijnt op de timerdisplay, aangevend dat de toetsen vergrendeld zijn. OPMERKING: u kunt de kookplaat in een noodgeval nog altijd uitschakelen, maar de toetsen blijven vergrendeld wanneer u de kookplaat opnieuw inschakelt. Ontgrendel de toetsen voordat u de kookplaat opnieuw gebruikt. De toetsen ontgrendelen 1. Schakel de kookplaat in. 2. Houd uw vinger 2 seconden lang op de toets toetsenvergrendeling. “Lo” verdwijnt van de display. ... -
Page 67: Automatische Uitschakelfunctie
Automatische uitschakelfunctie Deze functie activeert automatisch als u na een bereiding de kookplaat vergeet uit te schakelen. Gebruikt De kookzone schakelt vermogen automatisch uit na ongeveer Tussen 1….3 8 uur Tussen 4….6 4 uur Tussen 7….9 2 uur De timer gebruiken U kunt de timer instellen om een kookzone automatisch uit te schakelen na de ingestelde tijd. Laat de kookplaat nooit onbeheerd achter wanneer deze is ingeschakeld, zelfs wanneer u de timer heeft ingesteld om een kookzone automatisch uit te schakelen. die al ingeschakeld is. 1. Selecteer kookzone 2. Selecteer de timer. •... - Page 68 3. Voer terwijl “10” knippert een cijfer in met / behulp van . • Raak ∨of ∧eenmaal aan om de tijd telkens met een minuut te verminderen of vermeerderen. • De maximum instelbare tijd is 99 minuten. • Houd uw vinger op / om de tijd telkens met 10 minuten te vermeerderen of verminderen. 4. Druk op de toets timerinstelling om te bevestigen. De timer is nu ingesteld en begint af te tellen. • Als terwijl de cijfers knipperen / niet worden aangeraakt, ...
-
Page 69: Schoonmaken En Onderhoud
SCHOONMAKEN EN ONDERHOUD Wat? Hoe? Belangrijk! • Er is geen waarschuwing Dagelijkse 1. Schakel de kookplaat bevuiling van het uit. “hete kookplaat” glas 2. Breng een reiniger wanneer de kookplaat is (vingerafdrukken, voor kookplaten aan uitgeschakeld, hoewel de vlekken, gemorste terwijl het glas nog kookzone nog steeds zeer vlekken van niet‐ warm is (maar niet warm kan zijn! Wees suikerhoudende heet!). uiterst voorzichtig. • Schuursponsjes voor levensmiddelen) 3. Spoel en droog met een schone doek of zwaar gebruik, sommige keukenpapier. nylon schuursponsjes en 4. Schakel de kookplaat agressieve/schurende weer in. reinigingsmiddelen ... - Page 70 2.Houd de schraper in zelfs het glas permanent een hoek van 30° kunnen beschadigen. • Snijgevaar: wanneer de tegen de kookplaat en schraap het vuil beschermkap is naar een koele plaats opengeklapt, is het mes op de kookplaat. van een 3.Neem het vuil op scheermesschraper met een theedoek of vlijmscherp. Gebruik met keukenpapier. uiterste voorzichtigheid 4.Zodra de kookplaat en berg altijd veilig en voldoende is buiten het bereik van afgekoeld om veilig kinderen op. aan te raken, reinigt u deze met kookplaatreiniger volgens de bovenstaande instructies in “Dagelijkse bevuiling van het glas”. 5. Schakel de kookplaat weer in. Gemorste 1. Schakel de Wees voorzichtig met levensmiddelen op kookplaat uit. ...
-
Page 71: Problemen Oplossen
PROBLEMEN OPLOSSEN Probleem Mogelijke oorzaak Mogelijke oplossing De kookplaat Geen stroom. Controleer of de kookplaat op schakelt niet de netvoeding is aangesloten en in. of het stopcontact is ingeschakeld. Controleer of er bij u thuis of in uw buurt geen stroomstoring is. Raadpleeg een gekwalificeerd elektricien als het probleem aanhoudt nadat u deze zaken heeft gecontroleerd. De tiptoetsen De toetsen zijn Ontgrendel de toetsen. Zie het werken niet. vergrendeld. hoofdstuk ‘De toetsen vergrendelen’ voor instructies. De tiptoetsen U gebruikt wellicht Gebruik bij het aanraken van de werken niet het tipje van uw toetsen de hele vingertop. goed. vinger om de toetsen aan te raken. Er komen Kookgerei met Gebruik alleen kookgerei met krassen in het scherpe randen. een vlakke, gladde. Zie glas. ... - Page 72 Opmerking: Energieverbruik <210Wh/kg in overeenstemming met EU‐verorderingsnr. 66/2014. Vanaf Fase I vanaf 20 feb. 2015 elektrische kookplaat (Wh/kg) bereikt 20 feb. 2015 <210 20 feb. 2017 <200 20 feb. 2019 <195 Productinformatie‐eisen (vanaf 20 feb. 2015) EN60350-2:2013+A11:2014. De testmethode is in overeenstemming met de voorschriften van Merk Proline VH 2 Referentie Categorie Keramische kookplaat met 2 kookvelden Spanning/frequentie V / Hz 220‐240V~ 50Hz of 60Hz 2700-3300W Nominaal – Totaal vermogen (W) Afmetingen product (mm)(L*B*H) 288*520*55 Afmetingen ingebouwd (mm)(L*B*H) 268*490 Netto gewicht product (kg) 4,5 kg Gemaakt in P.R.C Wij verontschuldigen ons voor eventueel ongemak als gevolg van ...
- Page 73 VERWIJDERING Als verantwoordelijke handelaar dragen we zorg voor het milieu. We moedigen u aan om de juiste verwijderingsprocedure voor uw apparaat en verpakkingsmateriaal te volgen. Dit draagt bij tot het behoud van de natuurlijke rijkdommen door deze te recyclen zodat zowel de menselijke gezondheid en het milieu worden beschermd.
- Page 74 Etablissements Darty & fils ©, 9 Rue des Bateaux-Lavoirs, 94200 Ivry-sur-Seine, France Déclaration UE de Conformité N°86202203 EU Declaration of Conformity EU- Conformiteitsverklaring Declaración UE de Conformidad Declaração UE de Conformidade Description du produit – Product Description: Productbeschrijving: Descripcion del producto: Descriçào do produto: Marque –...
- Page 75 Reference number Title 2014/30/EU EMC Directive (EMC) 2014/35/EU Low Voltage Directive (LVD) 2009/125/EC Eco design requirements for energy-related products (ErP) 2011/65/EU & (EU) 2015/863 RoHS EMC: LVD : EN 62233:2008 ErP : La présente déclaration de conformité est établie sous la seule responsabilité du fabricant. This declaration of conformity is drawn up under the sole responsibility of the manufacturer.
Need help?
Do you have a question about the VH 23 T and is the answer not in the manual?
Questions and answers