Table of Contents
Advertisement
Available languages
Available languages
Quick Links
Advertisement
Chapters
Table of Contents

Related Manuals for Proline PGH4IX


Summary of Contents for Proline PGH4IX
- Page 1 MANUEL D’UTILISATION PROLINE PLAQUE DE CUISSON AU GAZ PGH4IX Besoin d’un conseil ? Une question sur ce produit ? RDV sur la communauté SAV Darty : https://sav.darty.com Déjà 1/2 million de solutions grâce à l’avis des utilisateurs.
- Page 2 PGH4IX PLAQUE DE CUISSON AU GAZ GASKOOKPLAAT GAS HOB HANDLEIDING OPERATING INSTRUCTIONS...
-
Page 3: Table Of Contents
Table des matières AVERTISSEMENTS ..................... 2 INSTRUCTIONS IMPORTANTES DE SÉCURITÉ ............ 3 DESCRIPTION ....................5 INSTALLATION ....................6 CONNEXION ÉLECTRIQUE ................. 9 CONNEXION AU GAZ ..................10 MISE EN SERVICE .................... 11 CONVERSION DU GAZ NATUREL AU GPL............11 FONCTIONNEMENT ..................12 NETTOYAGE ET ENTRETIEN ................ -
Page 4: Avertissements
AVERTISSEMENTS Cet appareil est destiné à un usage domestique uniquement. Toute utilisation autre que celle prévue pour cet appareil, ou pour une autre application que celle prévue, par exemple une application commerciale, est interdite. Cet appareil peut être utilisé par des enfants âgés d'au moins 8 ans et par des personnes ayant des capacités physiques, sensorielles ou mentales réduites ou dénuées d’expérience ou de connaissance, s'ils (si elles) sont... - Page 5 L'utilisation d'un appareil de cuisson au gaz conduit à la production de chaleur, d’humidité et de produits de combustion dans le local où il est installé. Veiller à assurer une bonne aération de la cuisine, notamment lors de l’utilisation de l’appareil : maintenir ouverts les orifices d'aération naturelle, ou installer un dispositif d'aération mécanique (hotte de ventilation mécanique).
-
Page 6: Instructions Importantes De Sécurité
INSTRUCTIONS IMPORTANTES DE SÉCURITÉ Lisez attentivement ces instructions avant d’installer et d’utiliser cette plaque de cuisson. Utilisez l’appareil uniquement pour faire cuire des aliments. N’utilisez jamais cet appareil comme un radiateur. Gardez cet appareil propre. Les résidus d'aliments pourraient provoquer un incendie. -
Page 7: Description
N'allumez pas la lumière. N'allumez / n'éteignez aucun appareil et ne touchez à aucune prise. N'utilisez pas le téléphone. Cessez d'utiliser la Ouvrez la fenêtre Contactez le centre plaque de cuisson et pour aérer. d'entretien en tournez les boutons utilisant un téléphone de contrôle sur la à... -
Page 8: Installation
INSTALLATION Cet appareil doit être installé par une personne compétente comme indiqué dans les normes et règlements de sécurité relatifs à l'installation du gaz, et doit seulement être utilisé dans un endroit bien aéré. Lors de l'installation de la plaque de cuisson, assurez-vous qu'elle reste facilement accessible pour un technicien en cas de panne. - Page 9 Positionnement 600mm 700mm 400mm 400mm 50mm Cet appareil doit être intégré dans un meuble de cuisine ou dans un plan de travail de 600 mm, à condition que les distances minimales suivantes soient respectées : Les bords de la plaque doivent être à une distance minimale de 60 mm d'un mur latéral ou arrière.
- Page 10 25 mm au minimum 74 mm au maximum Un espace minimum de 200mm est nécessaire entre les bords latéraux de la plaque et tout placard ou mur adjacent. Les meubles adjacents et tous les matériaux utilisés dans l'installation doivent pouvoir résister à...
-
Page 11: Connexion Électrique
N'utilisez pas de mastic de silicone pour sceller l'appareil contre la découpe du plan de travail. Cela rendrait difficile le retrait de l'appareil hors de la découpe, en particulier s'il doit être réparé. 1. Placez les pattes de fixation au-dessus des trous qui correspondent à... -
Page 12: Connexion Au Gaz
électrique domestique correspond à celle qui est indiquée sur la fiche signalétique de la plaque. Assurez-vous que le câble d'alimentation de la plaque n’entre pas en contact avec des surfaces dont la température est supérieure à 50°C. CONNEXION AU GAZ Cet appareil est conçu pour fonctionner au GPL (gaz de pétrole liquéfié) ou au GN (gaz naturel).. -
Page 13: Mise En Service
MISE EN SERVICE Lorsque la plaque de cuisson a été entièrement installée, il sera nécessaire de vérifier le réglage minimum de la flamme. Pour cela, suivez la procédure ci-dessous : Tournez le robinet à gaz en position MAX et allumez le brûleur. ... -
Page 14: Fonctionnement
Retirez tous les supports d'ustensiles, les chapeaux des brûleurs, les couronnes et les boutons de contrôle. Avec une clé à douille de 7mm (non fournie), dévissez les injecteurs des brûleurs et remplacez-les par les injecteurs GPL appropriées. Pour ajuster le débit de gaz Avec un tournevis plat (non fourni), serrez complètement la vis de réglage du conduit de dérivation. - Page 15 2. Relâchez le bouton de contrôle. 3. Tournez le bouton de contrôle jusqu'au réglage souhaité. Observez attentivement les aliments frire à une puissance élevée, car ils peuvent prendre feu. Faites toujours chauffer la graisse lentement et surveillez-la lorsqu'elle chauffe.
- Page 16 Éteindre un brûleur Tournez le bouton de contrôle correspondant dans le sens des aiguilles d'une montre en position . Ustensiles de cuisson Ustensiles adaptés Brûleur Diamètre minimum Diamètre maximum des ustensiles de des ustensiles de cuisson cuisson Brûleur rapide 20 cm 24 cm Brûleurs...
-
Page 17: Nettoyage Et Entretien
NETTOYAGE ET ENTRETIEN Fermez toujours le robinet à gaz et débranchez la plaque de cuisson de la prise de courant avant de procéder au nettoyage ou à l'entretien. Il est recommandé de nettoyer la plaque de cuisson alors qu'elle est encore tiède, car les éclaboussures se nettoient plus facilement que si la plaque est froide. -
Page 18: Guide De Dépannage
SPÉCIFICATIONS TECHNIQUES Voici la fiche technique de la plaque de cuisson domestique conformément à la réglementation de l'Union européenne n° 66/2014 Numéro de modèle PGH4IX Type de plaque Plaque de cuisson au gaz Nombre de brûleurs à gaz Efficacité... - Page 19 rapide (brûleur à gaz arrière gauche) Efficacité énergétique du brûleur à gaz 57,5 brûleur à gaz semi-rapide (brûleurs à gaz avant gauche et droit) Efficacité énergétique de la plaque de 57,9 brûleur à gaz cuisson à gaz Pour atteindre une efficacité énergétique maximale, il est recommandé d'utiliser des casseroles / poêles de taille recommandée pour chaque brûleur ci-dessus.
-
Page 20: Mise Au Rebut
MISE AU REBUT En tant que distributeur responsable, nous accordons une grande importance à la protection de l’environnement. Nous vous encourageons à respecter les procédures correctes de mise au rebut de votre appareil, des piles et des éléments d’emballage. Cela aidera à préserver les ressources naturelles et à garantir qu’il soit recyclé... - Page 21 Inhoudsopgave WAARSCHUWINGEN: ......................2 BELANGRIJKE VEILIGHEIDSINSTRUCTIES ................3 OMSCHRIJVING ......................... 5 INSTALLATIE ........................6 ELEKTRISCHE AANSLUITINGEN ..................10 GASAANSLUITING ......................10 INBEDRIJFSTELLING ......................11 OMSCHAKELING VAN AARDGAS VAN LPG ..............12 GEBRUIK .......................... 12 REINIGING EN ONDERHOUD ................... 15 PROBLEEMOPLOSSING ....................16 TECHNISCH GEGEVENSBLAD ...................
-
Page 22: Waarschuwingen
WAARSCHUWINGEN Dit apparaat is alleen bestemd voor huishoudelijk gebruik en mag niet voor andere doeleinden of toepassingen worden gebruikt, zoals niet-huishoudelijk gebruik of in een commerciële omgeving. Dit apparaat kan worden gebruikt door kinderen vanaf 8 jaar en ouder of personen met beperkte fysische, visuele of mentale mogelijkheden, of die een gebrek hebben aan ervaring en kennis, als ze onder toezicht staan of instructies hebben gekregen over het veilig gebruik van het apparaat... -
Page 23: Belangrijke Veiligheidsinstructies
apparaat wordt gebruikt. Houd natuurlijke ventilatiegaten open of installeer een mechanisch ventilatie-apparaat (mechanische afzuigkap). Een langdurig en intensief gebruik van het apparaat kan bijkomende ventilatie, zoals het openen van een venster, of meer doeltreffende ventilatie, zoals het verhogen van het niveau van de mechanische ventilatie indien aanwezig, vereisen. - Page 24 Houd het apparaat schoon. Etensresten kunnen brand veroorzaken. Probeer nooit om de kookplaat aan te passen. Gebruik de kookplaat niet als het met water in aanraking is gekomen. Gebruik de kookplaat niet als uw handen nat zijn. ...
-
Page 25: Omschrijving
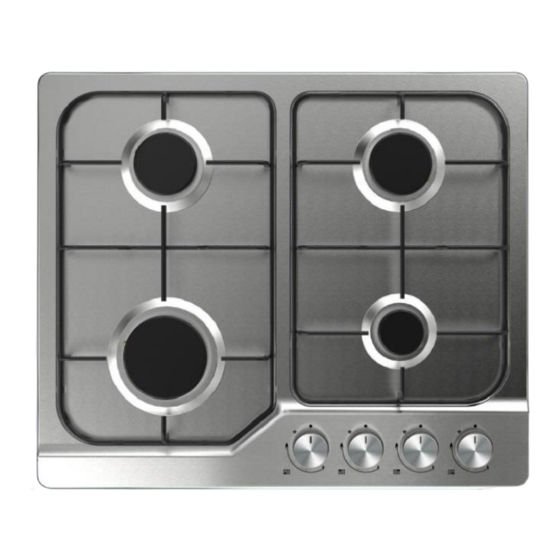
OMSCHRIJVING 1. Snelle brander 2. Halfsnelle branders 3. Hulpbrander 4. Regelknoppen oebehoren Beugel (4) Schroef (4) Schuimband (4) Injector (4) Elleboog... -
Page 26: Installatie
INSTALLATIE Dit apparaat moet worden geï nstalleerd door een bekwame persoon zoals aangegeven in de lokale gasveiligheidsrichtlijnen en -voorschriften en mag alleen worden gebruikt in een goed geventileerde ruimte. Installeer de kookplaat op een plaats zodat in geval van een defect de reparateur het apparaat makkelijk kan bereiken. - Page 27 Plaatsbepaling 600mm 700mm NODIGE VRIJE RUIMTE WANNEER DE KOOKPLAAT 400mm ONDER EEN AFZUIGKAP WORDT GEÏ NSTALLEERD. 400mm 50mm Dit apparaat is bestemd voor inbouw in een keukenkast of 600 mm werkblad, mits de volgende minimum afstanden mogelijk zijn: De randen van de kookplaat moeten zich op minstens 60 mm van een zij- of achterwand bevinden.
- Page 28 Zorg voor een minimale afstand van 200mm tussen de zijranden van de kookplaat en een aangrenzende kast of wand. Het aangrenzend meubilair en alle materialen die in de installatie worden gebruikt moeten tijdens de werking bestand zijn tegen een temperatuurtoename van minstens 85°C boven de kamertemperatuur.
- Page 29 Gebruik geen silicone afdichtingsmiddel om het apparaat in de opening af te dichten. Dit zal het verwijderen van het apparaat uit de opening in de toekomst bemoeilijken, bijv. in geval reparatie nodig is. 1. Breng de beugels aan over de gaten die met de grootte van de schroeven overeenstemmen.
-
Page 30: Elektrische Aansluitingen
ELEKTRISCHE AANSLUITINGEN De kookplaat met het elektriciteitsnet verbinden dient door een gekwalificeerde elektricien of een ander bevoegd persoon en in overeenstemming met de lokale voorschriften te worden uitgevoerd. DE KOOKPLAAT MOET WORDEN GEAARD. Voordat u het apparaat inschakelt, controleer of de netspanning van uw woning overeenstemt met de spanning vermeld op het typeplaatje van uw kookplaat. -
Page 31: Inbedrijfstelling
Gasspecificaties Snel Halfsnel Hulp BRANDER: (groot) (medium) (klein) THERMISCH VERMOGEN 1,75 (kW): INJECTOR DIAMETER (mm): 1,30 1,00 0,78 THERMISCH VERMOGEN 1,75 (kW): DEBIET (g/u): INJECTOR DIAMETER (mm): 0,87 0,66 0,50 Categorie aardgas: I2H (20) / I2E+ LPG (vloeibaar petroleumgas) gascategorie: I3+(28-30/37) Totale warmteafvoer : 7.5kW(546g/h) INBEDRIJFSTELLING Eenmaal de kookplaat volledig is geï... -
Page 32: Omschakeling Van Aardgas Van Lpg
OMSCHAKELING VAN AARDGAS VAN LPG Belangrijk De omschakeling van de gaskookplaat mag alleen door een bekwame persoon worden uitgevoerd. Opgelet, dit model is ontworpen voor gebruik met aardgas maar kan tevens worden omgeschakeld voor gebruik met butaan- of propaangas mits de juiste injectoren worden geï... - Page 33 Om te bepalen welke regelknop voor welke brander is, bekijk het positiesymbool naast de regelknop. 1. Duw de regelknop van de gewenste brander in en draai tegen de klok in naar de maximum instelling. Vonken komen uit de brander zolang de regelknop wordt ingeduwd. De vlam wordt ontstoken.
- Page 34 1. Branderdeksel 2. Branderkroon 3. Branderplaat 4. Aansteker Thermokoppel OPMERKING: Tijdens het aansteken van een brander, na installatie of een stroomonderbreking, is het normaal dat de aansteker automatisch wordt geactiveerd. OPGELET: Als de vlam van de brander per ongeluk wordt uitgeblazen, zet de brander uit en wacht minstens 1 minuut voordat u de brander opnieuw aansteekt.
-
Page 35: Reiniging En Onderhoud
worden. Gebruik de kookplaat nooit zonder pannen. Als u het apparaat niet gebruikt, draai de gaskraan dicht. Let op wanneer u levensmiddelen in hete olie of vet frituurt, gespetter van olie of vet kan eenvoudig vlam vatten. ... -
Page 36: Probleemoplossing
Aansteker en thermokoppel De gaten en groeven moeten schoon zijn zodat de vlam juist wordt ontstoken. De vlammen branden niet juist als de aansteker vuil is. Maak ze regelmatig schoon met een kleine, zachte borstel. Behoed de aanstekers tegen hevige stoten en schokken. -
Page 37: Technisch Gegevensblad
TECHNISCH GEGEVENSBLAD Hieronder vindt u de technische fiche van de huishoudelijke kookplaat overeenkomstig EU-verordeningsnr. 66/2014 Identificatie van model PGH4IX Type kookplaat Gaskookplaat Aantal gasbranders Energie-efficiëntie voor snelle gasbrander 58,7 % gasbrander (linksachter) Energie-efficiëntie voor halfsnelle gasbrander 57,5 % gasbrander (links- en rechtsvoor) Energie-efficiëntie voor de gaskookplaat... -
Page 38: Verwijdering
VERWIJDERING Als verantwoordelijke handelaar dragen we zorg voor het milieu. We moedigen u aan om de juiste verwijderingsprocedure voor uw apparaat en verpakkingsmateriaal te volgen. Dit draagt bij tot het behoud van de natuurlijke rijkdommen door deze te recyclen zodat zowel de menselijke gezondheid en het milieu worden beschermd. - Page 39 Table of Contents WARNINGS ........................2 IMPORTANT SAFETY INSTRUCTIONS ................. 3 DESCRIPTION ........................5 INSTALLATION ........................6 ELECTRICAL CONNECTIONS ....................9 GAS CONNECTION ......................9 COMMISSIONING ......................10 CONVERSION FROM NATURAL GAS TO LPG ..............11 OPERATION ........................11 CLEANING AND MAINTENANCE ..................14 TROUBLESHOOTING ......................
-
Page 40: Warnings
WARNINGS This appliance is intended for domestic household use only and should not be used for any other purpose or in any other application, such as for non-domestic use or in a commercial environment. This appliance can be used by children aged from 8 years and above and persons with reduced physical, sensory or mental capabilities or lack of experience and knowledge if they have been given supervision or instruction... -
Page 41: Important Safety Instructions
Prolonged intensive use of the appliance may call for additional ventilation, for example opening of a window, or more effective ventilation, for example increasing the level of mechanical ventilation where present. Prior to installation, ensure that the local distribution conditions (nature of the gas and gas pressure) and the adjustment of the appliance are compatible. - Page 42 When using another appliance, ensure that the power cord of the hob does not come into contact with the hot surfaces of this appliance. Unstable or misshapen pans should not be used on the hob as they can cause an accident by tipping or spillage.
-
Page 43: Description
DESCRIPTION 1. Rapid burner 2. Semi-rapid burners 3. Auxiliary burner 4. Control knobs Accessories Bracket (4) Sponge (4) Screw (4) Elbow Injector (4) -
Page 44: Installation
INSTALLATION This appliance must be installed by a competent person as stated in the local gas safety standards and regulations and only used in a well ventilated space. Ensure that once the hob is installed, it is easily accessible for the engineer in the event of a breakdown. Warnings ... - Page 45 Positioning 600mm 700mm CLEARANCES REQUIRED WHEN FITTING THE HOB 400mm WITH A COOKER HOOD ABOVE 400mm 50mm This appliance is to be built into a kitchen unit or 600 mm worktop, providing the following minimum distances are allowed: The edges of the hob must be a minimum distance of 60 mm from a side or rear wall.
- Page 46 The adjacent furniture and all materials used in the installation must be able to withstand a minimum temperature rise of 85°C above the ambient temperature during operation. An oven must have forced ventilation to install the hob above it. ...
-
Page 47: Electrical Connections
2. Carefully turn the hob back over the then gently lower it into the aperture that you have cut out. 3. Adjust the brackets and fully tighten the to secure the hob into position. Bracket Screws ELECTRICAL CONNECTIONS Any electrical work required to install this hob should be carried out by a qualified electrician or competent person in accordance with the local regulations. -
Page 48: Commissioning
Gas specification Rapid Semi-rapid Auxiliary BURNER: (large) (medium) (small) THERMAL POWER (kW): 1.75 INJECTOR DIAMETER 1.30 1.00 0.78 (mm): THERMAL POWER (kW): 1.75 FLOW RATE (g/h): INJECTOR DIAMETER 0.87 0.66 0.50 (mm): Natural gas category: I2H (20) / I2E+ LPG (Liquefied Petroleum Gas) gas category: I3+(28-30/37) Total heat input : 7.5kW(546g/h) COMMISSIONING When the hob has been fully installed it will be necessary to check the... -
Page 49: Conversion From Natural Gas To Lpg
CONVERSION FROM NATURAL GAS TO LPG Important The replacement / conversion of the gas hob should only be undertaken by a competent person. It is important to note that this model is designed for use with natural gas but can be converted for use with butane or propane gas providing the correct injectors are fitted and the gas rate is adjusted to suit. - Page 50 To determine which knob controls which burner, check the position symbol next to the control knob. 1. Press the control knob of the required burner and turn it anticlockwise to the maximum power setting. While the control knob is still pressed down, sparks will be produced on the burner.
- Page 51 1. Burner cap 2. Burner crown 3. Burner plate 4. Ignition sparker Thermocouple NOTE: When switching on a burner, after installation or a power cut, it is normal for the ignition spark to be activated automatically. WARNING: If the burner flames are accidentally blown out, switch off the burner and do not try to relight it for at least 1 minute.
-
Page 52: Cleaning And Maintenance
Take care when frying food in hot oil or fat, as the overheated splashes could easily ignite. As soon as liquid starts boiling, turn down the flame so that it will keep the liquid simmering. If the control knobs are difficult to turn, please contact your local service centre. -
Page 53: Troubleshooting
TECHNICAL DATA SHEET Below is the sheet of domestic hob according to EU regulation No. 66/2014. Model identification PGH4IX Type of hob Gas hob Number of gas burners Energy efficiency for rapid gas burner (left rear gas 58.7 %... - Page 54 recommended size for each burner above. If there is no special cooking requirement, turn the control knob to the maximum position. Keep the burner and pan support clean. Note: Energy efficiency according to EU regulation No. 66/2014. Since in % gas hob 20 Feb.
-
Page 55: Disposal
DISPOSAL As a responsible retailer we care about the environment. As such we urge you to follow the correct disposal procedure for the appliance and packaging materials. This will help conserve natural resources and ensure that it is recycled in a manner that protects health and the environment. - Page 56 Descriçào do produto: Marque – Proline Brand /Merk /Marca: Référence commerciale – PGH4IX Model number: /Modelnummer / Numero de modelo / Numero do modelo: L’objet de la déclaration décrit ci-dessus est conforme à la législation d’harmonisation de l’Union applicable :...
- Page 57 Reference number Title ☒ 2014/30/EU EMC Directive (EMC) ☒ 2014/35/EU Low Voltage Directive (LVD) ☒ 2009/125/EC Eco design requirements for energy-related products (ErP) ☒ 2011/65/EU & (EU) 2015/863 RoHS ☒ 2016/426/EU Appliance burning gaseous fuels regulation EMC: EN 55014-1:2017+A11:2020 EN 55014-2:2015 EN IEC 61000-3-2:2019 EN 61000-3-3:2013+A1:2019 LVD :...
Need help?
Do you have a question about the PGH4IX and is the answer not in the manual?
Questions and answers