Table of Contents
Advertisement
Quick Links
Advertisement
Table of Contents
Troubleshooting

Subscribe to Our Youtube Channel
Related Manuals for Respironics SmartMonitor 2


Summary of Contents for Respironics SmartMonitor 2
- Page 1 SmartMonitor 2 ® Service Manual ® ®...
- Page 2 Limited Warranty Respironics warrants that the monitor will be free from defects in materials and workmanship for a period of one year from the time of purchase. Respironics accessories are warranted to be free of defects in materials and workmanship for a period of 90 days from the time of purchase.
-
Page 3: Table Of Contents
Chapter 2 Warnings, Cautions ...2-1 Overview ............ 7-2 Warnings ............ 2-2 7.1.1 Component Identification ....... 7-3 Cautions ............. 2-3 SmartMonitor 2 Repair Kits ....7-4 Classifications ..........2-4 Accessories ..........7-7 Replacement Instructions ......7-9 Chapter 3 System Requirements, .. -
Page 4: Chapter 1 Introduction
Chapter 1: Introduction Chapter 1: Introduction Other devices may be used with the SmartMonitor 2: 1.1 SmartMonitor 2 Overview • Nellcor 200 1. General System Description The SmartMonitor 2 is intended for use in continuous • Nova Cosmo Oximeter monitoring of heart rate and respiration of infant and adult patients in a home, hospital or portable environment. - Page 5 Chapter 1: Introduction Visit Respironics Home Page on the World Wide Web at: www.respironics.com E-Mail: service@respironics.com SmartMonitor 2 Service Manual 1007897...
-
Page 6: Chapter 2 Warnings, Cautions
Chapter 2: Warnings, Cautions, Notes Chapter 2: Warnings, Cautions, Classifications 2.1 Warnings ............2-2 2.2 Cautions ............2-3 2.3 Classifications..........2-4 SmartMonitor 2 Service Manual 1007897... -
Page 7: Classifications
This could prevent the monitor alarm from • being heard. SmartMonitor 2 may not be able to detect all episodes of inadequate • breathing. If a baby has apnea due to choking (obstructive apnea), the Never use the monitor on the baby while the baby is being bathed. - Page 8 Touching a conductive material with a grounded path, license physician. This instrument should be used only under the such as a wall or crib, before handling the patient or the SmartMonitor 2 supervision of a physician. often prevents static buildup problems.
- Page 9 Chapter 2: Warnings, Cautions, Notes 2.3 Classification The SmartMonitor 2 is classified as: • Class II/Internally Powered equipment. • Type BF Applied part. • Ordinary protection against the ingress of liquids. • Not suitable for use in the presence of a flammable anesthetic mixture with air or nitrous oxide.
- Page 10 Chapter 3: System Requirements, Features, and Specifications Chapter 3: System Requirements, Features, and Specifications 3.1 System Requirements ........3-2 3.2 System Features ..........3-2 3.3 System Specifications........3-3 SmartMonitor 2 Service Manual 1007897...
-
Page 11: Chapter 3 System Requirements
(local or networked) if reports are Windows 98, Windows NT 4.0 required (service pack 3 or higher), Windows Serial Cable SmartMonitor or SmartMonitor 2 Me or Windows 2000. direct connect cable, see Ordering Information You must have administrative access to install under Windows 2000... -
Page 12: System Features
Chapter 3: System Requirements, Features, and Specifications 3.3 System Specifications System Features Classification: Class II , Type BF applied part. The SmartMonitor 2 system incorporates the following features ENVIRONMENTAL: • Respiration Detection Light Temperature ..........Operating: 41°F to 113°F (5°C to 45°C) - Page 13 0.1-1A @10.5-11.5VDC Communications ........Serial output via computer Battery ............Type: 6vdc 1.85Ah Minimum Rechargeable Rechargeable NIMH, 15 hours continuous use. Recharge time 6 hours @ 77° F; shelf life, 30 days if fully charged. SmartMonitor 2 Service Manual 1007897...
-
Page 14: Chapter 4 Installation And Setup
Chapter 4: Installation and Setup Chapter 4: Installation and Setup Setting Alarm and Recording Limits ....4-2 Transferring SmartMonitor 2 Information ..4-4 SmartMonitor 2 Service Manual... -
Page 15: Setting Alarm & Recording Limits
4.1 Setting Alarm and Recording POWER Limits • • Down arrow, Up arrow, Up arrow, ENTER, ENTER, ENTER • • up arrow key • 4.1.1 Manual Set-Up • ENTER • > • ENTER • • • SmartMonitor 2 Service Manual... - Page 16 Chapter 4: Installation and Setup • • • RESET • POWER • RESET For step by step instructions, refer to the users manual. SmartMonitor 2 Service Manual...
- Page 17 Chapter 4: Installation and Setup To recover the old data using a PCMCIA card 4.2 Transferring SmartMonitor 2 Information To recover the old data by downloading using Synergy-E downloaded must memory 100% full choose Modem Download SmartMonitor 2 Service Manual...
- Page 18 Connect a phone cord from the wall jack to the modem connector on the back of the SmartMonitor 2. • To allow the SmartMonitor 2 to work with the modem, place the monitor in Communications Mode: • Press and hold the blue RESET button.
- Page 19 Chapter 4: Installation and Setup Transferring SmartMonitor 2 Data to a Memory Card ENTER This is an optional feature of SmartMonitor 2 and may not be installed on every unit. • The display may show card full - overwrite? •...
- Page 20 Chapter 4: Installation and Setup Transferring SmartMonitor 2 Data Using a Computer Communications Mode Setup • • • RESET • POWER • • RESET RESET • SmartMonitor 2 Service Manual...
-
Page 21: Chapter 5 Routine Maintenance
Chapter 5: Routine Maintenance Chapter 5: Routine Maintenance 5.1 Overview ............ 5-2 5.2 Cleaning Instructions ........5-2 SmartMonitor 2 Service Manual 1007897... -
Page 22: Overview
Chapter 5: Routine Maintenance 5.1 Overview Electrodes The SmartMonitor 2 Infant Apnea Monitor was designed to be simple • Do not attempt to clean the disposable style electrodes. and easy to use. This chapter provides guidelines for proper cleaning •... -
Page 23: Chapter 6 Troubleshooting
Chapter 6: Troubleshooting and Diagnostics Chapter 6: Troubleshooting Diagnostics 6.1 Overview ............6-2 6.2 Troubleshooting Table ........6-3 SmartMonitor 2 Service Manual 1007897... -
Page 24: Overview
6.1 Overview This troubleshooting section is provided as a guide to help the technician determine what is wrong with the SmartMonitor 2. It should also be used to determine what parts, if any, need to be replaced. SmartMonitor 2 Service Manual... -
Page 25: Troubleshooting Table
• Contact Respironics • Internal part failure • Contact Respironics • Reduce likelihood of electrostatic • Internal error condition detected by SmartMonitor 2 • All lights will flash together discharge around the SmartMonitor 2. and the alarm will beep in Contact Respironics. - Page 26 • Defective lead wires. • Replace lead wires and perform Functional Self- • Defective electrodes. Test. • Replace electrodes. • Internal part failure. • Contact Respironics SmartMonitor 2 Service Manual 1007897...
- Page 27 Chapter 7: Repair and Replacement Chapter 7: Repair and Replacement 7.1 Overview ..........7-2 7.2 SmartMonitor 2 Repair Kits..... 7-4 7.3 Accessories .......... 7-7 7.4 Replacement Instructions ....7-9 SmartMonitor 2 Service Manual 1007897...
-
Page 28: Chapter 7 Repair & Replacement
724-387-5012 procedure(s). Refer to Section 8.1 for testing that is required after Visit Respironics Home Page on the World Wide Web at: component replacement. www.respironics.com If you require technical assistance during any of these procedures, contact:... -
Page 29: Component Identification
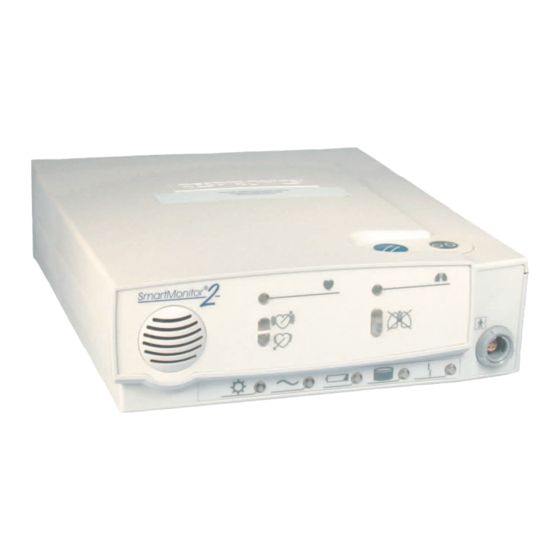
Chapter 7: Repair and Replacement 7.1.1. Component Identification Figure 7-1 SmartMonitor 2 (Component Identification) SmartMonitor 2 Service Manual 1007897... -
Page 30: Smartmonitor 2 Repair Kits
Chapter 7: Repair and Replacement 7.2 SmartMonitor 2 Repair Kits Replacement Part Replacement Part No. Page No. Audible Alarm 1008033 Battery Door * H2500-63 N / A Bottom Enclosure Assembly 1008025 7-10 Clear Feet (x4) * H2500-67 N / A... - Page 31 Chapter 7: Repair and Replacement SmartMonitor 2 Repair Kits (Continued) Replacement Part Replacement Part No. Page No. Front Panel Display 1008034 7-12 Labels Kit * 1008027 N / A Includes: Battery Compartment Label Battery Door Outside Label I/O Panel Label...
- Page 32 Chapter 7: Repair and Replacement SmartMonitor 2 Repair Kits (Continued) Replacement Part Replacement Part No. Page No. PCMCIA Door * H2500-64 N / A PCA Hardware* 1008029 Includes: Screw #6-32 x 3/16”, PHP, Nylon (x6) Screw #4-40 x 1/4” ,PH.PAN (x8) Standoff, #4-40 x 5/8”, F-F,3/16 HEX,N (x4)
-
Page 33: Accessories
Chapter 7: Repair and Replacement 7.3 SmartMonitor 2 Accessories Accessory Reorder No. SmartMonitor 2 Service Manual 1007897... - Page 34 Chapter 7: Repair and Replacement SmartMonitor 2 Accessories (continued) Accessory Reorder No. SmartMonitor 2 Service Manual 1007897...
-
Page 35: Replacement Instructions
Chapter 7: Repair and Replacement 7.4 Replacement Instructions 7.4.1 Audible Alarm Replacement Kit Replacement Part Number 1008033 Included in Kit: Tools Required: ® Procedure WARNING: CAUTION: Figure 7-2 SmartMonitor 2 Service Manual 1007897... - Page 36 Chapter 7: Repair and Replacement 7.4.2 Bottom Enclosure Assembly Replacement Replacement Part Number 1008025 Included in Kit: Tools Required: ® Procedure • • • • • WARNING: CAUTION: SmartMonitor 2 Service Manual 7-10 1007897...
- Page 37 Chapter 7: Repair and Replacement Bottom Enclosure Assembly Replacement (continued) Figure 7-4 Figure 7-3 SmartMonitor 2 Service Manual 7-11 1007897...
- Page 38 Chapter 7: Repair and Replacement 7.4.3 Front Panel Display Replacement Replacement Part Number 1008034 Included in Kit: Tools Required: ® Procedure • • WARNING: CAUTION: SmartMonitor 2 Service Manual 7-12 1007897...
- Page 39 Chapter 7: Repair and Replacement 7.4.4 Liquid Crystal Display (LCD) Replacement Replacement Part Number 1008024 Included in Kit: Tools Required: ® Procedure • • • WARNING: CAUTION: SmartMonitor 2 Service Manual 7-13 1007897...
- Page 40 Step 9 Remove the Modem Assembly, if applicable. (3 nylon screws on the bottom of the PCA. CAUTION: Step 10 Remove the board from the bottom enclosure. Step 11 Remove the PCMCIA Drive. Step 12 Replace by reversing step 1-11. SmartMonitor 2 Service Manual 7-14 1007897...
- Page 41 Chapter 7: Repair and Replacement 7.4.6 Modem Replacement Replacement Part Number H2500-53 Included in Kit: Tools Required: ® Procedure • • • WARNING: CAUTION: SmartMonitor 2 Service Manual 7-15 1007897...
- Page 42 Chapter 7: Repair and Replacement 7.4.7 Patient Connector Replacement Replacement Part Number 1008028 Included in Kit: Tools Required: ® Procedure • • • SmartMonitor 2 Service Manual 7-16 1007897...
- Page 43 Chapter 7: Repair and Replacement 7.4.8 PCMCIA Drive Replacement Replacement Part Number H2500-54 Included in Kit: Tools Required: ® Procedure WARNING: CAUTION: SmartMonitor 2 Service Manual 7-17 1007897...
- Page 44 Chapter 7: Repair and Replacement PCMCIA PCB Replacement ( continued) Figure 7-6 SmartMonitor 2 Service Manual 7-18 1007897...
- Page 45 Chapter 7: Repair and Replacement 7.4.9 Real Time Clock Replacement Replacement Part Number H2500-66 Included in Kit: Tools Required: ® Procedure WARNING: CAUTION: SmartMonitor 2 Service Manual 7-19 1007897...
- Page 46 Chapter 7: Repair and Replacement Real Time Clock Replacement (continued) Figure 7-8 Figure 7-7 SmartMonitor 2 Service Manual 7-20 1007897...
- Page 47 Chapter 7: Repair and Replacement 7.4.10 Top Enclosure Replacement Replacement Part Number 1008026 Included in Kit: Tools Required: ® Procedure WARNING: CAUTION: SmartMonitor 2 Service Manual 7-21 1007897...
-
Page 48: Chapter 8 Verification
Chapter 8: Verification Chapter 8: Verification Checkout Procedures ..........8-2 SmartMonitor 2 Test Data Sheet ......8-8 SmartMonitor 2 Service Manual 1007897... - Page 49 Stopwatch No other simulators are acceptable for use with these procedures. Checkout Procedure for SmartMonitor 2 The Smartmonitor 2 must pass all of the procedures before use on patients. Important things to remember as the checkout procedure is being done: Complete all checkout procedures in one continuous operation.
- Page 50 While in the Menu Mode, the SmartMonitor 2 will beep every light. 10 seconds. This is to remind you that the SmartMonitor 2 is not monitoring and to power off the SmartMonitor 2 after The SmartMonitor 2’s memory should be cleared before parameters are set.
- Page 51 Press the UP arrow button to proceed to the next parameter to be selected. Press the UP arrow to display CLEAR MEMORY?, then clear the memory. For the purposes of this check out procedure, set the SmartMonitor 2 parameters to the following values. Parameter...
- Page 52 Connect the lead wires to the Functional Self-Test recep the list after these parameters have been entered, the first tow tacles on the side of the SmartMonitor 2. Insert the pin parameters - Standard Alarm Parameters and Standard Record end of the WHITE lead wire into the receptacle labeled Parameters will both read Not Selected.
- Page 53 Chapter 8: Verification Low Battery - The SmartMonitor 2 battery pack is dis Approximately 20 seconds after last Respiration detection charged. Turn the SmartMonitor 2 off using the correct the Red Apnea light should illuminate. (There should be no power-off procedure. Make sure the battery Charger is green HEART or RESPIRATION lights during this alarm.)
- Page 54 The Battery Charger and the Patient Cable should remain There are 11 test points that require different simulator settings. connected to the SmartMonitor 2, as they were in the Func- For each test point, make the required changes as listed in the tional Self-Test.
- Page 55 Chapter 8: Verification 8.1 SmartMonitor 2 Test Data Sheet (Page 8-8 through 8-17) Low ECG Verification Simulator Settings for Test Set Up Test Point Simulator Setting Detection Low Heart Alarm Pass ECG Amplitude/MV ECG Beats/Min Respiration Breaths/Min ECG Beats/Min Variation Ohms...
- Page 56 Variation OHMS previous Test Set Up are in BOLDED Variation OHMS TEXT. Press the RESET button on the Resp. Breath/Min SmartMonitor 2 to reset any alarm faults. Variation OHMS Variation OHMS Resp. Breath/Min Due to large signal changes that Variation OHMS...
- Page 57 Due to large signal changes that result when Simulator settings are initially changed, the off-scale signal recognition circuitry of the SmartMonitor 2 may activate and cause brief pauses in detection. Once normal signal detection by the monitor resumes, allow an additional 10 seconds for the circuitry to stabilize before proceeding with verifying the operation of the SmartMonitor 2.
- Page 58 Turn the SmartMonitor 2 POWER on. (The Verification of Low Breath Rate Alarm SmartMonitor 2 must be powered off and then on for the changed parameter values to be accepted. Enter the Menu Mode of the SmartMonitor 2 as directed in the ALARM SETPOINTS section.
- Page 59 Due to large signal changes that result when Simulator settings are initially changed, the off-scale signal recognition circuitry of the SmartMonitor 2 may activate and cuase brief pauses in detection. Once normal signal detection by the monitor resumes, allow an additional 10 seconds for the circuitry to stabilize before proceeding with verifying the operation of the SmartMonitor 2.
- Page 60 1. Press the POWER button to turn Test Point Test Operation Alarm Power Light Pass the SmartMonitor 2 off (without Power Off Monitor by pressing the RESET button.) The JUST pressing the audible alarm should sound continu- POWER button ously.
- Page 61 Reconnect Black Lead Wire to Patient Cable and press the RESET button on Monitor. Disconnect White Lead Wire from Patient Cable Reconnect White Lead Wire to Patient Cable and Press RESET button on Monitor. 1007897 SmartMonitor 2 Service Manual 8-14...
- Page 62 Monitor light on the Remote Alarm comes on. Press the POWER button to turn the SmartMonitor 2 on. The alarm should beep and all the lights should come on for approximately 4 seconds. After all the alarm lights turn off, the CHARGER and POWER light should remain on and the green HEART and RESPIRATION light should be blinking.
- Page 63 Clock Chip Battery Once every 15 years, the SmartMonitor 2 should be returned to Respironics for replacement of the clock chip, which contains an internal lithium battery. If this battery is depleted, the monitor will sound a constant alarm, the LCD display will read “ERROR 2,” and the memory may possibly be cleared, causing the alarm and record parameters to be set to standard values.
- Page 64 All information on the data sheets should be recorded after each verification has been completed. The data sheet must be signed in ink and dated by the technician performing the verification Notification / RA# ____________________________________ Serial #: ____________________________________________ Tested by: (print)_____________________________________ Tested by: (signature)__________________________________ Date: __________/____________/__________ SmartMonitor 2 Service Manual 8-17 1007897...
- Page 65 Appendix A Appendix A SmartMonitor2 Service Manual 1007897...
- Page 66 Appendix A SmartMonitor2 Service Manual 1007897...
- Page 67 Appendix A SmartMonitor2 Service Manual 1007897...
- Page 68 Appendix A SmartMonitor2 Service Manual 1007897...
- Page 69 Appendix A SmartMonitor2 Service Manual 1007897...
- Page 70 Appendix A SmartMonitor2 Service Manual 1007897...
- Page 71 Appendix A SmartMonitor2 Service Manual 1007897...
- Page 72 Appendix A SmartMonitor2 Service Manual 1007897...
- Page 73 Appendix A SmartMonitor2 Service Manual 1007897...
- Page 74 Appendix A SmartMonitor2 Service Manual A-10 1007897...
- Page 75 Appendix A SmartMonitor2 Service Manual A-11 1007897...
- Page 76 Appendix A SmartMonitor2 Service Manual A-12 1007897...
- Page 77 Appendix A SmartMonitor2 Service Manual A-13 1007897...
- Page 78 Appendix A SmartMonitor2 Service Manual A-14 1007897...
- Page 79 Appendix A SmartMonitor2 Service Manual A-15 1007897...
- Page 80 Appendix A SmartMonitor2 Service Manual A-16 1007897...
- Page 81 Appendix A SmartMonitor2 Service Manual A-17 1007897...
- Page 82 Appendix A SmartMonitor2 Service Manual A-18 1007897...
- Page 83 Appendix A SmartMonitor2 Service Manual A-19 1007897...
- Page 84 Reorder # 1007898 Revision # 1007897 DS 11/21/01...
Need help?
Do you have a question about the SmartMonitor 2 and is the answer not in the manual?
Questions and answers