Table of Contents
Advertisement
Advertisement
Table of Contents
Troubleshooting

Related Manuals for Respironics REMstar Auto M Series system


Summary of Contents for Respironics REMstar Auto M Series system
- Page 1 1 0 0 1 M u r r y R i d g e L a n e R espi roni cs De utsch lan d 1 0 2 0 1 2 1 1040442 M u r r y s v i l l e , PA 1 5 6 6 8 G ew erbes tra sse 17 A M 9 / 1 2 / 0 6 JR 1/15/07...
- Page 2 Other Patent Nos. FI 105650; DE 69231157; ES 2146591; IT 24310/BE. Other U.S. and foreign patents pending. REMstar, Whisper Swivel, Encore Pro, and Encore Pro SmartCard are trademarks of Respironics, Inc. NOTE: The C-Flex and A-Flex trademarks are used under license. © 2007 Respironics, Inc. and its affiliates. All rights reserved.
-
Page 7: Table Of Contents
1.4 System Overview .......................1-5 1.4.1 Breathing Circuit Overview ................1-6 1.5 Glossary .........................1-7 1.6 Symbol Key ........................1-8 1.7 How to Contact Respironics ..................1-8 Chapter 2: Device Controls and Displays .................2-1 2.1 Controls and Displays ....................2-1 2.1.1 Control Panel Inactivity ................2-2 2.2 Rear Panel ........................2-2 Chapter 3: Setup ..........................3-1... - Page 8 4.3.3 A-Flex Comfort Feature ................4-4 4.3.3.1 A-Flex Enabled..................4-4 4.3.3.2 A-Flex Disabled .................. 4-4 4.4 Changing the Device Settings ................4-5 4.4.1 Navigating the Display Screens..............4-5 4.4.1.1 Viewing Data on the Patient Data Screens ....... 4-6 4.4.1.2 Viewing and Modifying Patient Setup Screens ...... 4-8 4.5 Completing the FOSQ Questionnaire ..............4-11 4.6 Patient Reminder Screen ..................4-12 Chapter 5: Device Alerts and Troubleshooting ..............
-
Page 9: C Ontents
• Glossary and symbol key • How to contact Respironics 1.1 s ystEm ontEnts Your REMstar Auto M Series system includes the following items: Carrying Case User Manual Flexible Tubing Swivel Power Supply (may not be included) Reusable Gray Foam... -
Page 10: Warnings
1.2 I ntEndEd The Respironics REMstar Auto M Series system is a CPAP (Continuous Positive Airway Pressure) device designed for the treatment of Obstructive Sleep Apnea only in spontaneously breathing patients weighing >66 lbs (30 kg). The device is to be used only on the instruction of a licensed physician. The system can deliver CPAP therapy or Auto-CPAP therapy. - Page 11 Oxygen supports combustion. Oxygen should not be used while smoking or in the presence of an open flame. • When using oxygen with this system, a Respironics Pressure Valve (Part Number 302418) must be placed in-line with the patient circuit. Failure to use the pressure valve could result in a fire hazard.
-
Page 12: Cautions
1.3.2 C autIons A Caution indicates the possibility of damage to the device. • The device may only be operated at temperatures between 41° F (5° C) and 95° F (35° C). • If this device has been exposed to either very hot or very cold temperatures, allow it to adjust to room temperature before starting therapy. -
Page 13: System Overview
1.4 s ystEm vErvIEW The REMstar Auto M Series device, shown in Figure 1–2, is a CPAP (Continuous Positive Air- way Pressure) device designed for the treatment of Obstructive Sleep Apnea (OSA). It can deliver CPAP therapy or Auto-CPAP therapy. When prescribed for you, the device provides several special features to help make your therapy more comfortable. -
Page 14: Breathing Circuit Overview
d EvICE EaturE EsCrIptIon Accessory Module If applicable, insert the optional accessory card here. Air Outlet Connect the flexible tubing here. Flex Button This button allows you to change the Flex comfort setting, if Flex is prescribed for you. See Chapter 4 for more information about Flex. -
Page 15: Glossary
1.5 g lossary The following terms and acronyms appear throughout this manual: Cronym EfInItIon Active State The state of the device when power is applied, the airflow is on, and the device is providing therapy. A-Flex A therapy feature that establishes a level of pressure relief taking place at the end of inhalation and at the start of exhalation. -
Page 16: Symbol Key
1.7 h ontaCt EspIronICs To have your device serviced, contact your home care provider. If you need to contact Respironics directly, call the Respironics Customer Service department at 1-800-345-6443 or 1-724-387-4000. You can also use the following address: Visit Respironics web site at: www.respironics.com... -
Page 17: Chapter 2: Device Controls And Displays
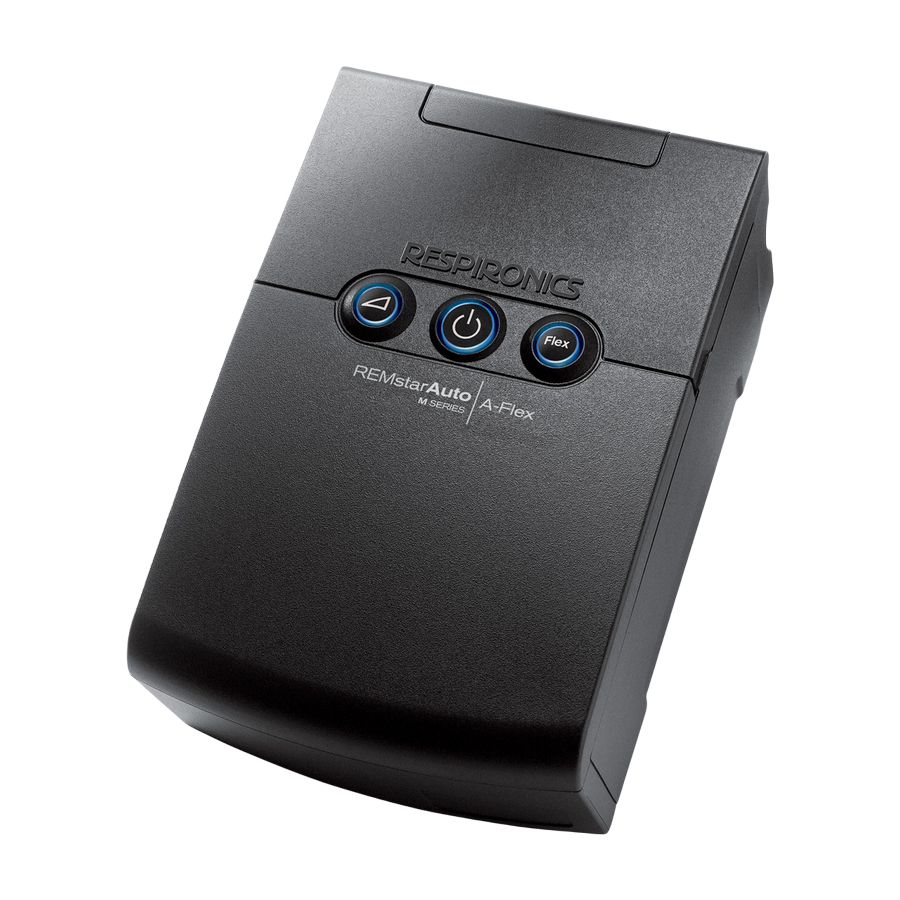
2: d haptEr EvICE ontrols Isplays This chapter describes the device’s control buttons and displays, patient circuit connections, and rear panel connections. 2.1 C ontrols Isplays Figure 2–1 shows the three primary control buttons on the REMstar Auto M Series device. Flex 2–1 p IgurE... -
Page 18: Control Panel Inactivity
The device’s display screen shows the set pressure, patient data, instructions, and error messages. See Chapter 4 for instructions on navigating the display screens. Figure 2–3 provides a view of the entire device control panel, with the cover door open. Placement Area for Optional Quick Reference Label... -
Page 19: Chapter 3: Setup
3: s haptEr Etup This chapter provides instructions on how to: • Install the air filters • Position the device • Connect the breathing circuit • Supply power to the device 3.1 I nstallIng IltErs Caution: A properly installed, undamaged foam filter is required for proper operation. The device uses a gray foam filter that is washable and reusable, and an optional white ultra-fine filter that is disposable. - Page 20 To use the system, you will need the following accessories in order to assemble the recommended circuit: • Respironics interface (e.g, nasal mask) with integrated exhalation port (or Respironics inter- face with a separate exhalation device such as the Whisper Swivel® II) •...
- Page 21 Connect the tubing to the mask: If you are using a mask with a built-in exhalation port, connect the mask’s connector to the flexible tubing, as shown in Figure 3–3. Exhalation Port Mask's Connector Flexible Tubing Connector 3–3 C IgurE onnECtIng WIth uIlt xhalatIon...
-
Page 22: Using Ac Power
3.4 s upplyIng oWEr EvICE You can power the device using AC or DC power. Caution: If this device has been exposed to either very hot or very cold tempera- tures, allow it to adjust to room temperature before beginning the following setup procedures. Warning: Route the wires to avoid tripping. Warning: This device is activated when the power cord is connected. Pressing the button turns the airflow on or off. Important! If you are using your device with a humidifier, refer to the instructions included with your humidifier for details on how to power the device and humidifier. 3.4.1 u aC p sIng oWEr Complete the following steps to operate the device using AC power. 1. -
Page 23: Using Dc Power
The Respironics DC Power Cord (Reorder Number 1001956) can be used to operate this device in a stationary recreational vehicle, boat, or motor home. The Respironics DC Battery Adapter Cable (Reorder Number 532209), when used with the DC Power Cord, enables the device to be operated from a 12 VDC free-standing battery. - Page 24 3.5 C omplEtE ssEmbly xamplE Figure 3–7 shows an example of how a complete assembly will look, with breathing circuit con- nected and power applied to the device. 3–7 f IgurE Inal ssEmbly xamplE hoWn WIth ptIonal CCEssory odulE Figure 3–8 shows an example of how you should route your tubing and situate your device on your nightstand for the best setup possible.
- Page 25 4: d haptEr EvICE pEratIon This chapter explains the therapies available with the REMstar Auto M Series device, how to start the device, and how to change the settings. 4.1 a vaIlablE hErapIEs The REMstar Auto M Series device delivers the following therapies: •...
- Page 26 Note: The FOSQ option will only appear on the Standby screen if a SmartCard is inserted in the device or if a modem is connected. 3. Press the button to turn on the airflow. The Active Display screen appears, shown in Figure 4–3. 15.0 cmH 2 O 4–3 a IgurE CtIvE Isplay WIth mart The Active Display screen shows the set pressure. Some symbols indicating when certain conditions are turned on or detected will also appear on the Active Display screen or on the Standby screen.
-
Page 27: C-Flex Comfort Feature
4.3 u sIng EaturEs You can press the (Ramp) button to activate the Ramp feature, or the Flex button to change the Flex setting, if your provider has enabled these features. 4.3.1 r EaturE The device is equipped with an optional ramp feature that your home care provider can enable or disable. -
Page 28: A-Flex Comfort Feature
4.3.2.2 IsablEd If C-Flex has not been prescribed for you and your provider has disabled the C-Flex feature, the fol- lowing screen appears when you press the Flex button, and you cannot enable or adjust the setting. C-Flex Setting FLEX comfort has been disabled on this unit. -
Page 29: Changing The Device Settings
4.4 C hangIng EvICE EttIngs You can view the set pressure on the Active Display screen, and you can view the following set- tings on the Patient Data screens: • Therapy usage hours • Number of sessions greater than 4 hours •... - Page 30 4.4.1.1 IEWIng atIEnt CrEEns Figure 4–8 shows how to navigate the Patient Data screens. Press Press – FOSQ Setup Therapy Usage Hrs/Night 7 Day Avg: 5:00 30 Day Avg: 8:00 Sessions > 4 7 Days: 5 Sessions 30 Days: 8 Sessions Apn-Hyp Index 90% Pressure Note: Only appears if in...
- Page 31 Sessions Greater than 4 Hours Screen Sessions > 4 This screen displays the number of device therapy sessions that 7 Days: 5 Sessions exceeded 4 hours in 7-day and 30-day periods. The maximum value 30 Days: 8 Sessions that can be displayed for the 7-day period is 35 sessions, and the maximum value for the 30-day period is 150 sessions.
-
Page 32: Viewing And Modifying Patient Setup Screens
Compliance Check Value Screen This screen displays a number used by your home care provider to validate that the data provided by you is the data taken from the Summary Data Screen. This is a “read-only” screen and you cannot change the number on the screen. - Page 33 The Patient Setup screens are described below. Standby Screen The Standby screen appears when you first apply power to the device. You can access the Patient Setup menu from this screen by – FOSQ Setup pressing the + button. Once inside the Setup menu, press the buttons to cycle through the screens.
- Page 34 Ramp Starting Pressure Screen Ramp Start Pres You can increase or decrease the ramp starting pressure in 0.5 cm O increments by pressing the + or – buttons. The default setting 4.0 cmH 2 O is 4 cm H O. You can adjust the setting from 4 cm H O to the CPAP pressure setting.
-
Page 35: Completing The Fosq Questionnaire
4.5 C fosQ Q omplEtIng uEstIonnaIrE Note: The FOSQ option only appears on the Standby screen if you have a SmartCard inserted or a modem connected to the device. From the Standby screen, you can access the FOSQ questionnaire by pressing the – button. The FOSQ test is a ‘quality of life’ questionnaire designed specifically for people with sleep disorders. The results allow health care professionals to see how therapy has improved the quality of your life. -
Page 36: Patient Reminder Screen
3. After you answer the first question, press the button to access the next FOSQ screen and continue answering each question. If you need to go back to a previous screen, press the button. 4. There are 30 FOSQ questions. Once you have reached the last question, press the button to save your answers and exit the questionnaire. -
Page 37: Chapter 5: Device Alerts And Troubleshooting
5: d haptEr EvICE lErts roublEshootIng This chapter describes the device alerts and also provides troubleshooting information for issues you may run into when using the device. 5.1 d EvICE lErts The device provides two alert levels, high and medium priority. •... - Page 38 lErt ummary ablE The following table summarizes the high and medium priority alerts. lErt udIblE Isual EvICE CtIon ossIblE ausE atIEnt CtIon ndICator ndICator System Error • • • • Backlights: The device enters the Device failure Press any of the display ◊◊...
- Page 39 lErt udIblE Isual EvICE CtIon ossIblE ausE atIEnt CtIon ndICator ndICator Mask Leak • • The device continues The breathing Check your breathing Backlights: to operate. circuit is discon- circuit connections and re- ◊ ◊ ◊ nected or there is connect the tubing if it has a large air leak.
-
Page 40: Troubleshooting
5.2 t roublEshootIng The table below lists some of the problems you may experience with your device or mask and pos- sible solutions to those problems. roblEm appEnEd Nothing happens when There’s no power If you are using AC power, check the outlet you apply power to at the outlet or power and verify that the device is properly... - Page 41 roblEm appEnEd The device’s display is The device or Unplug the device and the power supply. erratic. power supply has Reapply power to the device. If the problem been dropped continues, relocate the device to an area with or mishandled, lower EMI emissions (e.g., away from electronic or the device or equipment such as cellular phones, cordless...
- Page 42 roblEm appEnEd The device has fallen off The device may Always make sure your device is placed on a your table or nightstand. not have been hard, flat surface so the feet on the bottom of properly seated the device can adhere to the surface (make sure on the nightstand, there is no fabric under the device).
- Page 43 roblEm appEnEd You are having problems You have lost the If you are not using a humidifier, you cannot connecting the tubing to air outlet port or connect your tubing to the device without the the device. are traveling and detachable air outlet port, shown below.
- Page 44 roblEm appEnEd The air out of the mask The air filters may Clean or replace the air filters as described in is much warmer than be dirty. Chapter 7. usual. The device may be The temperature of the air may vary somewhat operating in direct based on your room temperature.
-
Page 45: Chapter 6: Accessories
6: a haptEr CCEssorIEs Contact your home care provider for additional information on the accessories available for your REMstar Auto M Series system. When using optional accessories, always follow the instructions enclosed with the accessories. 6.1 a ddIng umIdIfIEr You can use the M Series Heated humidifier or the M Series Pass-over humidifier with your device. -
Page 46: Using The Smartcard
When using oxygen with this system, the oxygen supply must comply with local regulations for medical oxygen. • When using oxygen with this system, a Respironics Pressure Valve (Part number 302418) must be placed in-line with the patient circuit. Failure to use the pressure valve could result in a fire hazard. -
Page 47: Cleaning The Device
Allow the filter to air dry IltErs completely before reinstalling it. If the foam filter is torn, replace it. (Only Respironics-supplied filters should be used as replacement filters.) Filter Area If the white ultra-fine filter is dirty or torn, replace it. -
Page 48: Service
7.3 C lEanIng ubIng Clean the tubing daily. Disconnect the flexible tubing from the device. Gently wash the tubing in a solution of warm water and a mild detergent. Rinse thoroughly. Air dry. 7.4 s ErvICE The REMstar Auto M Series device does not require routine servicing. Warning: If you notice unexplained changes in the performance of this device, if it is making unusual or harsh sounds, if the device or power supply have been... - Page 49 8: s haptEr pECIfICatIons nvIronmEntal pEratIng toragE 41° F (5° C) to 95° F (35° C) -4° F (-20° C) to 140° F (60° C) EmpEraturE 15 to 95% (non-condensing) 15 to 95% (non-condensing) ElatIvE umIdIty 77 to 101kPa (0 - 7500 ft) tmosphErIC rEssurE hysICal...
- Page 50 rEssurE 4.0 to 20.0 cm H O (in 0.5 cm H O increments) Pressure Increments: Pressure Stability: <10.0 cm H O (±0.5 cm H ≥10.0 to 20.0 cm H O (±1.0 cm H Measured in accordance with EN ISO 17510-1 @ 1/3, 2/3, and Pmax with BPM set to 10, 15, and 20 BPM @ 20°...
- Page 51 a: EmC I ppEndIx nformatIon – ’ - E uIdanCE anufaCturEr EClaratIon lECtromagnEtIC mIssIons This device is intended for use in the electromagnetic environment specified below. The user of this device should make sure it is used in such an environment. - g mIssIons omplIanCE lECtromagnEtIC nvIronmEnt...
- Page 52 ’ - E – This device is intended for use in the uIdanCE anufaCturEr EClaratIon lECtromagnEtIC mmunIty electromagnetic environment specified below. The user of this device should make sure it is used in such an environment. IEC 60601 t mmunIty omplIanCE EvEl lECtromagnEtIC nvIronmEnt EvEl uIdanCE...
- Page 53 ’ - E – This device is intended for use in the uIdanCE anufaCturEr EClaratIon lECtromagnEtIC mmunIty electromagnetic environment specified below. The user of this device should make sure it is used in such an environment. IEC 60601 t mmunIty EvEl omplIanCE EvEl lECtromagnEtIC nvIronmEnt uIdanCE...
- Page 54 rf C ECommEndEd EparatIon IstanCEs bEtWEEn ortablE obIlE ommunICatIons QuIpmEnt EvICE The device is intended for use in an electromagnetic environment in which radiated RF disturbances are controlled. The customer or the user of this device can help prevent electromagnetic interference by maintaining a minimum distance between portable and mo- bile RF communications equipment (transmitters) and this device as recommended below, according to the maximum output power of the communications equipment.
- Page 55 (2) years from the date of sale by Respironics, Inc. to the dealer. If the product fails to perform in accordance with the product specifications, Respironics, Inc. will repair or replace – at its option – the defec- tive material or part.
Need help?
Do you have a question about the REMstar Auto M Series system and is the answer not in the manual?
Questions and answers
I have a REMStar Plus M Series machine by Respironics. When I switch on the power, the on/off button gives out double beeping beeps and blinks. Then when I press the on/off button again, no air comes out. What could be wrong?
A double beep and blinking light on the Respironics REMStar Plus M Series machine when turning it on, followed by no air coming out after pressing the on/off button, may indicate a problem with the airflow blower. If the audible indicator sounds and the backlights turn on when power is applied, but airflow does not start, the device may not be operating correctly. This situation requires contacting a home care provider for assistance.
This answer is automatically generated
I have a REMStar Plus M series machine. I have used it for a long time. Recently, when I turn the power on, the light on the machine lit up and gives double beeping sound that would not stop until I shut the power switch off. What can be wrong?
A double beeping sound on a Respironics Auto M Series system indicates a high priority alert. This could be caused by a problem with the airflow blower or the device not operating properly after power is applied. If the backlights turn on but the airflow does not start, contact your home care provider for assistance.
This answer is automatically generated