Respironics REMstar Pro M Series User Manual
Cpap (continuous positive airway pressure) device
Hide thumbs
Also See for REMstar Pro M Series:
- User manual (24 pages) ,
- User manual (64 pages) ,
- Service manual (70 pages)
Table of Contents
Advertisement
Advertisement
Table of Contents
Troubleshooting

Related Manuals for Respironics REMstar Pro M Series


Summary of Contents for Respironics REMstar Pro M Series
- Page 1 REMstar ® M Series 1050656 JR 1/22/08 EN-DOM...
- Page 2 5,794,615; 6,105,575; 6,609,517; 6,629,527; 6,622,724; 6,564,797; 6,427,689, and 6,932,084. Other patents pending. REMstar, Whisper Swivel, Encore Pro, and Encore Pro SmartCard are trademarks of Respironics, Inc. NOTE: The C-Flex trademark is used under license. © 2008 Respironics, Inc. and its affiliates. All rights reserved.
-
Page 3: Table Of Contents
1.4 System Overview .......................1-5 1.4.1 Breathing Circuit Overview ................1-6 1.5 Glossary .........................1-7 1.6 Symbol Key ........................1-8 1.7 How to Contact Respironics ..................1-8 Chapter 2: Device Controls and Displays .................2-1 2.1 Controls and Displays ....................2-1 2.1.1 Control Panel Inactivity ................2-2 2.2 Rear Panel ........................2-2 Chapter 3: Setup ..........................3-1... - Page 4 4.3 Changing the Device Settings ................4-4 4.3.1 Navigating the Display Screens..............4-4 4.3.1.1 Viewing Data on the Patient Data Screens ....... 4-5 4.3.1.2 Viewing and Modifying Patient Setup Screens ...... 4-7 4.4 Completing the FOSQ Questionnaire ..............4-9 4.5 Patient Reminder Screen ..................4-10 Chapter 5: Device Alerts and Troubleshooting ..............
-
Page 5: System Contents
Intended Use • Warnings, cautions, and contraindications • System overview • Glossary and symbol key • How to contact Respironics ystEm ontEnts Your REMstar Pro M Series system includes the following items: Carrying Case User Manual Flexible Tubing Power Supply Reusable Gray Foam Filter Disposable Ultra-fine Filter AC Power Cord Device 1–1 s... - Page 6 Several accessories are available to make your OSA treatment with the REMstar Pro M Series system as convenient and comfortable as possible. To ensure that you receive the safe, effective therapy prescribed for you, use only Respironics accessories.
- Page 7 • Oxygen supports combustion. Oxygen should not be used while smoking or in the presence of an open flame. • When using oxygen with this system, a Respironics Pressure Valve must be placed in-line with the patient circuit. Failure to use the pressure valve could result in a fire hazard. • Do not use the device in the presence of a flammable anaesthetic mixture in combination with oxygen or air, or in the presence of nitrous oxide. • Do not use this device if the room temperature is warmer than 95° F (35° C). If the device is used at room temperatures warmer than 95° F (35° C), the temperature of the airflow may exceed 106° F (41° C). This could cause irritation or injury to your airway.
- Page 8 1.3.2 C aUtIons A Caution indicates the possibility of damage to the device. • The device may only be operated at temperatures between 41° F (5° C) and 95° F (35° C). • If this device has been exposed to either very hot or very cold temperatures, allow it to adjust to room temperature before starting therapy. Condensation may damage the device. • Do not immerse the device or allow any liquid to enter the enclosure or the inlet filter. • A properly installed, undamaged reusable foam inlet filter is required for proper operation. • Tobacco smoke may cause tar build-up within the device, which may result in the device malfunctioning. Note: Additional warnings, cautions, and notes are located throughout this manual. 1.3.3 C ontraIndICatIons When assessing the relative risks and benefits of using this equipment, the clinician should...
-
Page 9: Ramp Feature
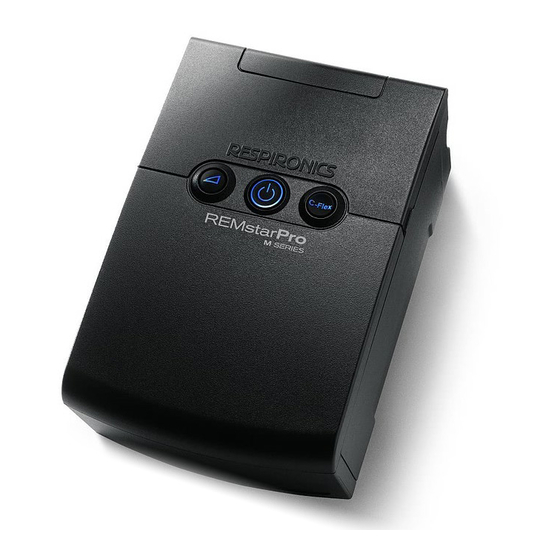
The REMstar Pro M Series device, shown in Figure 1–2, is a sleep apnea system that delivers Continuous Positive Airway Pressure (CPAP). CPAP maintains a constant level of pres- sure throughout the breathing cycle. When prescribed for you, the device provides several special features to help make your therapy more comfortable. - Page 10 EvICE EatUrE EsCrIptIon Accessory Module If applicable, insert the optional accessory card here. Air Outlet Connect the flexible tubing here. C-Flex Button This button allows you to change the C-Flex comfort setting, if C-Flex is prescribed for you. See Chapter 4 for more information about C-Flex.
- Page 11 Note: The exhalation port may be part of the interface or may be part of a separate exhalation device, but is required to minimize the potential for CO rebreathing. lossary The following terms and acronyms appear throughout this manual: Cronym EfInItIon Active State The state of the device when power is applied, the airflow is on, and the...
- Page 12 No User Serviceable Parts oW to ontaCt EspIronICs To have your device serviced, contact your home care provider. If you need to contact Respironics directly, call the Respironics Customer Service department at 1-800-345-6443 or 1-724-387-4000. You can also use the following address: Respironics...
-
Page 13: Rear Panel
Isplays This chapter describes the device’s control buttons and displays, patient circuit connections, and rear panel connections. ontrols and Isplays Figure 2–1 shows the three primary control buttons on the REMstar Pro M Series device. 2–1 p IgUrE rImary ontrol Uttons These buttons are described below. -
Page 14: Supplying Power To The Device
The screen times out after one minute if there is no activity and returns to the Standby screen. anEl Figure 2–4 shows the REMstar Pro M Series device’s rear panel (without a humidifier). DC Power Inlet Air Outlet Port... - Page 15 3: s haptEr EtUp This chapter provides instructions on how to: • Install the air filters • Position the device • Connect the breathing circuit • Supply power to the device nstallIng thE IltErs Caution: A properly installed, undamaged foam filter is required for proper operation. The device uses a gray foam filter that is washable and reusable, and an optional white ultra-fine filter that is disposable.
- Page 16 IrCUIt To use the system, you will need the following accessories in order to assemble the recommended circuit: • Respironics interface (e.g, nasal mask) with integrated exhalation port (or Respironics inter- face with a separate exhalation device such as the Whisper Swivel® II) • Respironics 6 ft. (1.83 m) flexible tubing • Respironics headgear (for the patient interface) Warning: If the device is used by multiple persons (e.g., rental devices), a low-...
- Page 17 Connect the tubing to the mask: If you are using a mask with a built-in exhalation port, connect the mask’s connector to the flexible tubing, as shown in Figure 3–3. Exhalation Port Mask's Connector Flexible Tubing Connector 3–3 C IgUrE onnECtIng a asK WIth UIlt...
-
Page 18: Using Ac Power
UpplyIng oWEr to thE EvICE You can power the device using AC or DC power. Caution: If this device has been exposed to either very hot or very cold tempera- tures, allow it to adjust to room temperature before beginning the following setup procedures. -
Page 19: Using Dc Power
3.4.2 U dC p sIng oWEr The Respironics DC Power Cord can be used to operate this device in a stationary recreational vehicle, boat, or motor home. The Respironics DC Battery Adapter Cable when used with the DC Power Cord, enables the device to be operated from a 12 VDC free-standing battery. Caution: When DC power is obtained from a vehicle battery, the device should not be used while the vehicle’s engine is running. Damage to the vehicle or the device may occur. - Page 20 omplEtE ssEmbly xamplE Figure 3–7 shows an example of how a complete assembly will look, with breathing circuit con- nected and power applied to the device. 3–7 f IgUrE Inal ssEmbly xamplE hoWn WIth ptIonal CCEssory odUlE Figure 3–8 shows an example of how you should route your tubing and situate your device on your nightstand for the best setup possible.
- Page 21 4: d haptEr EvICE pEratIon This chapter explains how to start the device and change the settings. tartIng thE EvICE Plug the device in to an AC or DC power source. The three primary buttons light up and the Software Version screen momentarily appears, shown in Figure 4–1. V 1.0 4–1 s IgUrE...
- Page 22 3. Press the button to turn on the airflow. The Active Display screen appears, shown in Figure 4–3. 4–3 a IgUrE CtIvE Isplay mart The Active Display screen shows the set pressure. Some symbols indicating when certain conditions are turned on or detected will also appear on the Active Display screen or on the Standby screen.
- Page 23 sIng thE amp and EatUrEs You can press the (Ramp) button to activate the Ramp feature, or the C-Flex button to change the C-Flex setting, if your provider has enabled these features. 4.2.1 r EatUrE The device is equipped with an optional ramp feature that your home care provider can enable or disable.
- Page 24 4.2.2.2 IsablEd If C-Flex has not been prescribed for you and your provider has disabled the C-Flex feature, the following screen appears when you press the C-Flex button, and you cannot enable or adjust the setting. C-Flex Setting FLEX comfort has been disabled on this unit. 4–5 C-f IgUrE IsablEd CrEEn hangIng thE EvICE EttIngs You can view the set pressure on the Active Display screen, as well as the following information on the Patient Data screens: •...
- Page 25 4.3.1.1 IEWIng ata on thE atIEnt CrEEns Figure 4–6 shows how to navigate the Patient Data screens. Press Press – FOSQ Setup Therapy Usage Hrs/Night 7 Day Avg: 5:00 30 Day Avg: 8:00 Sessions > 4 7 Days: 5 Sessions 30 Days: 8 Sessions Apn-Hyp Index...
- Page 26 Sessions Greater than 4 Hours Screen Sessions > 4 This screen displays the number of device therapy sessions that 7 Days: 5 Sessions exceeded 4 hours in 7-day and 30-day periods. The maximum value 30 Days: 8 Sessions for the 7-day period is 35 sessions, while the maximum value for the 30-day period is 150 sessions.
- Page 27 4.3.1.2 IEWIng and odIfyIng atIEnt EtUp CrEEns Figure 4–7 shows how to navigate the Patient Setup screens. – FOSQ Setup Press Press Press C-Flex Setting 1 2 3 Auto Off Ramp Start Pres Feature: ON 4.0 cmH 2 O Mask Alert Feature: ON 4–7 n IgUrE...
- Page 28 Ramp Starting Pressure Screen Ramp Start Pres You can increase or decrease the ramp starting pressure in 0.5 cm O increments by pressing the + or – buttons. The default setting 4.0 cmH 2 O is 4 cm H O. You can adjust the setting from 4 cm H O to the CPAP pressure setting.
- Page 29 fosQ Q omplEtIng thE UEstIonnaIrE Note: The FOSQ option only appears on the Standby screen if you have a SmartCard inserted or a modem connected to the device. From the Standby screen, you can access the FOSQ questionnaire by pressing the – button. The FOSQ test is a ‘quality of life’...
- Page 30 3. After you answer the first question, press the button to access the next FOSQ screen and continue answering each question. If you need to go back to a previous screen, press the button. There are 30 FOSQ questions. Once you have reached the last question, press the button to save your answers and exit the questionnaire.
- Page 31 5: d haptEr EvICE lErts and roUblEshootIng This chapter describes the device alerts and also provides troubleshooting information for issues you may run into when using the device. EvICE lErts The device provides two alert levels, high and medium priority. •...
- Page 32 lErt Ummary ablE The following table summarizes the high and medium priority alerts. lErt UdIblE IsUal EvICE CtIon ossIblE aUsE atIEnt CtIon ndICator ndICator System Error • • • • Backlights: The device enters the Device failure Press any of the display ◊◊...
- Page 33 lErt UdIblE IsUal EvICE CtIon ossIblE aUsE atIEnt CtIon ndICator ndICator Mask Leak • • The device continues The breathing Check your breathing Backlights: to operate. circuit is discon- circuit connections and re- ◊ ◊ ◊ nected or there is connect the tubing if it has a large air leak.
- Page 34 roUblEshootIng The table below lists some of the problems you may experience with your device or mask and pos- sible solutions to those problems. roblEm appEnEd hat to Nothing happens when There’s no power If you are using AC power, check the outlet you apply power to the at the outlet or power and verify that the device is properly...
- Page 35 roblEm appEnEd hat to The device’s display is The device or Unplug the device and the power supply. erratic. power supply has Reapply power to the device. If the problem been dropped continues, relocate the device to an area with or mishandled, lower EMI emissions (e.g., away from electronic or the device or...
- Page 36 roblEm appEnEd hat to The device has fallen off The device may Always make sure your device is placed on a your table or nightstand. not have been hard, flat surface so the feet on the bottom of properly seated the device can adhere to the surface (make sure on the nightstand, there is no fabric under the device).
- Page 37 roblEm appEnEd hat to You are having problems You have lost the If you are not using a humidifier, you cannot connecting the tubing air outlet port or connect your tubing to the device without the to the device. are traveling and detachable air outlet port, shown below.
- Page 38 roblEm appEnEd hat to The air out of the mask The air filters may Clean or replace the air filters as described in is much warmer than be dirty. Chapter 7. usual. The device may be The temperature of the air may vary somewhat operating in direct based on your room temperature.
- Page 39 Some REMstar Pro M Series systems come with a SmartCard accessory module installed in the accessory slot on the back of the device to record information for the home care provider. Your home care provider may ask you to periodically remove the SmartCard and send it to him/her for evaluation.
- Page 40 • When using oxygen with this system, the oxygen supply must comply with local regulations for medical oxygen. • When using oxygen with this system, a Respironics Pressure Valve must be placed in-line with the patient circuit. Failure to use the pressure valve could result in a fire hazard. • Oxygen accelerates fires. Keep the device and the oxygen container away from heat, open flames, any oily substance, or other sources of ignition. Do not smoke in the area near the device or the oxygen.
- Page 41 Allow the filter to air dry IltErs completely before reinstalling it. If the foam filter is torn, replace it. (Only Respironics-supplied filters should be used as replacement filters.) Filter Area If the white ultra-fine filter is dirty or torn, replace it.
- Page 42 Clean the tubing daily. Disconnect the flexible tubing from the device. Gently wash the tubing in a solution of warm water and a mild detergent. Rinse thoroughly. Air dry. ErvICE The REMstar Pro M Series device does not require routine servicing. Warning: If you notice unexplained changes in the performance of this device, if it is...
- Page 43 8: s haptEr pECIfICatIons nvIronmEntal pEratIng toragE 5° C (41° F) to 35° C (95° F) -20° C (-4° F) to 60° C (140° F) EmpEratUrE 15 to 95% (non-condensing) 15 to 95% (non-condensing) ElatIvE UmIdIty 77 to 101kPa (0 - 7500 ft) tmosphErIC rEssUrE hysICal...
- Page 44 rEssUrE 4.0 to 20.0 cm H O (in 0.5 cm H O increments) Pressure Increments: Pressure Stability: <10.0 cm H O (±0.5 cm H ≥10.0 to 20.0 cm H O (±1.0 cm H Measured in accordance with EN ISO 17510-1 @ 1/3, 2/3, and Pmax with BPM set to 10, 15, and 20 BPM @ 20° C (±5° C), 50% RH (±5%), and an atmospheric pressure of 101.54 kPascals. Maximum Flow: 35 LPM Measured in accordance with EN ISO 17510-1 @ 1/3, 2/3, and Pmax with BPM set to 10, 15, and 20 BPM @ 23° C (±2° C), 50% RH (±5%), and an atmospheric pressure of 101.54 kPascals.
- Page 45 a: EmC I ppEndIx nformatIon – ’ UIdanCE and anUfaCtUrEr EClaratIon lECtromagnEtIC mIssIons This device is intended for use in the electromagnetic environment specified below. The user of this device should make sure it is used in such an environment. mIssIons omplIanCE lECtromagnEtIC...
- Page 46 ’ – This device is intended for use in the UIdanCE and anUfaCtUrEr EClaratIon lECtromagnEtIC mmUnIty electromagnetic environment specified below. The user of this device should make sure it is used in such an environment. IEC 60601 t mmUnIty EvEl omplIanCE EvEl lECtromagnEtIC...
- Page 47 (2) years from the date of sale by Respironics, Inc. to the dealer. If the product fails to perform in accordance with the product specifications, Respironics, Inc. will repair or replace – at its option – the defective material or part.
Need help?
Do you have a question about the REMstar Pro M Series and is the answer not in the manual?
Questions and answers