
Related Manuals for LABORIE NXT Go


Summary of Contents for LABORIE NXT Go
- Page 1 FOR DIGNITY. FOR LIFE. NXT Go Owner’s Manual UROLOGY & UROGYNECOLOGY Operation, care, and maintenance laborie.com...
- Page 2 Trademarks NXT Go is a trademark of Laborie Medical Technologies Corp. Roam NXT, PIM NXT, Urocap NXT, T-DOC, and Unisensor are trademarks of Laborie Medical Technologies Corp. Windows is a registered trademark of Microsoft Corp. Bluetooth is a registered trademark of Bluetooth SIG Inc.
-
Page 3: Table Of Contents
Quick Start Setting Up the Equipment Setting Up the NXT Go Pump Hub for NXT2100 Systems Setting Up the NXT Go Pump Hub for NXT Go with Cart System (NXT2300) Gathering Supplies and Equipment Preparing the Urocap NXT Preparing the NXT Go Pump Hub... - Page 4 Questionnaire Reports Review UDS Intelligence Quality Control (QC) QC Score and QC Score Summary Maintenance and Service Cleaning and Disinfection General Cleaning and Disinfection Cleaning and Disinfection Preparation Cleaning Disinfection Completing Cleaning and Disinfection Laborie NXT Go Owner’s Manual LBL-00145 [E]...
- Page 5 Remote Control NXT LED Signals Remote Control NXT Battery Replacement NXT Go Pump Hub Pairing a Version 2 (Wired Connection) NXT Go Pump Hub Pairing a Version 3 (Wired/Wireless Connection) NXT Go Pump Hub Information for All Pump Versions Infusion Volume Transducer...
- Page 6 NXT Go with Cart (NXT2300) Mounting the NXT Go Pump Hub Mounting the NXT Roam & PIM Assembly to the Cart Mounting the Urocap NXT to the Cart Mounting the IV Pole to the Cart Water Pressure Transducer Mount EMG Electrodes Commode Appendix A: System Specifications...
-
Page 7: Introduction
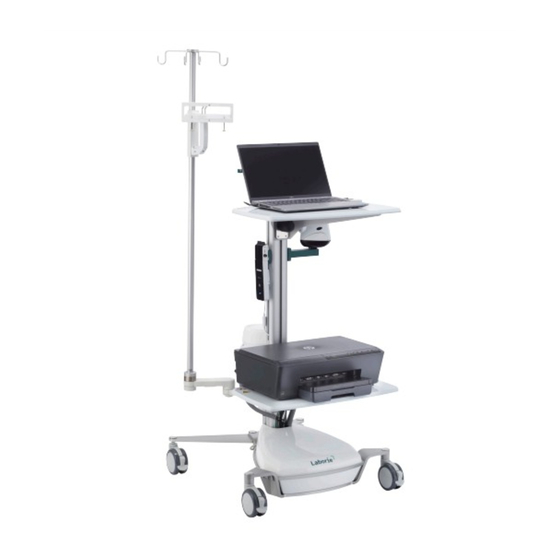
1 Introduction The Laborie NXT Go system (Figure 1-1) is a partially-wireless-capable system providing mobility and ease of use in the field of urodynamics. It allows studies to be performed with mountable modules and is controlled by Laborie’s Synergy software. The wireless and battery-powered features allow for improved system setup and use. For information on warranty and terms and conditions, visit https://www.laborie.com/terms-conditions/. -
Page 8: Equipment Intended Use
To determine which version pump you have, refer to lower-right corner of the label affixed to the bottom of the NXT Go pump hub. If the number printed there is V2.00, you have a Version 2 pump. If the number on the label is V3.00 or higher, you have a Version 3 pump. -
Page 9: Software And Equipment
Standard Equipment and Optional Accessories Prior to use, verify that all ordered equipment and accessories have been received. Contact Laborie if there are any discrepancies between ordered and received equipment. Inspect the equipment for any visible signs of damage or mishandling. -
Page 10: Warnings And Precautions
• Strictures in the urethra Laborie is not responsible for loss of patient files or test data. Laborie recommends that you back up patient data on a regular basis. To prevent any risk of damage to the cart, do not exceed the marked maximum weight indications. - Page 11 Only connect devices specified and approved by Laborie to the NXT Go system. Connecting any device not approved by Laborie to the ME system alters the functional integrity of the product, creating a safety risk.
-
Page 12: To Report Product Complaints Or Incidents
Email: helpdesk@laborie.com About This Manual The NXT Go Owner’s Manual is intended to provide important information and instruction regarding the use and care of the NXT system. Symbols Used in This Manual This manual provides important information to help you understand the features and safe use of the NXT system and its modules. -
Page 13: Quick Start
Setting Up the Equipment 1. Unpack the NXT Go Pump Hub, Roam NXT, Patient Interface Module NXT (PIM NXT), and Urocap NXT from their shipping boxes or transport case. Unpack the UPP Puller NXT. For information on the NXT Go pump hub,... -
Page 14: Setting Up The Nxt Go Pump Hub For Nxt2100 Systems
Setting Up the NXT Go Pump Hub for NXT2100 Systems 1. Hang the NXT Go infusion hook on an IV pole. For a visual of inputs on the NXT Go pump hub, refer to Figure 6-3. Connect the NXT Go infusion hook to the NXT Go pump hub. Connect the NXT Go power cord to the NXT Go pump hub power supply. - Page 15 • Preparation tray • Saline bag System-Specific Items: NXT Go pump hub (DCX2101) NXT Go infusion hook (MSM1185) Roam NXT (ROX2001) & PIM NXT for T-DOC (PIX2211) Urocap NXT (UCX2001) Roam NXT (ROX2001) & PIM NXT for Fluid (PIX2231)
- Page 16 Medex LogiCal pressure transducers (Medex TRA60X) PIM NXT for Fluid–to–Medex Transducer Cables (CAB1093) Clamp for Medex Pressure Transducers (BRA230) Bracket for Snap-on electrodes (ELE428) and cable Three Medex Pressure Transducers (BRA405) (CAB1091, CAB1092, CAB1103, CAB1104) Laborie NXT Go Owner’s Manual LBL-00145 [E]...
- Page 17 Infusion pump tubing for Laborie NXT systems (TUBPTNXT) Roam NXT–to–PIM NXT connector cable (CAB2111) NXT magnetic Pogo Pin cable, binder termination, 3 m length (CAB1081) Power supply, medical grade, Class II wall plug (POW1033) NXT Go Power Cord (POW006) NXT Go USB Cable (CAB1056)
-
Page 18: Preparing The Urocap Nxt
Preparing the Roam NXT 1. Ensure that the Roam NXT is charged. Laborie recommends charging the device overnight to ensure optimal battery power for a full day of procedures. 2. Confirm that the Roam NXT and PIM NXT are connected securely. The PIM NXT and the Roam NXT must be connected to function. -
Page 19: Preparing The Upp Puller Nxt (Optional)
Preparing the UPP Puller NXT (Optional) Ensure that the UPP Puller NXT is charged. Laborie recommends charging the device overnight to ensure optimal battery power for a full day of procedures. For instructions on how to charge the device, refer to the section “UPP... -
Page 20: Assembling The Upp Puller Nxt Stand
Synergy displays your repository inventory during the Preview phase of the study. Prior to beginning consumable setup, be sure that you first start a study. For instructions on starting the study, refer to the section “Starting a Study” on page 23. Laborie NXT Go Owner’s Manual LBL-00145 [E]... -
Page 21: Infusion Pump Tubing Setup
Infusion Pump Tubing Setup Laborie infusion pump tubing is intended for single use only. Do not reuse, reprocess, or resterilize pump tubing. Use of the infusion pump tubing outside of its intended application may affect pump accuracy. Do not run the pump at a speed exceeding the limitation of the catheter. -
Page 22: Setting Up Catheters And Transducers
RFID per pouch: Scan the SmartSense tag affixed to the packaging by placing it against the RFID reader located on the NXT Go pump hub for approximately three seconds. To view the SmartSense tag reader, refer to the section “NXT Go Pump Hub”... - Page 23 T-DOC G3 Air-Charged Catheters To set up the T-DOC G3 Air-Charged Catheters for use with the NXT system, perform the following steps: 1. Ensure that the PIM NXT for T-DOC is connected to the Roam NXT. A solid-green light bar on the Roam NXT indicates that the device is ready for use.
-
Page 24: T-Doc G1 Air-Charged Catheters
(Pdet) is equal to zero and that both Pabd and Pves pressures are reacting appropriately. If Pabd is higher than Pves, reposition the Pabd catheter. In Synergy, on the control panel, click the Equalize Pdet button. 11. Continue with the study procedure when ready. Laborie NXT Go Owner’s Manual LBL-00145 [E]... - Page 25 IMPORTANT Do not plug in or unplug any transducers when a procedure is running. Always stop the procedure before plugging in or unplugging transducers. Always consult the Instructions for Use provided with the product. Roam NXT, PIM NXT for Fluid, and Transducer Setup 1.
- Page 26 6. Open the stopcock to the syringe and the catheter, and infuse approximately 1 cc to 1.5 cc of solution. Laborie NXT Go Owner’s Manual LBL-00145 [E]...
- Page 27 7. Slowly open the stopcock to the Luer Lock to which the pressure measurement tubing will be attached. Connect the tubing to the stopcock as the meniscus forms on the stopcock Luer Lock. Take care not to lose fluid from the catheter.
-
Page 28: Placing The Emg Patch Electrodes
For ease of movement and accessibility during urodynamic procedures, you can mount the Roam NXT on an IV Pole (Figure 2-18) or on the procedure chair. When mounting the Roam NXT, always ensure that the clamping mount is securely fastened. Figure 2-18: Roam NXT Mounted on IV Pole Laborie NXT Go Owner’s Manual LBL-00145 [E]... -
Page 29: Performing A Study
On the title bar of the Synergy application, click the Settings icon ( ) and then click the Device Manager option; the Device Manager window opens, as shown in Figure 3-1. Figure 3-1: Device Manager Window LBL-00145 [E] Laborie NXT Go Owner’s Manual... -
Page 30: Freeflow Study
FreeFlow Study A FreeFlow study provides a measurement of the rate at which urine flows out of the body. It can be performed using the Urocap NXT and Synergy application provided as part of the Laborie NXT system. NOTE Before beginning the FreeFlow study, ensure that you have completed the tasks outlined in the section “Gathering Supplies and Equipment”... -
Page 31: Starting The Freeflow Study
Starting the FreeFlow Study Start the FreeFlow study as described in the section “Starting a Study” on page 23. The FreeFlow study requires the use of the Urocap NXT and Bluetooth Dongle NXT. Ensure that the Urocap NXT device is ready to use (i.e., fully charged, with the beaker in place). For information on preparing the Urocap NXT, refer to the section “Preparing the Urocap NXT”... - Page 32 4. In the Post Void Residual dialog box, click OK to save data and advance to the report. Clicking Cancel abandons any information you input and closes the Post Void Residual dialog box. NOTE Post Void Residual can also be entered and edited in the Report. Laborie NXT Go Owner’s Manual LBL-00145 [E]...
-
Page 33: Urology Urodynamic Study
FreeFlow Report 1. A preview of the FreeFlow Report will be generated using the default (UDS) configuration settings (Figure 3-6). You can apply the default configuration for the report or customize it. For information on customizing the report, refer to the section “Reports”... -
Page 34: Starting A Urology Urodynamic Study
23. The study requires the use of the Urocap NXT, Roam NXT, NXT Go pump hub, and Bluetooth Dongle NXT. Ensure that all modules are connected in the Synergy application and that the Urocap NXT and Roam NXT are fully charged. - Page 35 CAUTION You can stop an infusion at ANY TIME by pressing the gray pump stop button on the NXT Go pump hub, by opening the pump door, or by disconnecting the filling tube from the catheter or the water bag.
-
Page 36: Cystometry Study
23. The study requires the use of the Urocap NXT, Roam NXT, NXT Go pump hub, and Bluetooth Dongle NXT. Ensure that all modules are connected in the Synergy application and that the Urocap NXT and Roam NXT are fully charged. -
Page 37: Tests
5. When the patient begins to feel discomfort or fullness, stop the infusion pump by clicking the Pump Off button. CAUTION You can stop infusion at ANY TIME by pressing the gray pump stop button on the NXT Go pump hub, by opening the pump door, or by disconnecting the filling tube from the catheter or the water bag. -
Page 38: Urethral Pressure Profile
3. Feed the catheter through the catheter guide and use the catheter clamp to secure the catheter to the UPP Puller NXT. 4. Select the Rest Profile (On) button to start the rest profile. The UPP Puller NXT will begin pulling at the speed selected in the Workflow Configuration dialog box. Laborie NXT Go Owner’s Manual LBL-00145 [E]... -
Page 39: Finishing The Studies
Print icon. Troubleshooting For FAQs and troubleshooting tips, refer to the section “Troubleshooting Guide” on page 86. If problems cannot be resolved, contact the Laborie Service Team at 1-800-333-1039 or by email at service@laborie.com. Chapter 3 Performing a Study... -
Page 40: Synergy Software
To log in to Synergy, do the following: 1. On the desktop, double-click the Synergy shortcut icon, or, from the Laborie Dashboard, start the Synergy application. The Synergy Login window opens, as shown in Figure 4-1. Upon first login, you must accept the End User License Agreement. -
Page 41: Ldap Setup
“Sections and Icons in the Main Window” on page 39. IMPORTANT Do not leave the computer unattended after you have logged in. Laborie recommends that you manually lock the computer if you expect to be away from it for an extended time. LDAP Setup To use Microsoft Active Directory for Synergy access, you first must configure this option in the Login Settings dialog box (Figure 4-2) by clicking the Settings icon ( ... -
Page 42: Creating User Accounts
SSL certificate being used on the AD/LDAP server needs to be installed on the machine running the Laborie software. Select the appropriate AD Groups for the admin and the user level. Admins will have full access to audit logs, user creation, EMR settings, and more. Regular users from the user group will not have access to these settings. - Page 43 Figure 4-4: The User Setup Dialog Box 3. To reset the password of an active account, from the user list, select the existing account. On the Update User Info tab, in the New Password text box, type the new password and then click OK (Figure 4-5). Figure 4-5: Resetting a Password Chapter 4 Synergy Software...
- Page 44 3. In the Role text box, create a new role by typing a new title category and then, from the Authentication Type list box, select an authentication type (Figure 4-8). Select the checkboxes for all the functions for which the new user role can have access, and then click Save. Laborie NXT Go Owner’s Manual LBL-00145 [E]...
-
Page 45: Sections And Icons In The Main Window
Figure 4-8: Adding a New User Role 4. To reassign the account role, on the Synergy title bar, click the Admin icon ( ), select User Setup, and then click the Update User Info tab. Select the newly created role and then press Save. Sections and Icons in the Main Window This section provides an overview of the various features accessible from the Synergy main window, as presented in Figure 4-9. -
Page 46: Overview Of Sections
Reporter Settings Contains Import Custom Report Template, and Export Custom Report Templates. Workflow Contains Editor, Import Custom Workflow, and Export Custom Workflow. Editor displays the Workflow Configuration page; create new workflows and set hardware channels. Laborie NXT Go Owner’s Manual LBL-00145 [E]... -
Page 47: Patient Management
Admin Table 4-4 presents the options that you can access by clicking the Admin icon ( ). Table 4-4: Admin Options Overview Options Description User Setup Displays the User Setup dialog box, in which you can add new users (for Local accounts) and update user information (for Local users). - Page 48 3. Click the export icon ( ) to open the Export Document dialog box, as shown in Figure 4-12. NOTE Click the Export button ( ) to select the desired format in which to export the report. The Export Document dialog box opens. Laborie NXT Go Owner’s Manual LBL-00145 [E]...
- Page 49 Figure 4-12: Export Document Dialog Box 4. Select the required format, file path, and other required options, and then click OK. Reassigning a Study The reassign function allows you to transfer study results from one patient to another if the wrong patient was initially selected.
-
Page 50: Patient Details
• Involuntary Leakage associated with urgency as well as effort/exertion • Post-Prostatectomy Leakage • Urgency with Involuntary Leakage • Low Capacity • High Capacity • Frequency • Urgency without Leakage • Decreased Bladder Sensation Laborie NXT Go Owner’s Manual LBL-00145 [E]... -
Page 51: Database Management
• Increased Bladder Sensation • Absent Bladder Sensation • Feeling of incomplete bladder emptying • Weak / intermittent stream • Post-void dribbling • Hesitancy • Straining to Void • Position-dependent Micturition • Dysuria (Painful Voiding) • Vaginal Prolapse Symptoms • Polyuria •... - Page 52 2. Click the Browse button and then select an archived folder. All patients archived in this folder will be displayed in the Database Management window. 3. Choose patients for import by selecting the corresponding checkboxes. 4. Click the Import button. A message box opens to confirm a successful import. Figure 4-17: Database Management—Import Patients Tab Laborie NXT Go Owner’s Manual LBL-00145 [E]...
-
Page 53: Study Management
Restore or Permanently Delete Patient Data In the Database Management window, you can restore patients who were previously deleted from the Patients section. 1. In the Database Management window, select the Restore/Delete Patients tab (Figure 4-18). Figure 4-18: Database Management—Restore/Delete Patients Tab 2. Select the patients for data restore by selecting the corresponding checkboxes. To select patients individually, select the corresponding checkboxes. -
Page 54: Customizing Workflows
2. From the Workflow drop-down menu, select the workflow template that you want to edit and then click Copy. This unlocks the editing options for the Workflow Steps and settings tabs. 3. In the Workflow Name text box, rename the workflow. Laborie NXT Go Owner’s Manual LBL-00145 [E]... - Page 55 ■ Use the Urocap Noise Reduction Level feature to detect and smooth chart spikes caused by environmental noise. For guidance on option selection, contact Laborie Service. ■ Activate or disable Video for custom workflows and set your Desired Frame Rate.
- Page 56 You can customize buttons per study phase using custom workflows. IMPORTANT Workflows cannot be reconfigured while a study is in progress. All workflow settings must be adjusted prior to starting a study. Laborie NXT Go Owner’s Manual LBL-00145 [E]...
- Page 57 To customize the control panel, first create a custom workflow, as instructed in the section “Customizing Workflows” on page 48. Then, follow the instructions provided here to customize the control panel per study phase: 1. In the Workflow Configuration window, click the Phases tab. From the list, select a phase to customize. Scroll down to the control panel section located at the bottom of the window (refer to Figure 4-21).
- Page 58 To set hardware channels, first ensure that you select the required Workflow option from the Workflow Steps drop- down menu. Click the Channels tab and confirm the presence of all desired phases. Click the Set Default Hardware Channels button. Click OK to save the changes and proceed to start the study. Laborie NXT Go Owner’s Manual LBL-00145 [E]...
-
Page 59: Start Study Button
Start Study Button Clicking the Start Study button (Figure 4-25) initiates the Preview Study phase. Figure 4-25: The Start Study Button After all study inputs are received, the button will change color to blue. If the button is gray, it cannot be activated. Hover the pointer over the Start Study button to display a ToolTip that will suggest troubleshooting options, as shown in Figure 4-26. -
Page 60: Procedure-Preview Phase
Displays live video feed, saved images, recorded video, brightness slider, and contrast slider. The Video Panel is available only if Video Settings are turned on in the workflow of the study under Global Settings. Laborie NXT Go Owner’s Manual LBL-00145 [E]... - Page 61 • During scanning of the consumable, the Roam NXT (connected to the PIM NXT) or the NXT Go pump hub will provide auditory feedback, emitting a single beep to indicate when a scan is in process, and an additional single beep for a successful scan.
-
Page 62: Procedure-Recording Phases
2. Manual consumables (e.g., pump tubing, extension tubing, pressure measurement tubing, Fluid NXT catheters, or other supplies required for the study) must be either scanned using the RFID reader embedded in the NXT Go pump hub, or the required information must be manually typed in the Consumable Traceability panel. -
Page 63: Questionnaire
Figure 4-29: Change Channel Color • In the Flow and Voiding phases, Synergy automatically begins recording data as soon as the Urocap NXT detects the start of the flow. By default, the Voiding phase will stop 60 seconds after voiding ends. You can also click the Next icon to proceed to the next step. -
Page 64: Reports
Name text box. NOTE New report configurations will be saved by Synergy upon application and may be selected from the Configuration list box for future formatting. Laborie NXT Go Owner’s Manual LBL-00145 [E]... - Page 65 Figure 4-31: Configuration Settings—Editing the Report 3. To enable or disable various data fields, in the Configuration Settings panel, select or clear the corresponding checkbox for the data field. You can change the position of some data fields in the report by using the Up and Down buttons. To move a data field, select the applicable field.
- Page 66 1. Select the required configuration copy and then expand the Report content option by clicking the right-facing triangle adjacent to the title (see Figure 4-33). 2. Select the checkbox for the Normal Values option. 3. Save the changes to the report by clicking the Apply Changes button. Laborie NXT Go Owner’s Manual LBL-00145 [E]...
- Page 67 Figure 4-34: Normal Values Video Images Video Images is an option available for activation in report customization for applicable workflows. When Video Settings are activated in the workflow configuration of a study, the Video panel provides access to live video and image capture. With this feature, you can record short videos and capture images during the study. Videos and images can be viewed in the Review workflow step.
- Page 68 The Send to EMR button will not be accessible when using the Preview Changes feature to view report configuration. To access the Send to EMR button, in the report Configuration Settings panel, click Apply Changes. Laborie NXT Go Owner’s Manual LBL-00145 [E]...
-
Page 69: Review
Review The Review workflow step allows you to assess the information recorded during the study. To review the study, in the Patients section, select the patient, click the Studies tab in the Patient Details section, and then click the Review button;... -
Page 70: Uds Intelligence
Green indicates the completion of all actions for the setup of the module. d. Blue submodules provide recommended actions regarding patient setup. Figure 4-39 presents examples of the color coding of the modules in the Preview phase. Laborie NXT Go Owner’s Manual LBL-00145 [E]... - Page 71 Green Module and Submodules Red Submodule Blue Submodule Amber Module Plus/Minus Box Figure 4-39: Pre-test QC Protocol Guidance During the Recording phases of the Procedure workflow step, the Quality Control window will display Protocol Guidance. Two protocol fields are provided: Total Score and Phase Score (Figure 4-40). The Quality Control icon will shift colors as the phase score evaluation changes.
-
Page 72: Qc Score And Qc Score Summary
2. In the Configuration Settings panel, expand the Report content option by clicking the right-facing arrow adjacent to the title. 3. Select the checkbox for the QC Score Summary option to turn on this function. 4. To save changes to the report, click Apply Changes. Laborie NXT Go Owner’s Manual LBL-00145 [E]... - Page 73 Figure 4-42: QC Score Summary The QC Score Summary, accessible through the study report and Review phase, provides an overview of points earned for each action per study phase. Table 4-7 explains how the QC Score is allotted per phase. Table 4-7: QC Score Allotment Process Flow Phase Blue = 0 points Yellow = +5 points...
- Page 74 Any PVR value, including 0 ml NOTE Scientific references are available in the Help menu of Synergy. To open the Help menu, on the title bar of the main window, click the Help icon ( ). Laborie NXT Go Owner’s Manual LBL-00145 [E]...
-
Page 75: Maintenance And Service
Laborie has not evaluated the use of cleaning/disinfection reagents that do not appear in the preceding list. Use of unapproved reagents could damage the NXT system and should be avoided. Do not use wipes containing bleach. For questions on the compatibility of a reagent that is not listed above, contact Laborie. IMPORTANT Ensure that the reagents are used for at least the contact time stated in the reagent instructions. -
Page 76: Cleaning And Disinfection Preparation
(e.g., presence of urine on the device), or, at minimum, daily. ■ NXT Go pump hub and laptop computer: Perform disinfection of the device, at minimum, once per week. Methods and Tools •... -
Page 77: Cleaning
This area should not require cleaning, given that it is protected by the transducer doors while not in use or by the catheter connector during urodynamic study. If dirt or debris is observed in the transducer channels as a part of daily inspection, contact Laborie for service and/or disposal instructions. - Page 78 Cleaning the NXT Go Pump Hub and the NXT Go Infusion Hook To clean the outer surface area of the NXT Go pump hub and the NXT Go infusion hook, follow the instructions provided in the section “Performing Manual Cleaning”...
- Page 79 This section covers the cleaning method for the cart, shelves, NXT Go pump hub, Remote Control NXT, and peripherals. For the Roam NXT, PIM NXT, Urocap NXT, Infusion Pump NXT, NXT Go pump hub, and UPP Puller NXT, refer to the device-specific cleaning sections starting on page...
-
Page 80: Disinfection
3. Repeat this process, if necessary, using either a fresh wipe or the clean side of the existing wipe until the affected area is visibly clean. 4. Reattach and close the transducer doors. Laborie NXT Go Owner’s Manual LBL-00145 [E]... -
Page 81: Completing Cleaning And Disinfection
For storage conditions, refer to Table A-1 on page 110. For long-term storage, Laborie recommends that the Roam NXT and the Urocap NXT be fully charged prior to storing. Remove the module from its charging dock and press the Reset button on the module to cause the device to go into long-term sleep mode. - Page 82 1. Secure loose parts and accessories. Organize and contain any cables and tubing to prevent trip hazards. 2. Remove any weight from the NXT Go infusion hook and remove the infusion pump tubing from the NXT Go pump hub.
-
Page 83: Verifying Calibration
• Do not move the cart while connected to separate accessories. Verifying Calibration Laborie recommends that you verify calibration annually or when any module has been shaken, dropped, or transported between sites, to confirm system accuracy. IMPORTANT NXT system modules do not require user calibration; the system modules are provided precalibrated. If verification procedures reveal a calibration malfunction, contact Laborie Service for a replacement device. - Page 84 ). Wait 10 seconds and then click the Zero Weight button. 2. Add 500 ml of water to the beaker. 3. Verify that the Relative Weight for the Urocap NXT in the diagnostic window is 500.00 g ±3%, as illustrated in Figure 5-4. Laborie NXT Go Owner’s Manual LBL-00145 [E]...
-
Page 85: Roam Nxt-Verifying Calibration
Figure 5-4: Urocap NXT—Device Diagnostics with Water Roam NXT—Verifying Calibration To set up verification of calibration for the Roam NXT, perform the following steps: 1. Log in to Synergy. 2. Ensure that the PIM NXT is connected to the Roam NXT. Connect the PIM NXT that corresponds with the consumable type in use. - Page 86 4. In Synergy, on the title bar, click the Settings icon ( ) and then click Device Manager. The Device Manager window opens. 5. Click the Roam NXT option and then click the Run Diagnostics button. The Device Diagnostics window opens (Figure 5-6). Laborie NXT Go Owner’s Manual LBL-00145 [E]...
-
Page 87: Infusion Pump Nxt And Volume Transducer-Verifying Calibration
Figure 5-6: Roam NXT—Device Diagnostics Window 6. The Pressure should be approximately 20 cm of water ±3%. Repeat for each channel. Infusion Pump NXT and Volume Transducer—Verifying Calibration To set up verification of calibration for the Infusion Pump NXT and infusion volume transducer: 1. -
Page 88: Configuration
4. The Total Weight in the Device Diagnostics window should be the previously measured weight ±5%. Configuration NXT Go Electrical Isolation Diagram Refer to the diagram shown in Figure 5-8 for a visual representation of the NXT Go electrical isolation from mains supply. For further information regarding electrical isolation, contact Laborie Service. NOTE To maintain electrical safety, the printer and laptop must be located outside of the patient area. -
Page 89: Nxt Go With Cart Electrical Isolation Diagram
Figure 5-8: NXT Go Isolation Diagram NXT Go with Cart Electrical Isolation Diagram Refer to the diagram in Figure 5-9 for a visual representation of the NXT Go electrical isolation from mains supply. Figure 5-9: NXT Go with Cart Isolation Diagram Chapter 5... -
Page 90: Roam Nxt And Wall Charger Isolation Diagram
Urocap NXT and Wall Charger Isolation Diagram Refer to the diagram in Figure 5-11 for a visual representation of the method to isolate the Urocap NXT from main supply when configured with a wall charger. For further information regarding electrical isolation, contact Laborie Service. -
Page 91: Computer Virus Protection
Figure 5-12: UPP Puller NXT Wall Charger Isolation Diagram Computer Virus Protection Each computer purchased from Laborie is verified to be virus-free prior to shipment and is installed with an antivirus program. It is the customer’s responsibility to correctly use and maintain the antivirus program. Customers may use an alternative antivirus program at their own risk. -
Page 92: Troubleshooting Guide
Plug the system into a known working electrical outlet. devices? Damaged power cord? Unplug the system and contact Laborie for a replacement power cord. Power cord not connected Ensure that the power cord is secure at the base of system and at properly? the electrical outlet. - Page 93 89. To determine the version number of the pump, refer to lower-right corner of the label affixed to the bottom of the NXT Go pump hub. If the number printed there is V2.00, you have a Version 2 pump.
- Page 94 Workflow. Use the new custom workflow to complete test with the patient. For more information on custom workflows, refer to the section “Workflows” on page 47. If problems continue, contact the Laborie Service team at 1-800-333-1039 or by email at service@laborie.com. Laborie NXT Go Owner’s Manual LBL-00145 [E]...
-
Page 95: Software Error Messages
Software Error Messages If the following error messages are displayed in Synergy software, contact the Laborie Service team at 1-800-333- 1039 or by email at service@laborie.com: • Hardware Failure • Device is not ready for another process • Data could not be written to EEPROM •... -
Page 96: Hardware
The Remote Control NXT (Figure 6-2) is a battery-powered device that connects to the computer wirelessly via Bluetooth technology. This device allows the user to control the NXT system from a distance. Figure 6-2: Remote Control NXT Membrane Icons Table 6-1 describes the Remote Control NXT key icons and their functions. Laborie NXT Go Owner’s Manual LBL-00145 [E]... -
Page 97: Remote Control Nxt Led Signals
Table 6-1: Remote Control NXT Icons Key Icon Function Key Icon Function Key Icon Function Begin Recording Valsalva Marker Pump On/Off Stop Active Hardware Urgency Marker Balance/Equalize 1 First Sensation Marker Leak Marker Balance/Equalize 2 First Desire to Void Marker User Custom 1-4 Zero All Pressures (Standard) Normal Desire User Custom 5-8... -
Page 98: Nxt Go Pump Hub
To determine which version pump you have, refer to lower-right corner of the label affixed to the bottom of the NXT Go pump hub. If the number printed there is V2.00, you have a Version 2 pump. If the number on the label is V3.00 or higher, you have a Version 3 pump. -
Page 99: Pairing A Version 3 (Wired/Wireless Connection) Nxt Go Pump Hub
2. In Synergy, open the Device Manager and verify that the pump hub is available. If you have an NXT Go System (NXT2100), after the pump has been paired with the laptop computer, you can choose to leave them connected via the USB cable or disconnect the cable and move the pump to a convenient location (within a 10 meter operating range). - Page 100 NXT Go Pump Hub Indicator Lights Table 6-3 indicates the various statuses for the NXT Go pump hub. The NXT Go pump hub must be connected to the power supply to function. Table 6-3: NXT Go Pump Hub Indicator Signals Laborie Logo Status Indicator...
-
Page 101: Infusion Volume Transducer
To set up the infusion volume transducer, do the following: 1. Hang the NXT Go infusion hook from an IV pole. Ensure that the NXT Go infusion hook connector cable is attached to the NXT Go. - Page 102 Roam NXT, PIM NXT for T-DOC G1 Air-Charged Catheters, T-DOC G1 on NXT adapter cables, and indicates the PIM NXT pressure-channel connectors. T-DOC G1 on NXT Interlocked Roam NXT Adapter Cables and PIM NXT for Fluid Pressure-Channel Connectors Figure 6-8: Roam NXT and PIM NXT for T-DOC Controls Laborie NXT Go Owner’s Manual LBL-00145 [E]...
-
Page 103: Replacing The Pim Nxt
PIM NXT for Fluid The PIM NXT for Fluid has four pressure channel connectors for use with the PIM NXT for Fluid–to–Medex transducer cables and NXT fluid catheters. The PIM NXT for Fluid provides two EMG input ports to connect EMG accessories such as patches, fine wires, and needles. -
Page 104: Roam Nxt-Charging The Battery And Pairing
Charge the Roam NXT by using the supplied wall charger and the NXT Magnetic Pogo Pin cable. 1. Attach the binder connector to the connector on the wall charger. 2. Connect the wall charger to a power supply. 3. Attach the Magnetic Pogo Pin connector to the Roam NXT. Laborie NXT Go Owner’s Manual LBL-00145 [E]... -
Page 105: Urocap Nxt
Table 6-4 indicates the different statuses for the Roam NXT and its battery. Laborie recommends that you have the device plugged in, or for the device to have at least one to two hours of battery charge before beginning a test. Always connect the Roam NXT device to the wall charger at the completion of working hours to ensure full charge for the next study period. -
Page 106: Urocap Nxt-Charging The Battery And Pairing
Laborie recommends that you have at least one to two hours of battery charge on the Urocap NXT prior to the start of a test, or to complete the test with the Urocap NXT plugged in using the NXT magnetic Pogo Pin cable. Always return the device to the Urocap NXT charging hub at the completion of working hours to ensure a full charge for next study period. -
Page 107: Upp Puller Nxt
Use the UPP Puller NXT connector cable with the USB-to-binder adapter cable to connect the UPP Puller NXT to the NXT Go laptop computer. The UPP Puller NXT will power on and will appear in the Synergy Device Manager window. -
Page 108: Nxt Go With Cart (Nxt2300)
Pump Mount Spine Urocap IV Pole Mount (back of spine) Figure 6-17: NXT Go with Cart An internal line isolation transformer (LIT) provides the means to power Laborie-approved accessories and components. Connect the LIT to mains power. Laborie NXT Go Owner’s Manual LBL-00145 [E]... -
Page 109: Mounting The Nxt Go Pump Hub
Figure 6-21: Inserting the Pump Tubing To adjust the height of the NXT Go pump hub mount on the spine, loosen the set screws on the pump mount bracket (see Figure 6-22) and raise or lower the pump hub to the desired height, and then tighten the screws until the mount is securely in position. -
Page 110: Mounting The Nxt Roam & Pim Assembly To The Cart
NXT Go Pump Hub Set Screws for Height Adjustment Spine Bracket Figure 6-22: Adjusting the Height of the Pump Mount Bracket Mounting the NXT Roam & PIM Assembly to the Cart Connect the charger (CAB1081) to the NXT Roam & PIM Assembly (ROX2001 & PIX2211 or PIX2231), as demonstrated in Figure 6-23. -
Page 111: Mounting The Urocap Nxt To The Cart
To adjust the NXT Roam mount height, loosen the set screw and raise or lower the Roam mount to the desired height, and then tighten the screw until the mount is securely in position. Mounting the Urocap NXT to the Cart To mount the Urocap (UCX2001) into its charging dock (MSM1144), align the magnetic Pogo Pins on the underside of the Urocap with the charging port on the dock, as illustrated in Figure 6-25. -
Page 112: Mounting The Iv Pole To The Cart
(FBR7006), and then tighten the set screws (Figure 6-28) to lock the pole in place. Figure 6-28: Installing the IV Pole Bracket into the Spine Bracket You can position the IV pole to either the right or left side of the cart, as illustrated in Figure 6-29. Laborie NXT Go Owner’s Manual LBL-00145 [E]... -
Page 113: Water Pressure Transducer Mount
Figure 6-29: Position the IV Pole to Either the Left or Right Water Pressure Transducer Mount Remove the fluid-filled catheters from their box and locate the water pressure transducer mount, as shown in Figure 6-30. Connect the catheter receivers to the transducer cables going into the PIM, as in depicted in Figure 6-31. Figure 6-30: Water Pressure Transducer Mount Figure 6-31: Connecting the Catheter Transducer Cables to the PIM NXT for Fluid... - Page 114 You also can rotate the water pressure transducers by rotating the trigger handle. Figure 6-33: Water Pressure Transducer Mount Trigger Handle T-DOC Air-Charged Catheters The T-DOC NXT Air-Charged Catheter series are part of the next-generation Laborie systems designed for use during urodynamic studies (Figure 6-34). Figure 6-34: T-DOC NXT Air-Charged Catheter IMPORTANT The T-DOC Air-Charged Catheters are single-use catheters intended for urodynamic pressure monitoring.
-
Page 115: Emg Electrodes
PIM NXT. • T-DOC catheters provide the option of an integrated infusion lumen that connects to the Laborie infusion pump tubing. Each catheter connector contains a SmartSense tag that allows you to scan information into Synergy, facilitating consumable traceability. -
Page 116: Appendix A: System Specifications
IMPORTANT The Laborie-recommended transport conditions (–10°C to +40°C, 20% to 80% RH non- condensing) are displayed on the labels on the outside of the packaging. Laborie tests to more extreme conditions to ensure this product can withstand any unexpected conditions that may arise. - Page 117 OS: Windows 10 Enterprise LTSC 2019 64-bit Multilanguage Ports: 3x USB, 1 × USB-C, 1 HDMI, 1 Ethernet, Micro SD Wireless: Wireless LAN 802.11 ac Dual Band Bluetooth: Laborie Bluetooth dongle required Audio: Internal speakers, headphone, and microphone Conference: Integrated webcam with microphone...
- Page 118 External Materials: Dow Corning QP1-250, Cycoloy C6200-111, Elastosil 3003/30 A/B, gold-plated brass, Loctite 401 & 242 IMPORTANT Laborie cannot guarantee the IP47 rating unless the vent plug is inserted into the open vent hole. Laborie NXT Go Owner’s Manual LBL-00145 [E]...
- Page 119 UPP Puller NXT Dimensions: 45.7 cm (18") L × 6.4 cm (2.5") W × 11.4 cm (4.5") H P/N: UPX2001 Weight: 0.82 kg (1.8 lbs.) Arm extension: 81.3 cm (32") Speed: 0 to 2 mm/s IP Rating Compliance: IP54 Supported catheter sizes: 4.5 to 12 French External materials: Cycoloy C6200-111, aluminum 6061-T6, POM-C, Dow Corning QP1-250, stainless steel, TPE, fluoroelastomer rubber Remote NXT...
-
Page 120: Classification And Applicable Directives
CAN/CSA C22.2 No. 60601-2-49:11 (R2016) IEC 60601-1-2:2014 CAN/CSA-C22.2 NO. 60601-1-2:16 EN 60601-1-2:2015 IEC 62304:2006 + A1:2015 EN 62304:2006/AC:2008 IEC 62366-1:2015 EN 62366:2008 IEC 62133:2012 Related Standards TIR57:2016 ANSI/UL 2900-1:2017 ISO 15223-1:2016 IEC TR 62354:2014 ISO/IEC 17025:2017 Laborie NXT Go Owner’s Manual LBL-00145 [E]... -
Page 121: Appendix B: Symbols Glossary
Do not stack federal law restricts General warning sign grounding this device to sale Do not dispose of or use by or on the electronic products order of a licensed in the general waste physician. stream LBL-00145 [E] Laborie NXT Go Owner’s Manual... -
Page 122: Medical Device Label Placement
NOTE: Sterility symbols are applicable to consumable devices only. Please refer to consumable device Instructions for Use for complete symbol and instructional overview. Medical Device Label Placement For the location of the Medical Electrical System label for the NXT Go urodynamics system, refer to Figure B-1 and Figure B-2. Figure B-1: NXT Go Label Placement Figure B-2: NXT Go with Cart System Label Placement... -
Page 123: Appendix C: Electronic Compatibility (Emc)
The NXT needs special precautions regarding Electromagnetic Compatibility (EMC) and needs to be installed and put into service according to the EMC information provided in this manual. For EM compliance, it is important to use only catheters and accessories as supplied or recommended by Laborie. Contact Laborie for approved catheters. - Page 124 Power frequency 30 A/m 30 A/m Power frequency magnetic fields should be at (50/60 Hz) levels characteristic of a typical location in a magnetic field typical commercial or hospital environment. IEC 61000-4-8 Continued on next page Laborie NXT Go Owner’s Manual LBL-00145 [E]...
- Page 125 Immunity Test IEC 60601 Test Level Compliance Level Electromagnetic Environment Guidance Conducted RF 3 Vrms 150 kHz to 80 MHz 3 Vrms Portable and mobile RF communications equipment should be used no closer to any part of IEC 61000-4-6 6 Vrms for ISM bands the NXT, including cables, than the recommended separation distance calculated from the equation Radiated RF...
-
Page 126: Transmitter And Wireless Compliance Statements
Operation of this equipment in a residential area is likely to cause harmful interference in which case the user will be required to correct the interference at his own expense. Laborie NXT Go Owner’s Manual LBL-00145 [E]...
Need help?
Do you have a question about the NXT Go and is the answer not in the manual?
Questions and answers