
Related Manuals for LABORIE NXT Pro


Summary of Contents for LABORIE NXT Pro
- Page 1 NXT Pro Owner’s Manual Version C Laborie NXT Pro Owner’s Manual LBL-00146 [C], MAN2010...
- Page 2 Trademarks NXT PRO is a trademark of Laborie Medical Technologies Corp. Roam NXT, PIM NXT, Urocap NXT, T-DOC, and Unisensor are trademarks of Laborie Medical Technologies Corp. Windows is a registered trademark of Microsoft Corp. Bluetooth is a registered trademark of Bluetooth SIG Inc. LogiCal is a registered trademark of Smiths Medical.
-
Page 3: Table Of Contents
Placing the EMG Patch Electrodes ............. 31 Performing Roam NXT Patient Setup ............32 How to Perform a Study ..................33 Starting a Study ..................33 FreeFlow Study .................... 34 Starting the FreeFlow Study ..............35 Laborie NXT Pro Owner’s Manual LBL-00146 [C], MAN2010... - Page 4 4.1.2.2 Managing User Role ................47 Sections and Icons in the Main Window ............49 Overview of Sections ................49 Overview of Icons on the Title Bar ............50 4.2.2.1 Settings ..................... 50 Laborie NXT Pro Owner’s Manual LBL-00146 [C], MAN2010...
- Page 5 4.5.4.2 Adding Comments ................70 4.5.4.3 Quick Results and Nomograms ............. 71 4.5.4.4 Normal Values ..................71 4.5.4.5 Video Images ..................72 4.5.4.6 Sending Reports to EMR ..............74 Review ....................74 Laborie NXT Pro Owner’s Manual LBL-00146 [C], MAN2010...
- Page 6 General Maintenance ................87 5.2.1.1 Caring for the Interlocked Roam NXT & PIM NXT ........88 5.2.1.2 Caring for the Urocap NXT ..............88 Caring for the Cart and its Components ............ 88 Laborie NXT Pro Owner’s Manual LBL-00146 [C], MAN2010...
- Page 7 Infusion Volume Transducer ................ 105 Roam NXT ....................106 PIM NXT ..................... 106 6.6.1.1 PIM NXT for T-DOC ................106 6.6.1.2 PIM NXT for Fluid ................107 Replacing the PIM NXT ................. 107 Laborie NXT Pro Owner’s Manual LBL-00146 [C], MAN2010...
- Page 8 Figure 2: Lockable Wheels ..................19 Figure 3: Roam NXT and Urocap NXT inserted in NXT Docking Station ......20 Figure 4: Connecting the NXT Pro Cart to Supply Mains ..........20 Figure 5: Urocap NXT Setup ..................23 Figure 6: UPP Nose Locking Mechanism ............... 24 Figure 7: Connect the UPP Motor and Nose ..............
- Page 9 Figure 58: Configuration Settings—Editing the Report ........... 70 Figure 59: Comments Window ................... 70 Figure 60: Comments and Header Options ..............71 Figure 61: Normal Values ..................72 Figure 62: Select Images/Burst for Report Window............73 Laborie NXT Pro Owner’s Manual LBL-00146 [C], MAN2010...
- Page 10 Figure 71: Cleaning the Area Between Motor and Nose ..........84 Figure 72: Adjusting the Worksurface ................. 89 Figure 73: Moving the NXT Pro in Transport Position ............. 89 Figure 74: Urocap NXT—Device Diagnostics ..............90 Figure 75: Urocap NXT—Device Diagnostics with Water ..........91 Figure 76: Wiring Diagram—EMG Calibration Verification with a Waveform Generator ..
- Page 11 Table 16: Symbols Glossary ..................123 Table 17: Guidance and Manufacture’s Declaration – Electromagnetic Emissions .... 124 Table 18: Guidance and Manufacturer’s Declaration—Electromagnetic Immunity .... 127 Table 19: Separation Distances between Portable and Mobile RF ........128 Laborie NXT Pro Owner’s Manual LBL-00146 [C], MAN2010...
-
Page 12: Introduction
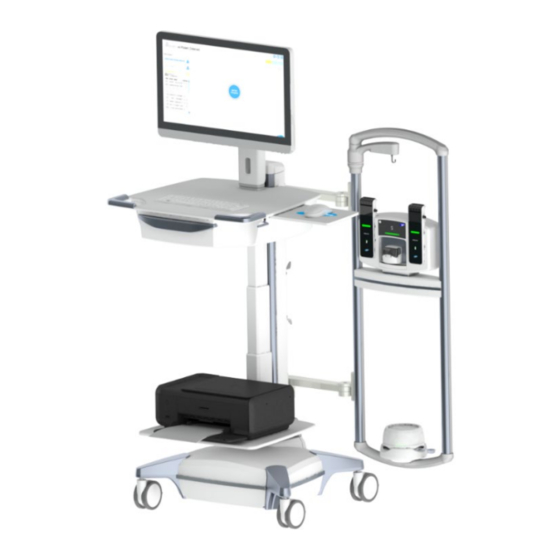
Introduction Introduction The Laborie NXT system (Figure 1) is a fully wireless-capable system providing mobility and ease of use in the field of urodynamics. It allows studies to be performed with mountable modules and is controlled by the Laborie Synergy software. The wireless and battery- powered features of each device allow for improved system setup and use. -
Page 13: Equipment Intended Use
Flow stand, IV pole, carts, stands, trolleys: Provides mountable surfaces for • standard equipment and accessories. SmartSense Barcode reader: Allows consumable device information to be • recorded by the system. 1.4 Contraindications None known. Laborie NXT Pro Owner’s Manual LBL-00146 [C], MAN2010... -
Page 14: About This Manual
• other version of Microsoft Windows. The UDS Urodynamics system and software provided by Laborie are tested as a complete package and will not work correctly if you upgrade the operating system. For more information, contact your Laborie support representative. -
Page 15: Standard Equipment And Optional Accessories
The presence of a bladder infection Strictures in the urethra Laborie is not responsible for loss of patient files or test data. Laborie recommends that you back up patient data on a regular basis. To prevent any risk of damage to the cart: Ensure that the monitor is free of any obstacles. - Page 16 Introduction Laborie equipment and accessories are licensed by governments, approved by safety agencies, and warranted to work only with one another. The Roam NXT and the PIM NXT are not intended for long-term direct patient contact. If the devices must be attached to a patient, place gauze or another material between the devices and the patient’s skin.
- Page 17 Only connect devices specified and approved by Laborie to the NXT system multiple- socket outlets. Connecting any device not approved by Laborie to the ME system alters the functional integrity of the product, creating a safety risk. Always position the NXT system to facilitate ease of access to all electrical connections and plugs.
- Page 18 Laborie authorized personnel. NOTE: Local laws take priority over the aforementioned requirements and warnings; if in doubt, consult your local Laborie representative or the Technical Service department. Laborie NXT Pro Owner’s Manual LBL-00146 [C], MAN2010...
-
Page 19: Quick Start
BNC connection is supported with the use of the supplied (where applicable) DVI to BNC adaptor. CAUTION: Consult Laborie Service before connecting any video device to the NXT system. Anyone connecting supplementary equipment to ME equipment configures a medical system and is therefore responsible for ensuring that the system complies with the requirements for ME systems, encompassed in the IEC/EN 60601 series. -
Page 20: Figure 3: Roam Nxt And Urocap Nxt Inserted In Nxt Docking Station
The NXT Pro cart’s power cable plugs in at base of the NXT system. Connect the NXT system power cord to the NXT Pro cart, as shown in Figure 4, and then plug the NXT cart’s power cable to an external power source. After the NXT system is connected, press the ON button, as indicated in Figure 4. -
Page 21: Gathering Supplies And Equipment
Roam NXT (ROX2001) & PIM NXT for Fluid Remote Control NXT (RCX2001) (PIX2231) Commode Chair (CHA181 or CHA171) and UPP Puller NXT (UPX2001) and Funnel (CHA102) UPP Stand (UPP1006) Inkjet Printer supplied by Laborie Beaker (UD575) Laborie NXT Pro Owner’s Manual LBL-00146 [C], MAN2010... - Page 22 Snap-on electrodes (ELE428) and cable Infusion Pump Tubing for Laborie NXT (CAB1091, CAB1092, CAB1103, CAB1104) Systems (TUBPTNXT or TUB500-RFID) UPP Puller NXT Cable Roam NXT to PIM NXT Connector Cable (CAB1109) (CAB2111) Laborie NXT Pro Owner’s Manual LBL-00146 [C], MAN2010...
-
Page 23: Preparing The Urocap Nxt
106. 2.5 Preparing the UPP Puller NXT Ensure that the UPP Puller NXT is charged. Laborie recommends charging the device overnight to ensure optimal battery power for a full day of procedures. For instructions on how to charge the device, refer to the section UPP Puller NXT on page 113. -
Page 24: Assembling The Upp Puller Nxt
Figure 9: Connecting UPP Puller NXT Arm Clamp and the Pole Clamp Tighten the thumbscrew to complete mounting. To adjust any of the joints on the UPP Puller arm, loosen the thumbscrews, adjust, and retighten. Refer to Figure 10. Laborie NXT Pro Owner’s Manual LBL-00146 [C], MAN2010... -
Page 25: Assembling The Upp Puller Nxt Stand
65. Infusion Pump Tubing Setup Laborie infusion pump tubing is intended for single use only. Do not reuse, reprocess, or resterilize pump tubing. Use of the infusion pump tubing outside of its intended application Laborie NXT Pro Owner’s Manual LBL-00146 [C], MAN2010... -
Page 26: Replacing The Pump Tubing
Do not run the pump at a speed exceeding the limitation of the catheter. IMPORTANT: Always use only Laborie infusion pump tubing to ensure a properly and accurately • functioning system. Catheters, the saline bag, and the infusion pump tubing are consumables •... -
Page 27: Setting Up Catheters And Transducers
Quick Start Setting Up Catheters and Transducers The NXT system is compatible with Laborie T-DOC Air-Charged Catheters and Fluid NXT Catheters equipped with SmartSense tags. Refer to the section Gathering Supplies and Equipment on page for a list of compatible catheters. -
Page 28: Roam Nxt, Pim Nxt For Fluid, And Transducer Setup
(male) end of the pressure cartridge. To prime the cartridge and the pressure measurement tubing, attach a sterile fluid-filled syringe to the side port of the stopcock. Laborie NXT Pro Owner’s Manual LBL-00146 [C], MAN2010... -
Page 29: Bladder Fluid Nxt Catheters
Synergy Consumable Traceability panel. Aseptically remove the catheter from its package and open all Luer-Lok caps. Attach a four-way stopcock to the Pabd pressure lumen. Laborie NXT Pro Owner’s Manual LBL-00146 [C], MAN2010... -
Page 30: Confirming Catheter Placement
(Figure 16). With Auto Cough detection activated, Synergy will automatically mark these deflections as coughs. For more information, refer to the section Customizing Control Panel on page 61. Laborie NXT Pro Owner’s Manual LBL-00146 [C], MAN2010... -
Page 31: Placing The Emg Patch Electrodes
Preview phase. Place two electrodes peri-anally at the 10 o’clock and 2 o’clock position (or at the 9 o’clock and 3 o’clock position), as close to the anal verge as possible. Place the Laborie NXT Pro Owner’s Manual LBL-00146 [C], MAN2010... -
Page 32: Performing Roam Nxt Patient Setup
IV Pole or on the procedure chair. When mounting the Roam NXT, always ensure that the clamping mount is securely fastened. Figure 19: Roam Mounted on IV Pole Laborie NXT Pro Owner’s Manual LBL-00146 [C], MAN2010... -
Page 33: How To Perform A Study
In the Device Manager window, identify the Bluetooth Dongle NXT, Urocap NXT, Roam NXT, Pump NXT, and UPP Puller NXT, and verify that each device is properly connected, which is indicated by a green checkmark. Laborie NXT Pro Owner’s Manual LBL-00146 [C], MAN2010... -
Page 34: Freeflow Study
A FreeFlow study provides a measurement of the rate at which urine flows out of the body. It can be performed using the Urocap NXT and Synergy application provided as part of the Laborie NXT system. Laborie NXT Pro Owner’s Manual LBL-00146 [C], MAN2010... -
Page 35: Starting The Freeflow Study
Flow Phase button to start the study and move to the Flow phase. NOTE: To pause the study, click the Pause ( ) button; to resume the study, click the resume ( ) button. Laborie NXT Pro Owner’s Manual LBL-00146 [C], MAN2010... -
Page 36: Flow Phase
If the beaker is filled to capacity, select the Calculated PVR or Input PVR options. c. Input PVR allows the operator to input the PVR measurement calculated by a separate measurement device. Laborie NXT Pro Owner’s Manual LBL-00146 [C], MAN2010... -
Page 37: Freeflow Report
NOTE: For instructions on completing the study, see the section Finishing the Studies on page Printing the Study Result (Optional) on page 44. Laborie NXT Pro Owner’s Manual LBL-00146 [C], MAN2010... -
Page 38: Urology Urodynamic Study
Complete the patient and consumables setup during this phase. Refer to the section Setting Up Consumables and Preparing the Patient on page 25. When the patient and pump setup are complete, proceed to the Filling phase. Laborie NXT Pro Owner’s Manual LBL-00146 [C], MAN2010... -
Page 39: Filling Phase
Caution: You can stop an infusion at ANY TIME by pressing the gray pump stop button on the NXT docking station, by opening the pump door, or by disconnecting the filling tube from the catheter or the water bag. Laborie NXT Pro Owner’s Manual LBL-00146 [C], MAN2010... -
Page 40: Voiding Phase
To close the report, click the Finish button. The report will then appear on the Studies tab, in the Patient Details section. You may begin a secondary test with the same patient, under the guidance of the supervising physician, or continue to finish the study. Laborie NXT Pro Owner’s Manual LBL-00146 [C], MAN2010... -
Page 41: Cystometry Study
Urocap NXT setup. If the patient fails to void, reclick the Permission To Void button to create a new marker; this action will change the previous marker to Attempt to Void. If the Permission To Void button is Laborie NXT Pro Owner’s Manual LBL-00146 [C], MAN2010... -
Page 42: Review And Report Phases
Figure 28: Stress Test Designation Window Repeat the test after every 150 ml to 200 ml infused until stress incontinence is documented or ruled out. Finish the selected study. Laborie NXT Pro Owner’s Manual LBL-00146 [C], MAN2010... -
Page 43: Urethral Pressure Profile
Select the Rest Profile (Off) button to mark the end of the profile. Click the Puller Return button to return the UPP Puller NXT to the start position. Laborie NXT Pro Owner’s Manual LBL-00146 [C], MAN2010... -
Page 44: Finishing The Studies
For FAQs and troubleshooting tips, refer to the section Troubleshooting Guide • page 97. If problems cannot be resolved, contact the Laborie Service Team at 1-800- 333-1039 or by email at service@laborie.com. Laborie NXT Pro Owner’s Manual LBL-00146 [C], MAN2010... -
Page 45: Synergy Software
Login To log in to Synergy, do the following. On the desktop, double-click the Synergy shortcut icon, or, from the Laborie Dashboard, start the Synergy application. The Synergy Login window opens, as shown in Figure 29. Upon first login, you must accept the End User License Agreement. -
Page 46: Creating User Accounts
Synergy Software IMPORTANT: Do not leave the computer unattended after you have logged in. Laborie recommends that you manually lock the computer if you expect to be away from it for an extended time. Creating User Accounts Synergy facilitates four basic account structures: Local Admin, Local User, Domain Admin, and Domain User. -
Page 47: Managing User Role
Manage User Role dialog box. Follow the instructions provided here for managing user roles: On the Synergy title bar, click the Admin icon ( ) and then select Mange User Role (Figure 33). Figure 33: Accessing the Manage User Role Application Laborie NXT Pro Owner’s Manual LBL-00146 [C], MAN2010... -
Page 48: Figure 34: Manage User Role Dialog Box
Authentication Type list box, select an authentication type (Figure 35). Select the checkboxes for all the functions for which the new user role can have access, and then click Save. Figure 35: Adding a New User Role Laborie NXT Pro Owner’s Manual LBL-00146 [C], MAN2010... -
Page 49: Sections And Icons In The Main Window
Displays all configured studies on the Suggested and UDS tabs, accordingly. Title bar Contains icons with which you can access Help file, Settings, Admin Profile, and Close Application. Table 2: Synergy Main Window Section Overview Laborie NXT Pro Owner’s Manual LBL-00146 [C], MAN2010... -
Page 50: Overview Of Icons On The Title Bar
Contains Archive Patients, Import Patients, and Deleted Management Patients options. Contains Editor, Import Custom Workflow, and Export Custom Workflow Workflow. Editor displays the Workflow Configuration page; create new workflows and set hardware channels. Table 4: Settings Options Overview Laborie NXT Pro Owner’s Manual LBL-00146 [C], MAN2010... -
Page 51: Admin
View patients entered through the Electronic Medical Records (EMR) functionality • For information on performing any of the listed tasks, refer to the instructions provided in the subsections that follow. Figure 37: Patients Section Laborie NXT Pro Owner’s Manual LBL-00146 [C], MAN2010... -
Page 52: Adding A New Patient
(*) to view all patients, a plus sign (+) to view the last-entered patient, or an element of the patient’s name to view a specific patient. All fields provided in the Patients section are searchable. Laborie NXT Pro Owner’s Manual LBL-00146 [C], MAN2010... -
Page 53: Exporting Patient Data
(EMR), contact the EMR vendor and request the deletion of the previously sent report. Synergy will provide a warning message requesting confirmation of the action when reassigning a study previously sent to EMR. Laborie NXT Pro Owner’s Manual LBL-00146 [C], MAN2010... -
Page 54: View Patients Entered Through Emr
Select symptoms on the Symptoms tab • NOTE: All studies, including partial studies, will be stored under patient details after the study has started. Studies closed during the first Preview phase will not be saved. Laborie NXT Pro Owner’s Manual LBL-00146 [C], MAN2010... -
Page 55: Symptoms
Patient Details section. Database Management Navigate to the title bar and select Settings > Database Management. From this option, select Archive Patients, Import Patients, or Deleted Patients to open the Database Management window. Laborie NXT Pro Owner’s Manual LBL-00146 [C], MAN2010... -
Page 56: Archiving Patients
Database Management window. Select patients for import by selecting the corresponding checkboxes. Click the Import button. A message window opens to confirm a successful import. Laborie NXT Pro Owner’s Manual LBL-00146 [C], MAN2010... -
Page 57: Restore Or Permanently Delete Patient Data
To permanently delete patients in the Database Management window, select the individual corresponding checkboxes or select all patients by using the checkbox at the top of the column. Click Permanent Delete. Be careful when using this feature; this information cannot be restored. Laborie NXT Pro Owner’s Manual LBL-00146 [C], MAN2010... -
Page 58: Study Management
Studies are suggested based on patient file inputs such as patient symptoms and patient history. Scientific references are available in the Help menu of Synergy. NOTE: Studies must be displayed in the UDS tab to be suggested. Laborie NXT Pro Owner’s Manual LBL-00146 [C], MAN2010... -
Page 59: Customizing Workflows
Activate or disable Video for custom workflows and set your Desired Frame Rate. iii. Select the UPP method, Manual Pull or Puller, using Profile Settings. If using the Puller method, you must set Puller Speed. Laborie NXT Pro Owner’s Manual LBL-00146 [C], MAN2010... -
Page 60: Figure 47: Adding A Phase To A Custom Workflow
Settings tab, you can enable or disable automatic execution. In the Workflow Steps list box, select Report. To customize Landscape Graph Scaling settings, select scaling by Number of Pages or Time per Page. Click OK to save the workflow. Laborie NXT Pro Owner’s Manual LBL-00146 [C], MAN2010... -
Page 61: Workflow Step Settings Tabs
In the Workflow Configuration window, click the Phases tab. From the list, select a phase to customize. Scroll down to the control panel section located at the bottom of the window. Refer to Figure 48. Laborie NXT Pro Owner’s Manual LBL-00146 [C], MAN2010... -
Page 62: Figure 48: Workflow Configuration Window-Control Panel
A dialog box opens in which you can adjust minor button functions and appearance (Figure 50). Options include button caption, colors, and connectivity. When you’re finished making edits, click OK. Laborie NXT Pro Owner’s Manual LBL-00146 [C], MAN2010... -
Page 63: Accessing Hardware Channels
Workflow Steps drop-down menu. Click the Channels tab and confirm the presence of all desired phases. Click the Set Default Hardware Channels button. Click OK to save the changes and proceed to start the study. Laborie NXT Pro Owner’s Manual LBL-00146 [C], MAN2010... -
Page 64: Start Study Button
For a phase breakdown per study workflow, refer to the section Workflows on page 58. This section provides an overview of workflow steps, their phases, and their functions, from the start to the completion of the study. Laborie NXT Pro Owner’s Manual LBL-00146 [C], MAN2010... -
Page 65: Procedure-Preview Phase
The Video Panel is available only if Video Settings are turned on in the workflow of the study under Global Settings. Table 7: Slide Sidebar Icon Overview Laborie NXT Pro Owner’s Manual LBL-00146 [C], MAN2010... -
Page 66: Consumable Traceability
Manual consumables (e.g., pump tubing, extension tubing, pressure measurement tubing, Fluid NXT Catheters, or other supplies required for the study) must be either scanned using the registration system embedded in the NXT docking Laborie NXT Pro Owner’s Manual LBL-00146 [C], MAN2010... -
Page 67: Procedure-Recording Phases
OK to save changes (Figure 56). NOTE: The channel color can be changed during all workflow steps or configured in the workflow before beginning the study. Laborie NXT Pro Owner’s Manual LBL-00146 [C], MAN2010... -
Page 68: Questionnaire
• Prolapse Quality of Life (P-QOL) • To customize or check default questionnaires provided during a study, use the Workflow Configuration dialog box. Refer to the section Customizing Workflows on page 59. Laborie NXT Pro Owner’s Manual LBL-00146 [C], MAN2010... -
Page 69: Reports
58). If desired, change the title of the new report configuration by using the Name text box. NOTE: New report configurations will be saved by Synergy upon application and may be selected from the Configuration list box for future formatting. Laborie NXT Pro Owner’s Manual LBL-00146 [C], MAN2010... -
Page 70: Adding Comments
Configuration Settings. To edit comments from the Configuration Settings, expand the Comments option by clicking the right-facing triangle adjacent to the title and then click the click to enter text! link (Figure 60). This opens the Comments window. Laborie NXT Pro Owner’s Manual LBL-00146 [C], MAN2010... -
Page 71: Quick Results And Nomograms
Normal Values field is intended to provide an expected range of values for different events that might occur during the study (Figure 61). By default, the Normal Values option is not selected in the Configuration Settings for the report. Laborie NXT Pro Owner’s Manual LBL-00146 [C], MAN2010... -
Page 72: Video Images
) to open the Select Images/Burst for Report window. Videos captured will be deconstructed as images on the Image Burst tabs, and all single images captured will be found on the Images tab (Figure 62). Laborie NXT Pro Owner’s Manual LBL-00146 [C], MAN2010... -
Page 73: Figure 62: Select Images/Burst For Report Window
To incorporate selected images into the report, in the Configuration Settings panel, expand Report content. Select the Video Images option checkbox and then click Apply Changes to add this feature to the report. Laborie NXT Pro Owner’s Manual LBL-00146 [C], MAN2010... -
Page 74: Sending Reports To Emr
To review the study, in the Patients section, select the patient, click the Studies tab in the Patient Details section, and then click the Review button; the Review window opens (Figure 65). Figure 65: Review—FreeFlow Study Laborie NXT Pro Owner’s Manual LBL-00146 [C], MAN2010... -
Page 75: Uds Intelligence
You can access the Quality Control window by selecting the Quality Control icon ( ) on the Slide Sidebar at any time during the study. The quality feedback provided in the Quality Control window will vary based on the workflow step. Laborie NXT Pro Owner’s Manual LBL-00146 [C], MAN2010... -
Page 76: Pre-Test Quality Control
Score (Figure 67). The Quality Control icon will shift colors as the phase score evaluation changes. The Protocol Scores are color coded in accordance with QC Score values. Green signifies an excellent score, amber a good score, and blue a fair score. Laborie NXT Pro Owner’s Manual LBL-00146 [C], MAN2010... -
Page 77: Uds Intelligence In The Review Workflow Step
Configuration Settings panel of the report (Figure 68). To enable the QC Score Summary option in the report, do the following: Create a new report copy or select a previously created report copy from the Configuration list box. Laborie NXT Pro Owner’s Manual LBL-00146 [C], MAN2010... -
Page 78: Figure 69: Qc Score Summary
The QC Score Summary, accessible through the study report and Review phase, provides an overview of points earned for each action per study phase. Table 8 explains how the QC Score is allotted per phase. Laborie NXT Pro Owner’s Manual LBL-00146 [C], MAN2010... -
Page 79: Table 8: Qc Score Allotment Process
Table 8: QC Score Allotment Process NOTE: Scientific references are available in the Help Menu of Synergy. To open the Help Menu, in the title bar of the main window, click the Help icon ( ). Laborie NXT Pro Owner’s Manual LBL-00146 [C], MAN2010... -
Page 80: Maintenance And Service
Ammonia-based wipes • CAUTION: Laborie has not evaluated the use of cleaning/disinfection reagents that do not appear in the preceding list. Use of unapproved reagents could damage the NXT system and should be avoided. Do not use wipes containing bleach. For questions on the compatibility of a reagent which is not listed above, contact Laborie. -
Page 81: Cleaning And Disinfection Frequency
Transport the cart by first placing the system into the transportation mode described in the section Safely Moving the Cart on page 88. To limit cross-contamination, push the cart slowly to the designated cleaning area and avoid contact with other objects. Laborie NXT Pro Owner’s Manual LBL-00146, MAN2010... -
Page 82: Urocap Nxt Preparation
If dirt or debris is observed in the transducer channels as a part of daily inspection, contact Laborie for service and/or disposal instructions. -
Page 83: Cleaning The Urocap Nxt
Gently wipe the affected area with a cleaning wipe, taking care to avoid the transducer channels. Take care to prevent any excess cleaning reagent from entering the transducer channels. Wipe each transducer door to remove soiling and debris. Laborie NXT Pro Owner’s Manual LBL-00146, MAN2010... -
Page 84: Cleaning The Infusion Pump Nxt
If soiling is observed on the UPP Puller NXT arm or motor, wipe the surface with a fresh cleaning wipe to remove soiling. Take care not to remove the O-ring from the motor coupler while wiping (Figure 71). O-ring Figure 71: Cleaning the Area Between Motor and Nose Laborie NXT Pro Owner’s Manual LBL-00146, MAN2010... -
Page 85: Performing Manual Cleaning
Perform visual inspection of all units for corrosion, discoloration, pitting, or cracking. Contact Laborie for service and/or disposal instructions if the unit is observed with these defects. NOTE: There are no rinsing steps required for the cleaning or disinfection processes. -
Page 86: Disinfecting The Urocap Nxt
Performing Manual Cleaning on page allowing the surface to remain wet for three minutes or for the required contact time, as listed on the product label of the cleaning solution. Laborie NXT Pro Owner’s Manual LBL-00146, MAN2010... -
Page 87: Completing Cleaning And Disinfection
Appendix on page 117. For long-term storage, Laborie recommends that the Roam NXT and the Urocap NXT be fully charged prior to storing. Remove the module from its docking station and press the “Reset” button on the module to cause the device to go into long-term sleep mode. To wake up the modules after storage, place them in their corresponding docking stations. -
Page 88: Caring For The Interlocked Roam Nxt & Pim Nxt
Caring for the Cart and its Components Inspect the NXT Pro cart for any signs of damage or instability, including the NXT docking station and the Urocap NXT charging hub, which are mounted on the cart. Verify that all castor wheels both lock and unlock to facilitate safe stationary or transport conditions. -
Page 89: Figure 72: Adjusting The Worksurface
Maneuver the cart with two hands by grasping the cutout area on the keyboard tray, as indicated in Figure 73. Always maintain a clear view of the path forward. Figure 73: Moving the NXT Pro in Transport Position CAUTION: To prevent any risk of damage to the cart: Do not lean on trays, accessories, monitors, the main tower, or the spine of any carts. -
Page 90: Verifying Calibration
Maintenance and Service 5.3 Verifying Calibration Laborie recommends that users verify calibration annually or when any module has been shaken, dropped, or transported between sites, to confirm system accuracy. IMPORTANT: NXT system modules do not require user calibration; the system modules are provided precalibrated. -
Page 91: Checking The Absolute And Relative Weight With Water
2. Ensure that the PIM NXT is connected to the Roam NXT. Connect the PIM NXT that corresponds with the consumable type in use. 3. Connect the Urocap NXT, Roam NXT, and the Infusion Pump NXT to the Synergy software and set up the hardware channels. Laborie NXT Pro Owner’s Manual LBL-00146, MAN2010... -
Page 92: Verifying Emg Capability
UDS tab, choose the Urology Urodynamics test and click the Start Study button; the Preview phase will begin. 7. Verify that the graph in the preview phase shows EMG as a 200 µ sine wave. Laborie NXT Pro Owner’s Manual LBL-00146, MAN2010... -
Page 93: Verifying Pressure Measurement Capability
To set up verification of calibration for the Infusion Pump NXT and Infusion Volume Transducer: 1. Log in to the Synergy software. 2. Ensure that the Infusion Pump NXT is connected to the Synergy software. Laborie NXT Pro Owner’s Manual LBL-00146, MAN2010... -
Page 94: Checking The Total Weight Without A Saline Bag
2. Measure the weight of the saline bag using an external measuring device. 3. Setup the Infusion Volume Transducer with the saline bag. 4. The Total Weight in the Device Diagnostics window should be the previously measured weight ±5%. Laborie NXT Pro Owner’s Manual LBL-00146, MAN2010... -
Page 95: Configuration
Maintenance and Service 5.4 Configuration NXT PRO Electrical Isolation Diagram Refer to the diagram shown in Figure 79 for a visual representation of the NXT Pro electrical isolation from main supply. For further information regarding electrical isolation, contact Laborie Service. -
Page 96: Urocap Nxt And Wall Charger Isolation Diagram
Figure 82: UPP Puller NXT Wall Charger Isolation Diagram 5.5 Computer Virus Protection Each computer purchased from Laborie is verified to be virus-free prior to shipment and is installed with an antivirus program. It is the customer’s responsibility to correctly use and maintain the antivirus program. -
Page 97: Disposing Of Product After Use
Maintenance and Service System. Laborie is not responsible for any virus-related computer problems after delivery of the computer to the customer. 5.6 Disposing of Product After Use The NXT system equipment and disposables should be disposed of in the following manner: Contaminated single-use disposables: Discard these products according to •... - Page 98 Position of catheters? Check position and adjust as responding? necessary. Catheters are not securely Check connections and adjust as connected to the PIM NXT? necessary. Zeroes not set properly? Reset zeroes in Preview workflow step. Laborie NXT Pro Owner’s Manual LBL-00146, MAN2010...
- Page 99 Ensure that the beaker is placed on the adjusted during study? Uroflowmeter before starting the study. Funnel is touching the Adjust commode chair or beaker? Uroflowmeter. Incorrect beaker in use? Use beakers supplied by Laborie only. Laborie NXT Pro Owner’s Manual LBL-00146, MAN2010...
- Page 100 Printer cover open? Close cover of printer. Printer out of ink? Replace printer cartridges. Printer paper jammed or Clear the jammed paper and then misfed? press the paper feed button. Laborie NXT Pro Owner’s Manual LBL-00146, MAN2010...
-
Page 101: Software Error Messages
For more information on custom workflows, refer to the section Workflows on page 58. If problems continue, contact the Laborie Service team at 1-800-333-1039 or by email at service@laborie.com. Software Error Messages If the following error messages are displayed in Synergy software, contact the Laborie Service team at 1-800-333-1039 or by email at service@laborie.com:... -
Page 102: Hardware
Bluetooth technology. This device allows the user to control the NXT system from a distance. Figure 84: Remote Control NXT Membrane Icons Table 9 describes the Remote NXT key icons and their functionalities. Laborie NXT Pro Owner’s Manual LBL-00146, MAN2010... -
Page 103: Remote Control Nxt Led Signals
Connecting through Bluetooth technology Solid red Disconnected Solid purple Idle mode Green Indicates touch key input Blinking green Indicates the Remote Control NXT is losing connectivity Table 10: Remote Control NXT LED Signals Laborie NXT Pro Owner’s Manual LBL-00146, MAN2010... -
Page 104: Remote Control Nxt Battery Replacement
SmartSense tag reader (Figure 86). Pump is ready Pump is not ready; pump door is open Pump stop button Pump direction of Rotation SmartSense tag reader Figure 86: Status of the Pump Laborie NXT Pro Owner’s Manual LBL-00146, MAN2010... -
Page 105: Infusion Volume Transducer
Fluid density must be set in the Workflow Configuration window prior to beginning the study. Refer to the section Customizing Workflows on page 59. Laborie NXT Pro Owner’s Manual LBL-00146, MAN2010... -
Page 106: Roam Nxt
Transducer Channels Transducer PIM NXT Doors Atmospheric Reference Port EMG Port Clip Reset Button Roam NXT LED Status Charging Port Battery LED Status Figure 88: Roam NXT and PIM NXT Controls—Front and Back Laborie NXT Pro Owner’s Manual LBL-00146, MAN2010... -
Page 107: Pim Nxt For Fluid
Roam NXT. 2. Gently pull the PIM NXT away from Roam NXT base until it disconnects from the base (Figure 90). Figure 90: Roam NXT with a Detached PIM NXT Laborie NXT Pro Owner’s Manual LBL-00146, MAN2010... -
Page 108: Attaching New Pim Nxt
Ensure that the clip is securely fastened before using the clip or mounting the Roam NXT. Follow the same instructions to attach or detach the clip located on the PIM NXT (Figure 93). Figure 93: Removing the Roam NXT and PIM NXT Clips Laborie NXT Pro Owner’s Manual LBL-00146, MAN2010... -
Page 109: Roam Nxt-Charging The Battery
Roam NXT is completely drained, the device will not beep when inserted into the docking station. Table 11 indicates the different statuses for the Roam NXT and its battery. Laborie recommends that you have the device plugged in, or that the device has at least one to two hours of battery charge before beginning a test. -
Page 110: Urocap Nxt
Figure 95 indicates the location of key controls on the Urocap NXT: Charging Port Vent Plug Air Vents Reset Button Figure 95: Urocap NXT Controls Laborie NXT Pro Owner’s Manual LBL-00146, MAN2010... -
Page 111: Urocap Nxt-Charging The Battery
Table 12: Urocap NXT LED Signals Laborie recommends that you have at least one to two hours of battery charge on the Urocap NXT prior to the start of a test, or to complete the test with the Urocap NXT plugged in using the NXT Magnetic Pogo Pin cable. -
Page 112: Urocap Nxt Configuration With Wall Charger
Attach the Magnetic Pogo Pin connector to the Urocap NXT. 6.8 NXT Pro Cart The NXT Pro cart (Figure 98), acts as the backbone for the NXT system. Features of the NXT Pro cart include the following: Four-inch swivel castor wheels for curb clearance with brakes for stability. -
Page 113: Upp Puller Nxt
Figure 98: NXT Pro Cart The controls for turning the NXT urodynamics system on and off are located at the base of the NXT Pro cart. Refer to Figure 99 for all controls located on the base of the NXT Pro cart. Equalization and... -
Page 114: Upp Puller Nxt-Pairing
Figure 100: UPP Puller NXT Key Parts and Controls. UPP Puller NXT—Pairing Connect the UPP Puller NXT to the NXT Pro system to view the UPP Puller NXT in Synergy and power on the device. Connect the UPP Puller NXT cable to the cable connector on the UPP Puller NXT. -
Page 115: T-Doc Air-Charged Catheters
Table 13: UPP Puller NXT LED Signals 6.10 T-DOC Air-Charged Catheters The T-DOC NXT Air-Charged Catheter series are part of the next-generation Laborie systems designed for use during urodynamic studies (Figure 101). Figure 101: T-DOC NXT Air-Charged Catheter The T-DOC Air-Charged Catheters are single-use catheters intended for •... -
Page 116: Emg Electrodes
Hardware T-DOC catheters provide the option of an integrated infusion lumen that connects • to the Laborie infusion pump tubing. Each catheter connector contains a SmartSense tag that allows you to scan information into the Synergy software, facilitating consumable traceability. -
Page 117: Appendix
Enclosure material: cast steel (#14 gauge), light-gray paint, black text paint, yellow caution label Maximum Load: 6A Electrical Input: 220–240 V ~; 50/60 Hz; 6A Electrical Output: 220–240 V ~; 50/60 Hz; 800VA Laborie NXT Pro Owner’s Manual LBL-00146, MAN2010... - Page 118 IMPORTANT: The LABORIE recommended transport conditions (–10° C to +40° C, 20% to 80% RH Non-Condensing) are labelled on the outside of the packaging. Laborie tests to more extreme conditions to ensure this product can withstand any unexpected conditions that may arise.
- Page 119 Pressure Range: –40 to +400 cmH2O; EMG Range: ±1 mV Output Channels: 4 Pressure / 2 EMG Bandwidth: Pressure = 25 Hz; EMG = 0.5 Hz to 1 kHz IP Rating Compliance: IP47 Laborie NXT Pro Owner’s Manual LBL-00146, MAN2010...
- Page 120 Type BF Applied Part: N/A External Materials: Dow Corning QP1-250, Cycoloy C6200-111, Elastosil 3003/30 A/B, Gold-plated Brass, Loctite 401 & 242 IMPORTANT: LABORIE cannot guarantee the IP47 rating unless the vent plug is inserted into the open vent hole. UPP Puller NXT Dimensions: 18"...
-
Page 121: Classification And Applicable Directives
EN 62304:2006/AC:2008 • IEC 62366-1:2015 • EN 62366:2008 • IEC 62133:2012 • • TIR57:2016 Related Standards • ANSI/UL 2900-1:2017 ISO 15223-1:2016 • • IEC TR 62354:2014 • ISO/IEC 17025:2017 Table 15: Classifications and Directives Laborie NXT Pro Owner’s Manual LBL-00146, MAN2010... -
Page 122: Appendix B: Symbols Glossary
Laborie NXT Pro Owner’s Manual LBL-00146, MAN2010... -
Page 123: Medical Device Label Placement
Table 16: Symbols Glossary Medical Device Label Placement Refer to Figure 104 below for the location of the Medical Electrical System label for the NXT Pro Urodynamics System. Figure 104: NXT Pro Cart Label Placement Laborie NXT Pro Owner’s Manual LBL-00146, MAN2010... -
Page 124: Appendix C: Electronic Compatibility (Emc)
EMC information provided in this manual. For EM compliance, it is important to use only catheters and accessories as supplied or recommended by Laborie. Contact Laborie for approved catheters. Recommendations for actions to assure that the NXT remains safe regarding EM disturbances: The equipment should be visually inspected regularly for damaged cables and connectors. - Page 125 (50/60 Hz) location in a typical magnetic field commercial or hospital IEC 61000-4-8 environment. Note: U is the AC mains voltage prior to application of the test level. Laborie NXT Pro Owner’s Manual LBL-00146, MAN2010...
- Page 126 28 V/m survey, should be less 810/870/93 than the compliance level in 0 MHz each frequency range. Interference may occur 28 V/m near the equipment marked 1720/1845/ with the following symbol: Laborie NXT Pro Owner’s Manual LBL-00146, MAN2010...
-
Page 127: Table 18: Guidance And Manufacturer's Declaration-Electromagnetic Immunity
150 kHz to 80 Hz 80 MHz to 800 MHz 800 MHz to 2.5 GHz of Transmitter (W) 0.01 0.12 0.12 0.23 0.37 0.37 0.74 1.17 1.17 2.33 3.70 3.70 7.37 11.70 11.70 23.30 Laborie NXT Pro Owner’s Manual LBL-00146, MAN2010... -
Page 128: Transmitter And Wireless Compliance Statements
Operation of this equipment in a residential area is likely to cause harmful interference in which case the user will be required to correct the interference at his own expense. Laborie NXT Pro Owner’s Manual LBL-00146, MAN2010...
Need help?
Do you have a question about the NXT Pro and is the answer not in the manual?
Questions and answers